


Pull from email attachment
The Pull from email attachment step gives you the ability to receive file attachments (CSV, XLS, PDF, or JSON files) from an incoming email and pass it to the next step. The step also gives you the ability to pull an email subject and body into a Parabola Flow. Use this unique step to trigger Flows, using content from the email itself.
Note: PDF file support is currently offered to users on our Advanced Plan. Check out the Pricing Page for additional information.
Default attachment settings
To begin, take note of the generated email address that is unique to this specific flow. Copy the email address to your clipboard to start using this dedicated email address yourself or to share with others.

The File Type is set to CSV / TSV, though you can also receive XLS / XLSX, PDF, or JSON files.
The Delimiter is set to comma (,), but can also be adjusted to tab (\t) and semicolon (;). If needed, the default of Quote Character set to Double quote ( " " ) can be changed to single quote ( ' ' ).

Custom settings
This step contains optional Advanced settings, where you can tell Parabola to skip a certain number of rows or columns when receiving the attached file.

Auto-forwarding to a Parabola flow
To auto-forward a CSV attachment to an email outside of your domain, you may need to verify the @inbound.parabola.io email address. The below example shows how to set this up in Gmail.
- Start by copying the email address provided in the step configuration settings to your clipboard.

- In Gmail, head to your settings and select the Forwarding and POP/IMAP tab at the top of the page. Select Add a forwarding address and paste the email address into the form.

- A new modal will pop up letting you know a confirmation code has been sent to the @inbound.parabola.io email address. Click OK.

- Check your inbox to see a new email with the subject line Sorry we were unable to process your email attachment. The body of the email will contain a confirmation code and a verification link—both of which can verify the email address.

- Click the link and a new window will appear. Click Confirm to start forwarding mail.

- Once complete, a Confirmation Success! page will confirm that the @inbound.parabola.io email is verified.

- Next, head to your settings and create a filter to target the emails you want to auto-forward. Select Create filter once complete.

- Lastly, select Forward it to: and choose the @inbound.parabola.io email address that was recently verified.

Auto-forwarding is now set up to trigger your flow! Please note, you will need to do this each time you create a new flow using this step.
Pull multiple file attachments
By default, Flows will run with the first valid attached file. If you want the Flow to run through multiple attached files (multiple attachments on one email), open the “Email trigger settings” modal and change the setting to “Run the Flow once per attachment:”

(Access these settings from the Pull from Email attachment step, or from the Flow trigger settings on the published Flow page.)
For emails with multiple files attached, the Flow will run once per file received, sequentially.
- Files must be of the same type (CSV, XLS, PDF, or JSON) for the runs to process.
- The file type is defined in the initial step settings (”File type” dropdown).
- Any files received that are of a different type will cause a Flow run error.
Pull subject and body
We also support the ability to pull in additional information about an email, including:
- Email Body
- Subject Line
- Sender email address
- CC'd Emails
- File Attachment Name
To access these fields, you can toggle the "Pull data from" field to pull in Email subject and body. If you'd like to pull both an attachment and the subject and body, you can use two separate steps to pull in both of these datasets.

Pull a sheet from an Excel file based on file position
Use the "position is" option when pulling in an attached Excel document to specify which sheet to pull data from by its position, rather than its name. This is great for files that have key data in consistent sheet positions, but may not always have consistent sheet names.
When using this option, only the number of sheets that are in the last emailed file will show in the dropdown. If a Flow using these settings is run and there is no sheet in the specified position, the step will error.

Helpful tips
- This step will run every time the dedicated email address receives a new attached file. This is useful for triggering your flow to run automatically, outside of a dedicated schedule or webhook.
- If your XLS file has multiple sheets, this step auto-selects the first sheet but can be set to look for a specific sheet.
- This step can handle attached files that are up to 5MB.
- Each run of a Flow uses one file. If your Flow has multiple Pull from Email Attachment steps, they will all access the same email / file.
- What happens when multiple emails are received by your flow: If your flow is processing and another email (or multiple) comes in, then they will queue up to be pulled into your flow in the order they were received. All emails sent to a flow (up to 1,000 total) will be queued up and processed.
- By default, emails that are sent to Flow email addresses must have a valid attachment. You can disable that, and allow emails without attachments, by accessing the email trigger management modal and disabling the checkbox.
Related Recipes
Pulling data from PDF files
Use AI to parse PDF files into tables of data.
Parsing settings
Once a PDF is selected, choose how to initially process the file:
- Use an auto-detected table (default)
- Define a custom table
- Extract all data (not recommended)
Using the default auto-detection setting will send the file through our PDF parsing pipeline, where we will identify tables within the document, name them, and select the first table to extract possible columns from. (If the AI cannot find the exact table that you need, use the option to define a custom table.)
Once this step finishes its first calculation, you should see a table selected with a set of columns. The keys section should be empty.
Add additional columns by clicking the button to add a column, and then defining the name of the column. Helpful tips:
- Column names can be descriptive or instructive, and do not need to match exactly what the PDF says. However, the name should be something that is easy for the AI to associate with the desired column of data
- Providing examples is the best way to increase the accuracy of column (or key) parsing
- Each column can have additional instructions added to it, describing how to find the column, or how to manipulate it
Add keys to your results by clicking the button to add a key, and then defining the name of that key.
- Keys are things that exist once in the document, or in association with a table, such as an invoice number, billing date, shipping address, or grand total amount
- Keys also benefit from examples, as well as any additional instructions that can help the AI find the exact value that you need
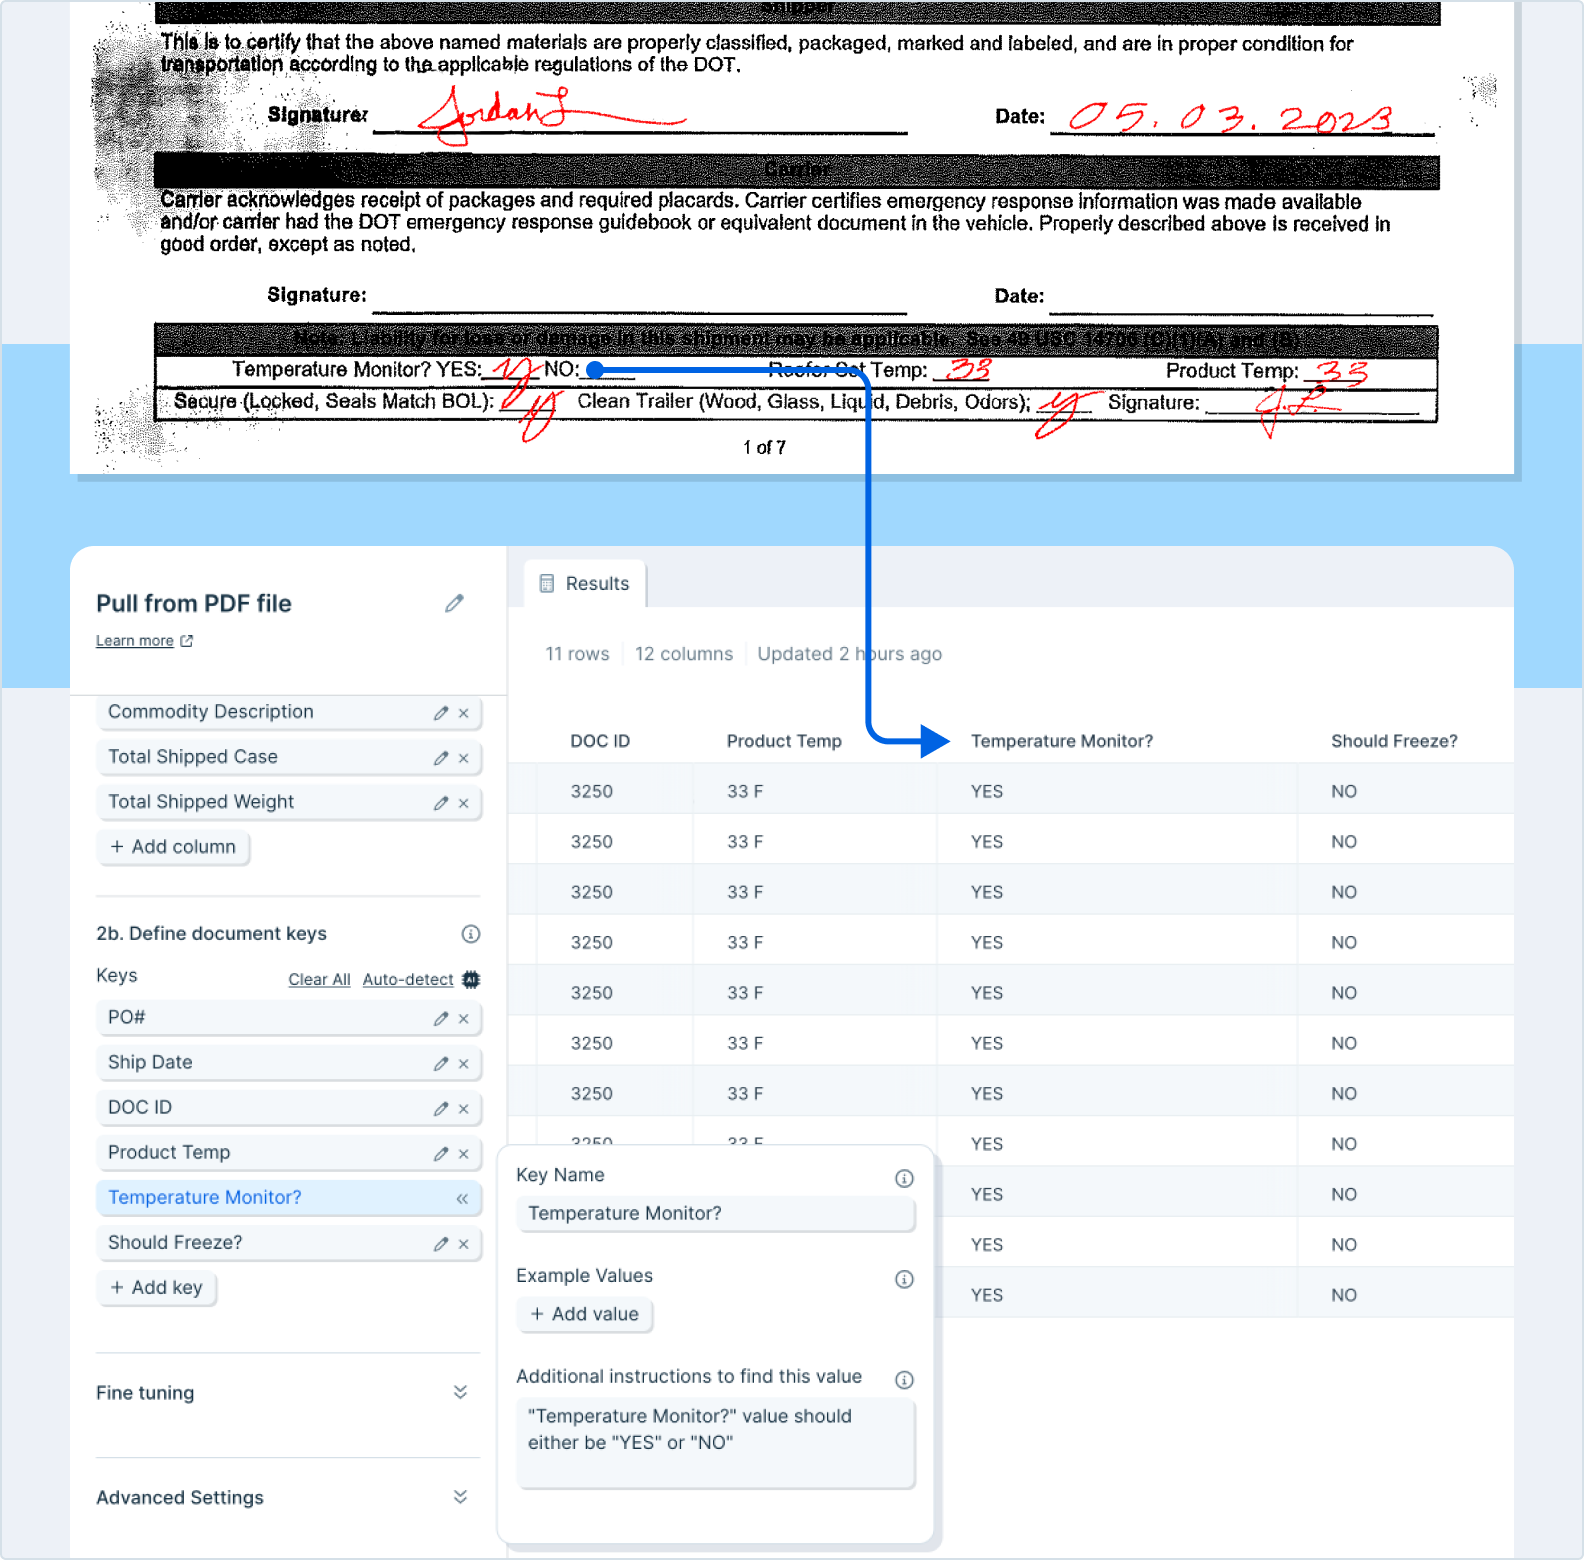
Usage tips
- This step can take many minutes to run! Grab a coffee and relax while the AI does the work for you. The more document pages that are needed for parsing, the longer it may take. Pages not associated with any values/tables are not sent for parsing.
- In the Advanced Settings of the step, you can choose to enable your step to accept automatic updates, or ignore them. If you accept updates, the output of these steps may change as we release updates to the AI prompting.
- If you need to pull data across multiple tables (from a single file), you will likely need multiple steps – one per table.
Columns and keys
It can be unclear whether a particular piece of data would be viewed as a column or a key.
- In general, keys are single pieces of data that are applicable to the entire document
- Columns are parts of tables that are likely to have more than one row associated with them
- “Total” rows are best expressed as keys
Columns that are shown after auto-detection do not always represent every column possible. Add more columns to match what you want the output to look like
It is very helpful to rename columns and keys to indicate to the AI what data you need
- The name can be very specific and used to find the exact data, or even manipulate data!
- For example, if an “Item” column contains both an ID and a description (e.g. “Red T-shirt #1494827), you can create two columns, named “Item description”and “Item ID”. The AI will then attempt to split the “Item” column into two columns, based on those names.
Giving examples for columns and keys is one of the best ways to increase accuracy
- The only exception is for multi-line data points, like an address. If that is the example, type it out in the fine tuning for that column instead
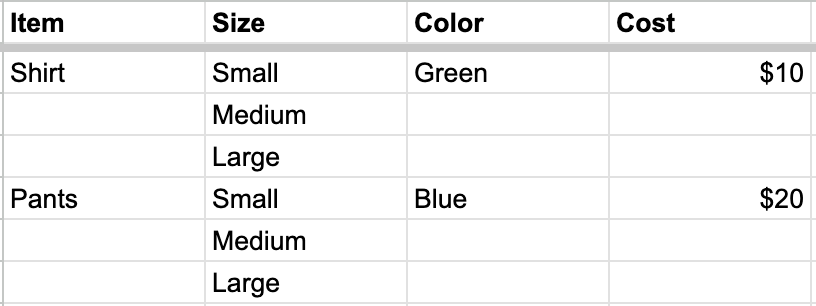
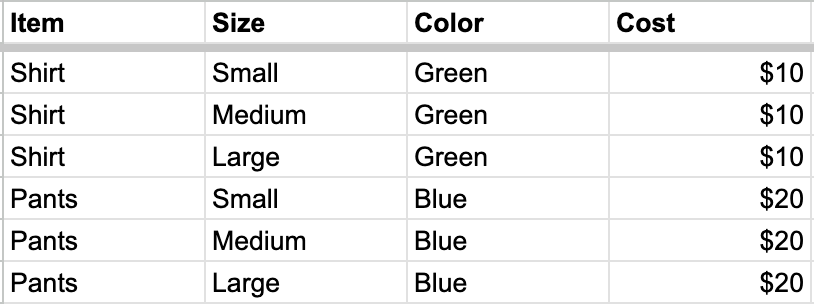
Mark columns as “Child columns” if they contain rows that have values unique from the parent columns:
Before
After marking “Size” as a child column
Extract all data
Choosing this option will use OCR to process your file, not AI.
You can choose the desired data format based on how you plan to transform the data in your Parabola flow. From the “Data format” dropdown, you have the following options:
- All data: this will return all of the PDF data, organized into rows
- Table data: this will return only data from identified tables within the PDF file.– If your file has multiple tables, each will have a unique ID (which you can use to later filter results, for example), and results will be returned sequentially (e.g. table 1, then table 2, and so on).– Note: tables that span multiple pages will be broken into individual tables for each page
- Key-Value pairs: this will return all identifiable key/value pairs – things that are clearly associated or labeled, such as “color: red” or “Customer name- Parabola”
- Raw text: this will return all of the PDF data, in a single cell (one cell per file page). This format is most useful if you plan to apply an AI step, like Extract or Categorize
For the “Table data” and “Key-Value pairs” formats, you can automatically pivot your results using the checkbox that appears in the step settings.
Limitations
- File size: PDF files must be <500 MB and 3,000 pages
- Languages supported: English, French, German, Italian, Portuguese, and Spanish
- PDFs cannot be password protected
- The maximum height and width is 40 inches and 2,880 points
- The minimum height for text to be detected is 15 pixels (~8 point font)
- We recommend always auditing the results returned in Parabola to ensure that they’re complete