- A Shopify account with app development permissions
- A Parabola account with a flow open and ready to connect
Set up your app in Shopify
Step 1: Create a new app
1
Log in to your Shopify account and navigate to the Dev Dashboard
Go to the Shopify Dev Dashboard.
2
Create the app
- In the left-hand navigation, click Apps
- Click Create app in the top-right corner
- Select Start from Dev Dashboard
- Name your app (e.g., “Parabola Integration”) and click Create
Step 2: Create a version
1
Configure version settings
- From your app, click the Versions tab
- Set your App URL to:
https://shopify.dev/apps/default-app-home - Select the newest Webhooks API version
2
Add scopes
Under Scopes, add the permissions your integration needs. Common examples:
3
Add the redirect URL and release
- Under Redirect URLs, add:
https://parabola.io/api/steps/generic_api/callback - Click Release
Offline access: When selecting scopes, you’re granting Parabola permission to access your store in the background without you being actively logged in. In step 6 below, you’ll request a non-expiring token to make sure this access never interrupts your automated flows.
Step 3: Install your app on your store
- From the Dev Dashboard, scroll down on your app and click Install app
- Select your store and click Install
Step 4: Get your credentials
- From the Dev Dashboard, click Settings
- Copy your Client ID and Client Secret — you’ll need both in Parabola
Connect Shopify to Parabola
Step 5: Add an API step in Parabola
- In your Parabola flow, add a Pull from API step to import Shopify data
- In the step settings, open the Authentication dropdown and select Add expiring access token
Step 6: Configure the expiring access token
1
Set the access token request URL
In the Access Token Request URL (POST) field, enter:Replace
{your-store} with your Shopify store name.2
Add request body parameters
Add the following parameters:
client_secret→ your Client Secretclient_id→ your Client IDgrant_type→client_credentials
3
Configure request headers
- Set Content-Type to
application/x-www-form-urlencoded - Delete the Accept header
4
Configure token settings
- Response Access Token Field →
access_token - Header Key for using Access Token →
X-Shopify-Access-Token - Header Value for using Access Token →
{token}
5
Apply the settings
Click Apply Access Token settings.
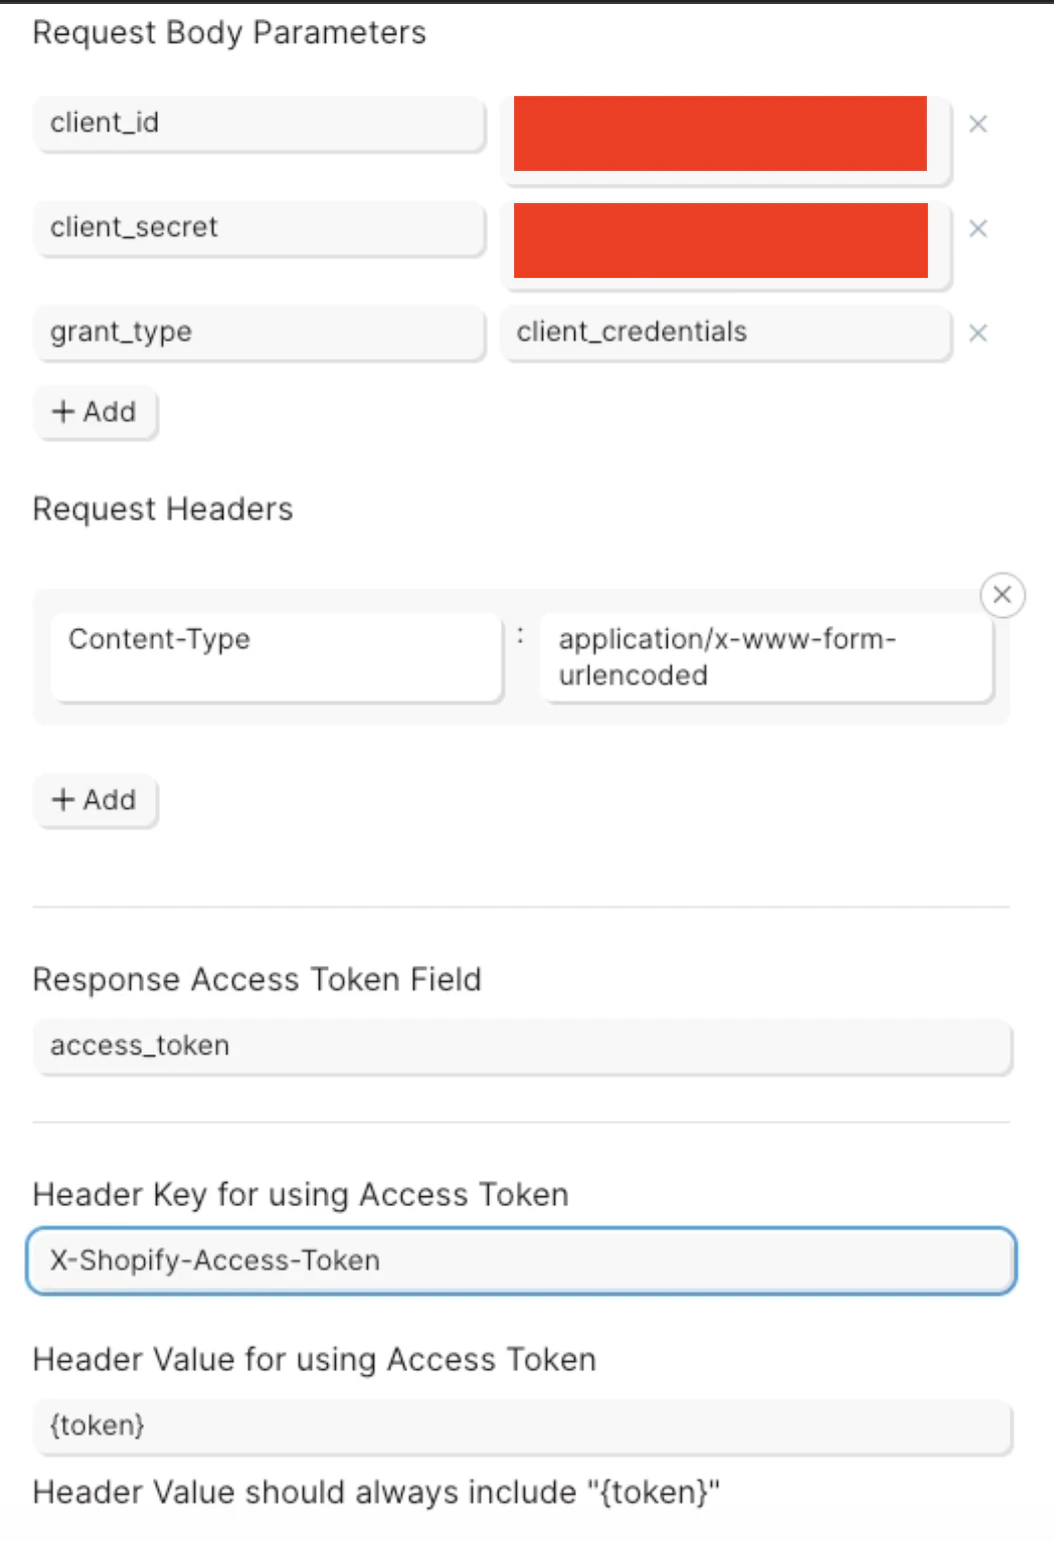
Your configuration should look like this:
Your configuration should look like this:
Step 7: Pull from the GraphQL API
1
Configure the API request
- Select the pen icon near API Request Settings
- Switch the API Endpoint URL method to POST
- Enter the endpoint URL:
{your-development-store} with your Shopify store name.2
Add a GraphQL query
- Select GraphQL for the Request Body
- Paste the following sample query:
Use cursor pagination to pull more records
Shopify’s Admin GraphQL API caps how many records you can fetch in a single request (typically 250). To pull more, you must page through results using cursors — opaque tokens that point to the next page. Without pagination, your flow only ever sees the first page.How cursor pagination works in Shopify
Shopify paginates connection fields usingfirst + after:
- Request page 1 with
first: Nand noafter(orafter: null). - Shopify returns:
pageInfo.hasNextPage— whether more pages existpageInfo.endCursor— the token for the next page
- Request page 2 by sending
after: "<endCursor from page 1>". - Repeat until
hasNextPageisfalse.
How Parabola handles the loop
In the Pull from API step, Parabola swaps in a placeholder each request as it loops through pages.
Parabola’s loop:
- Send the request (cursor starts empty /
null). - Read
hasNextPageat the configured path. - Read
endCursorand substitute it into<%cursor%>for the next request. - Stop when
hasNextPageisfalseor the page cap is hit.
Step-by-step setup
1
Write the GraphQL query with <%cursor%> in the after argument
The first request will send
after: "". Shopify treats an empty string as “start from the beginning,” so no special handling is needed.2
Configure the pagination panel
Using the example query above (
data.orders), the settings are:3
Run the flow
Parabola will keep firing requests until
hasNextPage is false or the page cap is hit, concatenating results into a single output table.Adapting the paths to your query
The response paths must match the shape of your GraphQL response, which mirrors the shape of your query. Example A —orders
- Query root:
orders { ... pageInfo { ... } } - Cursor path in response:
data.orders.pageInfo.endCursor - hasNextPage path:
data.orders.pageInfo.hasNextPage
shopifyPaymentsAccount.balanceTransactions
- Query root:
shopifyPaymentsAccount { balanceTransactions { ... pageInfo { ... } } } - Cursor path in response:
data.shopifyPaymentsAccount.balanceTransactions.pageInfo.endCursor - hasNextPage path:
data.shopifyPaymentsAccount.balanceTransactions.pageInfo.hasNextPage
products
- Cursor path in response:
data.products.pageInfo.endCursor - hasNextPage path:
data.products.pageInfo.hasNextPage
Common pitfalls
- Wrong paths. If
data.orders.pageInfo.endCursordoesn’t match your actual response shape, Parabola will only pull page 1. Run the query once, inspect the response, and confirm the path before turning on pagination. - Forgot
<%cursor%>in the query. The placeholder must appear in theafter:argument. Without it, Parabola has nowhere to inject the cursor. - Paginating a non-connection field. Only fields that return
pageInfo(connections) support cursor pagination. Singletons likeshop { ... }do not. - Editing page cap too low. If you cap at 5 pages while editing, your preview will look truncated — that’s expected. The run-time cap is what matters for production.
- Using
firstlarger than Shopify allows. Most connections cap at 250. Going higher returns an error. - Rate limits. Long pagination loops can hit Shopify’s cost-based rate limit. If you see throttling, lower
firstor add a delay.
Need to add more scopes?
If you need to grant Parabola access to additional Shopify data after your initial setup, you can update your app’s scopes without disrupting your existing connection.- Click on your app in the Dev Dashboard
- Click on the Versions tab
- Click Create Version in the upper right
- Select Scopes under Add Access and add the ones listed above