What is FTP?
FTP (File Transfer Protocol) is a standard network protocol used to transfer files between a client and a server over the internet. It enables businesses to securely upload, download, and manage files on remote servers. FTP is commonly used for bulk data transfers, website management, and automated file exchanges between systems.Pull from FTP
Pull in files from an FTP, SFTP, or FTPS server. Target exact files, or find files based on rules within a folder. Supports csv, tsv, excel, xml, and json file parsing. Can parse edi files as csv.Connecting to your FTP server
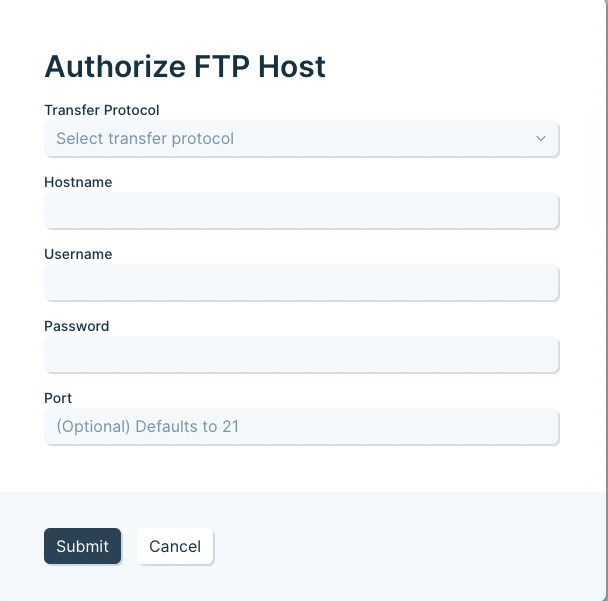
The first thing that you need to do is connect to your server in order to pull in any files. When you first add an FTP step to a flow, you can open it and will see an Authorize button. Click Authorize, and you will see this form:
Editing your FTP connection settings or adding another connection
If you need to edit or add another connection, open your FTP step, click on “Select accounts”, and then either click to add a new account, or edit the existing one. After editing your connection settings, click the refresh button to have the step re-connect with the new settings.Pulling in a specific file
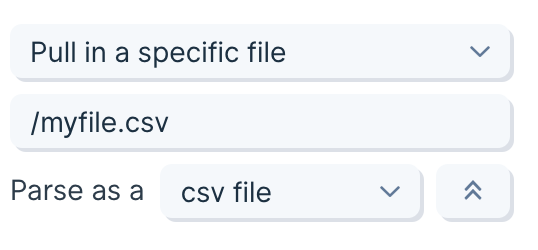
The main option at the top of the step allows you to switch between pulling in a specific file and a file based on rules.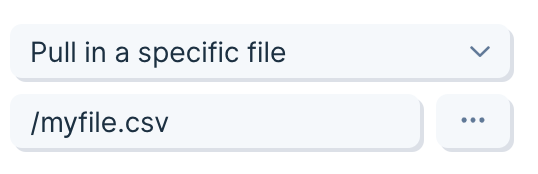

3-dot more menu to override how to parse a file. By default, this step will parse the file based on the extension of the file. But you can change that. For example, if you have a .txt file that is really a csv file inside, you can choose to parse that txt file as if it were a csv.
Pulling in a file based on rules
The main option at the top of the step allows you to switch between pulling in a specific file and a file based on rules. When pulling a file based on rules, a new file will be pulled in every time the flow is run, or the step is refreshed. A file can be selected based on:- The last_modified date of the file
- The folder the file is in
- Matching part of the name of the file

is anything, no filtering based on file name will be applied. You can select to filter for files that start with, end with, or contain a certain set of characters. This can also be used to match the file extension (.csv for example).
Third, choose a folder to find the file within. If you use / then it will search the root folder. Other folders that are inside of the folder that you have indicated will not be searched and will be ignored.
Finally, select a parsing option if you want to override the default.
Every time a file is pulled in from a rule, the name will be displayed in the step settings.

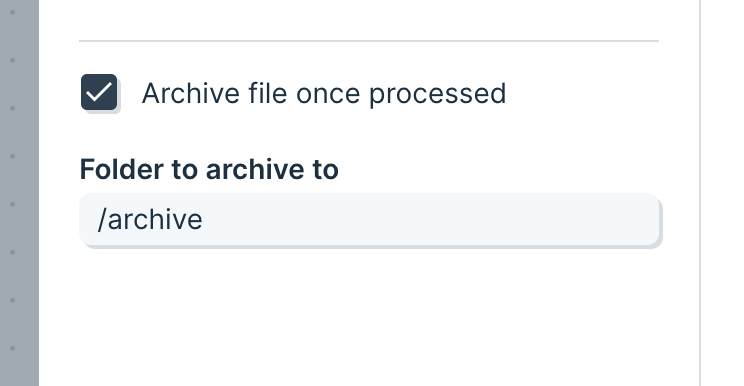
Moving files after processing (archiving)
Enable theArchive file once processed setting to automatically move files from the target folder to a different folder.
Files will be moved immediately after the data from the file is fetched by the Pull from FTP step. If the step fails for some reason with an error, the file will not be moved.
If the file is pulled in successfully, but another step causes the flow to fail, then the file will still be archived, even if the overall flow failed to complete.
In the run history of the flow, the names of any files pulled in from FTP will be listed to show what file was moved during successful or failed runs.
Use of this setting is best combined with the “Pull in a file based on rules” setting. With this combination, a Pull from FTP step can continuously cycle through a specific FTP folder and process any files available within it.
Parsing XML Files
Sometimes XML files will not successfully pull into this step. In that case, it may be due to how the step is parsing the file by default. Use the Top Level Key field to indicate which key to expand into the table. This can help if there is a list of data, but there are other keys surrounding it, and you just need to get to that interior list. You can indicate a deeper key by placing dots between each key level. For example, if you have an object calledCars, and inside it is a list called Colors, which you want to expand, you would put Cars.Colors in the Top Level Keys field.
File Metadata
To pull in file metadata like the date the file was last modified, it must be included as a value in a column.Limits
This FTP step can be used to pull in files up to 600MB. Contact us if you need larger files to be pulled in. Global limits my stop your file before its size does, however. Steps can only run for 1 hour, and can only pull in 5 million rows and 5000 columns.Send to FTP
Create or overwrite files in an FTP, SFTP, or FTPS server. Supports CSV, TSV, Excel, JSON, and XML file creation.Connect to your FTP server
Notes
- You can set the Port manually, or leave it blank to use the default for your selected protocol.
- Prefer SFTP or FTPS for secure transfers—plain FTP isn’t recommended.
Edit or add a connection
Open the step, click ‘Select accounts,’ then either add a new account or edit an existing one. After you edit, click the refresh icon to re-connect with the new settings.Choose your output mode
At the top of the step, choose one:- Create a new file (recommended for dated or run-specific outputs)
- Overwrite an existing file (recommended for stable file names/paths)
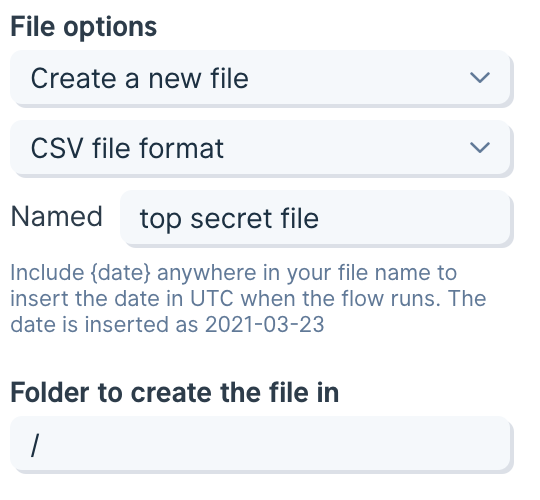
Create a new file
Configure three things: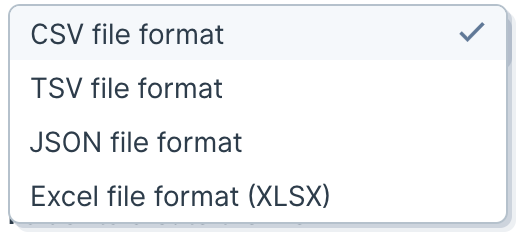
Supported formats
CSV- Output extension:
.csv.
- Tab-separated values.
- Output extension:
.tsv.
- Output extension:
.xlsx. - No additional formatting is applied.
- Top-level JSON array; each row becomes an object.
- Output extension:
.json.
- The XML content must be stored in a single column in your input data—select this column in the step settings.
- Output extension:
.xml. - Supports exporting one file per row, up to 50 files per run.
- XML is validated during step edits by default (can be toggled off). Invalid XML will not be exported.
- Only creating new files is supported—overwriting is not available for XML.
Name the file
Type the base file name without an extension. For example, entercustomers (not customers.csv). If you include an extension, you’ll end up with a duplicate (e.g., customers.csv.csv).
Use merge tags to make the name unique:
Column merge tags (create mode only)Reference values from your data to build the file name:
- Wrap the column name in curly braces like,
{CustomerId} - Examples:
invoices_{CustomerId}_{date}→invoices_12345_2025-09-30export_{Region}_{timestampDash}→export_APAC_2025-09-30_14-03-22
Advanced Settings
- Enable checkbox to omit header rows in exports (default is off)
- Enable checkout to remove merge columns from output (default is off)
Tips
- Most servers reject duplicate names in the same folder. Use date/time or column merge tags to avoid collisions.
- Avoid special characters your server may not allow in file names.
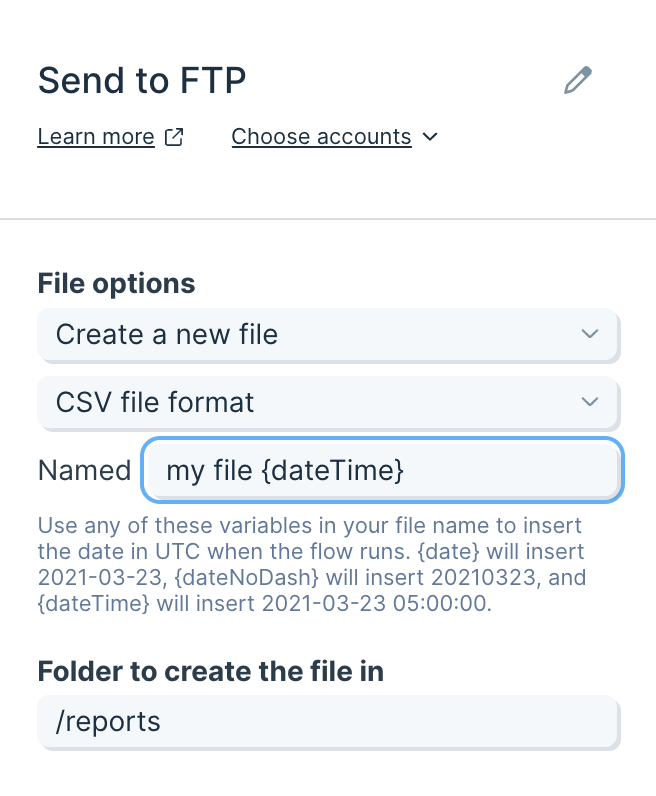
Choose a folder to put the file
Specify the destination folder path:- Paths start at the root:
/ - Example for a root-level folder named
reports:/reports - Example nested path:
/exports/daily
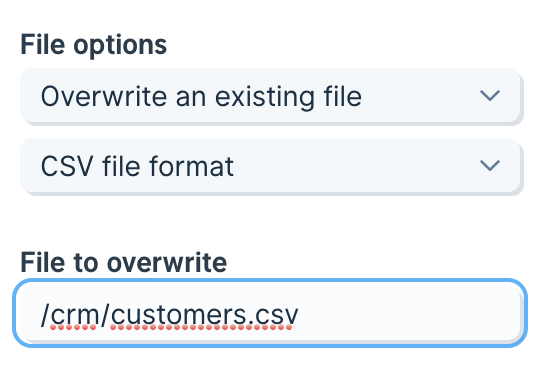
Overwrite an existing file
Set File options dropdown to “Overwrite an existing file”. Select the output format and enter the full path (including the file name and extension) in the “File o overwrite” field.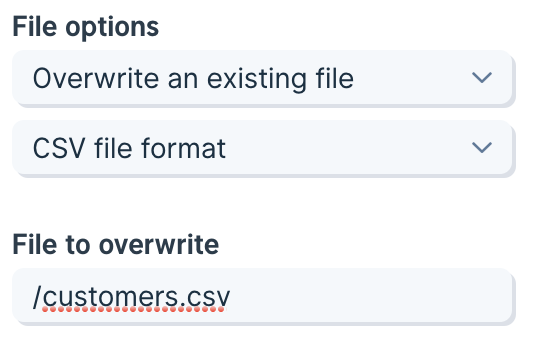
Select a format
Choose the format that matches the file’s intended use. While Parabola replaces the file contents entirely (so mismatched extensions can still “work”), keeping the extension aligned with the actual format prevents downstream confusion.Choose the file path
Provide an absolute path from the root/:
- Root example:
/customers.csv - Nested example:
/crm/customers.csv
Advanced Settings
- Enable checkbox to omit header rows in exports (default is off)