SharePoint Integration
What is Microsoft SharePoint?
Microsoft SharePoint is a web-based collaboration and document management platform that enables organizations to store, organize, and share information securely. It integrates with Microsoft 365, allowing teams to collaborate on files, automate workflows, and manage content efficiently. SharePoint is widely used for intranet portals, document storage, and business process automation.
How to use Parabola's Microsoft SharePoint integration
Parabola's Microsoft SharePoint integration helps businesses automate file and data management workflows.
- Automatically import and process files and lists from SharePoint
- Organize and sync SharePoint data with other business applications
- Streamline document workflows and automate reporting tasks
Learn more about Parabola’s Microsoft SharePoint integration below.
Pull from SharePoint
The Pull from SharePoint step gives you the ability to pull in datasets from your Microsoft SharePoint files.
Connect your SharePoint account
To connect your SharePoint account, click Authorize to login with your Microsoft account credentials.
Note: you may be asked to set up an authenticator app (for multi-factor authentication), or submit an authorization request to your IT administrator. This is dictated by your company’s Microsoft account settings.
Selecting a file
To select the specific file you want to work with:
- Select the site - the dropdown will show all SharePoint sites that you have access to
- Select the drive
- Search for the specific file you’re looking for - you can enter a term or paste in the entire file name. The dropdown will show all matching files
- The first matching file will automatically appear in the Results view. You can select a specific sheet, for files with multiple
File types supported
- XLS, XLSX*
- CSV (comma (,) delimiter)
- TSV (tab delimiter)
- JSON
- XML
Helpful tips
- This step pulls data in exactly as it is shown in SharePoint. Formatted dates and numbers will be pulled in and shown in their formatted state. Visual formatting, such as colors, font changes, or sizing will not show up in Parabola.
- Changes you make to the SharePoint file can take several minutes to appear in Parabola (between 10-30 minutes).
- There may be some delay between updating your SharePoint site permissions and seeing those sites available in your Parabola step.
- Updates to Excel workbooks can take up to several minutes to be reflected in SharePoint.
- *The Microsoft API has a size limit for Excel workbooks of 100 MB. Attempting to pull an Excel workbook greater than 100 MB will result in an error, and you will be prompted to reduce the size of your workbook. This does not apply to .xls file extensions, only .xlsx.
Microsoft Azure User Permission Settings
Parabola is a verified app publisher, meaning we've been verified as authentic by Microsoft. Parabola will only have access to the items in SharePoint/OneDrive that the account used to authorize Parabola has access to (that's on a per-user basis).
In order to enable a user to import data from Microsoft and/or send it to Microsoft, Parabola requests the following permissions:
- Permission to read, create, update and delete OneDrive files the signed in user has access to
- Permission to read, create, update and delete documents and list items in all SharePoint sites the signed in user has access to
- Permission to read profile of signed-in users (e.g., name, email)
- Note, the "write" permissions are for our Send to SharePoint/OneDrive steps, so that you can create or update a file.
If you see "Need admin approval" when authorizing Parabola, this means that your Microsoft Azure user consent settings are configured to require admin approval for approving any app. An IT admin on your team can check these settings in Microsoft Azure > Enterprise Applications > Consent and Permissions. If you toggle to Azure's recommended setting of only allowing members of your Microsoft org to consent apps from verified publishers, you should no longer require admin approval.
Send to SharePoint
The Send to Microsoft SharePoint step gives you the ability to automate sending custom datasets to SharePoint drives. You can create a new file or update a file by having the dataset overwrite or append (add on) to an existing file.
Connect your SharePoint account
To connect your SharePoint account, click Authorize to login with your Microsoft account credentials.
Custom settings
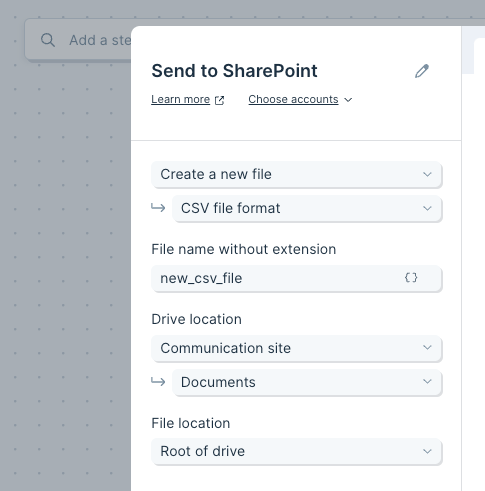
First, select whether to create a new file, or update an existing file.
Create a new file
Select the file type, and enter a file name. Then, indicate where the file should be saved: select a site, and drive. Within a drive, you can either save to the root of the drive (default), or search for a specific folder to save to.

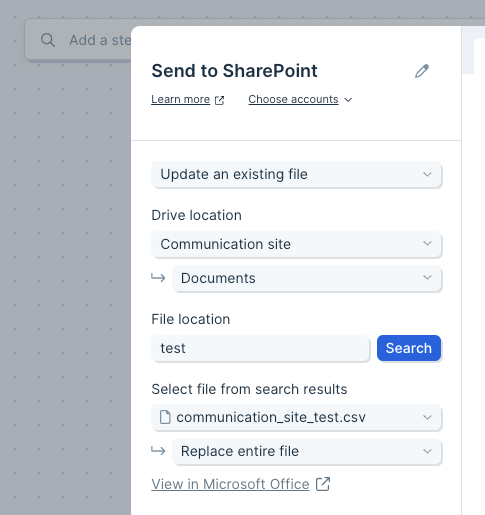
Update an existing file
First, choose the file you want to update by selecting a site, and drive. Then, search for the file by name.
Once your file is selected, you can decide how to update it:
- Replace entire file - all file types
- Append to bottom - Excel files only
(Note, you can specify which sheet of an Excel file to update.)

File types supported
- XLSX
- CSV (comma (,) delimiter)
- TSV (tab delimiter)
- JSON
- XML
Helpful tips
- Updates to Excel workbooks can take up to several minutes to be reflected in SharePoint.
- The Microsoft API has a size limit for Excel workbooks of 100 MB or 1,048,576 rows by 16,384 columns. (Read about other limits here.)
- If the size of the workbook you want to update already exceeds 100 MB or the max row and column limit, the API will return an error when Parabola attempts to fetch workbook metadata.
- If you are overwriting a worksheet and the data you're sending exceeds 100 MB or the max row and column limit, the Flow calculation will return an error. If you are appending to a worksheet and the data you're sending exceeds the remaining space of your workbook or will result in max row and column limit being exceeded, the Flow calculation will also return an error. In both cases you will be prompted to reduce the size of either your workbook or input data.