What is Snowflake?
Snowflake is a cloud-based data warehousing platform that enables businesses to store, process, and analyze large volumes of data efficiently. It provides scalable computing power, built-in security, and integration with various data sources. Snowflake is widely used for business intelligence, analytics, and real-time data processing across industries.Pull from Snowflake
Use the Pull from Snowflake step to pull in your data from your Snowflake database.Before you start
Check whether your team has already created a Snowflake OAuth security integration for Parabola (client ID and client secret). If it exists, you can skip to the Set up the step in Parabola section.Create a Snowflake OAuth security integration
In order to perform these steps, you must have Snowflake permissions to create a security integration.1
Sign into Snowflake. Click on “Worksheets” tab in the sidebar and click ”+ Worksheet” button in the upper right hand corner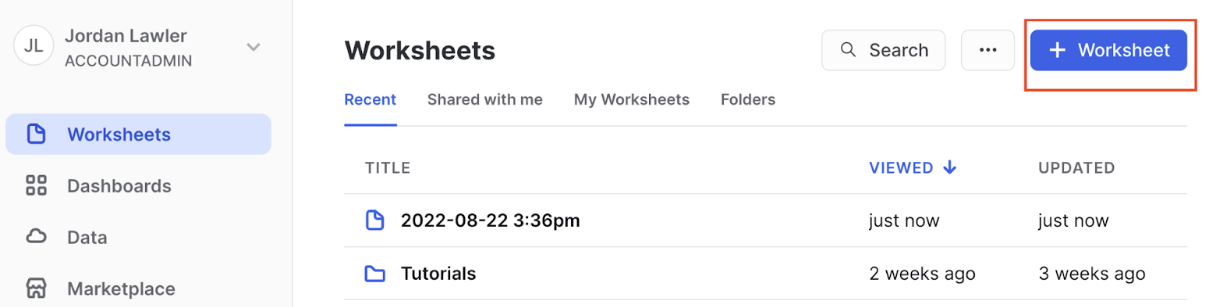
2
In the worksheet, paste the query below into the worksheets query box. This will instantiate a custom client OAuth server on your Snowflake instance that Parabola will use to connect to.
create security integration oauth_parabola_prod
type = oauth
enabled = true
oauth_client = custom
oauth_client_type = ‘CONFIDENTIAL’
oauth_redirect_uri = ‘https://parabola.io/api/auth/snowflake/callback’
oauth_issue_refresh_tokens = true
oauth_refresh_token_validity = 7776000
type = oauth
enabled = true
oauth_client = custom
oauth_client_type = ‘CONFIDENTIAL’
oauth_redirect_uri = ‘https://parabola.io/api/auth/snowflake/callback’
oauth_issue_refresh_tokens = true
oauth_refresh_token_validity = 7776000
Retrieving the Client ID and Client Secret
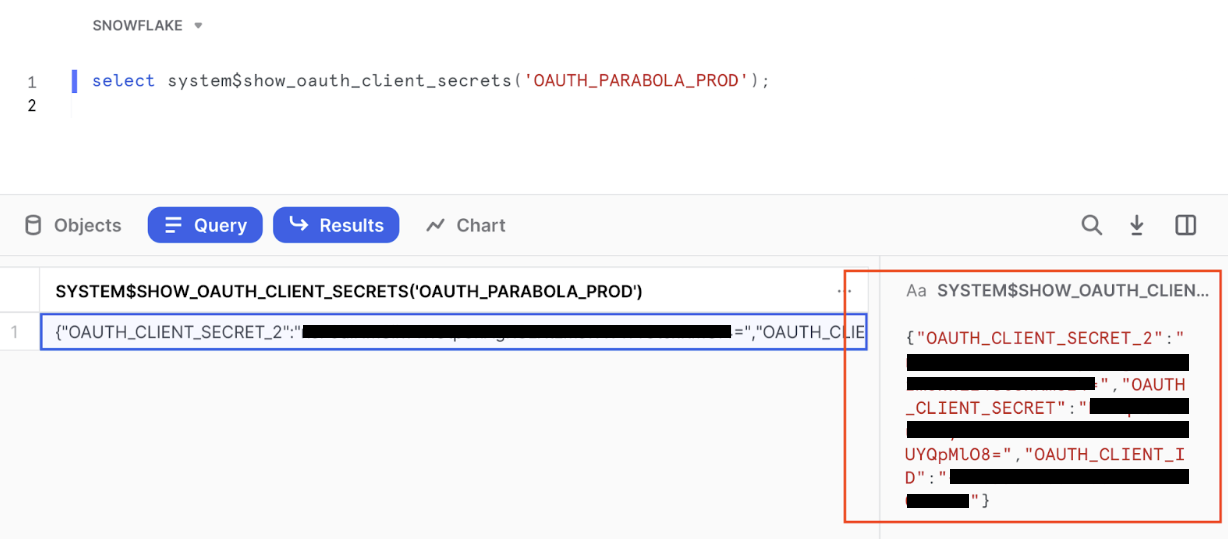
Run the following query:select system$show_oauth_client_secrets(‘OAUTH_PARABOLA_PROD’);
Note: The name of your integration passed into this statement should be all capitalized. Ex “oauth_parabola_prod” should be entered as ‘OAUTH_PARABOLA_PROD’

Set up the step in Parabola
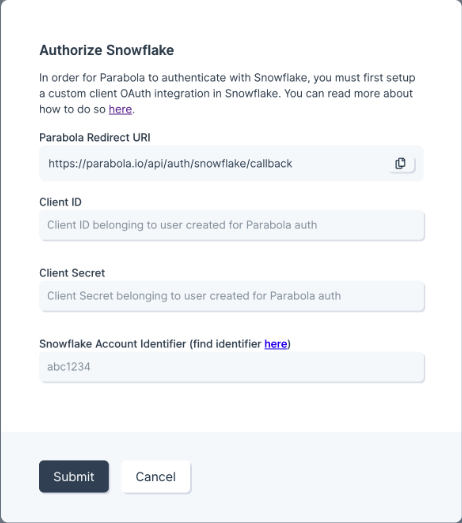
In your builder, bring in the Snowflake step and Click on “Authorize Snowflake”. You will see a form asking for client_id, client_secret, and account_identifier. For client_id and client_secret, paste the values you received above. For account_identifier, paste your Snowflake account id. Your account ID will be the located in your URL:<account_identifier>.snowflakecomputing.comStep Permissions
When a user authorizes our “Pull from Snowflake” step, their access to data within the Parabola step will be the same as their access to data within the Snowflake platform. If a user has granular permissions configured in Snowflake, their access will be gated in the same fashion within Parabola. While credentials like Client ID and Client Secret are at the organization level, when a user actually authenticates the step through their Snowflake login, we ensure that the actual user account permissions are enforced within the step itself. Parabola now supports shared authentication for Snowflake, making it easier for teams to authorize Snowflake once and reuse that connection across flows and users—without needing to repeatedly input credentials or reauthorize each step.- Admins can authorize a Snowflake connection once via any Pull from Snowflake or Send to Snowflake step.
- Any team member can select the shared Snowflake connection in their Pull from Snowflake or Send to Snowflake step by choosing the appropriate shared auth profile.
- Permissions and access levels will still reflect the Snowflake role tied to that authenticated connection.
Helpful Tips
On pulling data from Snowflake
There is currently no way to add dynamic filters to your query, so you’ll want to filter your data as much as possible in the query itself to limit the amount of data you’re pulling in.Get help from AI
When working in the ‘Query (optional)’ field, you’ll see two buttons that open AI chat:- “Help write query”: Describe the data you want in plain language (for example, “Show the last 30 days of shipped orders”), and AI will draft the SQL.
- “Optimize query”: Paste your existing SQL and ask AI to fix errors, improve performance, or add logic. This is especially helpful for resolving SQL syntax issues.
Snowflake’s maximum token validity
The maximum token validity is 90 days, as enforced by Snowflake. This limit cannot be extended. You can set a shorter validity period by updating theoauth_refresh_token_validity parameter for your custom client. If a token expires after reaching its maximum validity, you will be prompted to reauthorize your Snowflake connection the next time the flow runs.
Snowflake permissions
By default Parabola will mimic the permissions you have within your Snowflake instance. The request will check the user’s default role, warehouse, and database/schema. If these values are not set, or the users default values are not sufficient to make a certain request, you will see an error message like below:Settings Error: Error occurred with Snowflake API (status_code: 422, message: “SQL compilation error: Object ‘CUSTOMER’ does not exist or not authorized.”)

Role/Warehouse
Database/Schema
Send to Snowflake
Use the Send to Snowflake step to insert, update, or merge data into your Snowflake database. This step is currently offered to users on our Advanced Plan. Check out the Pricing Page for additional information. Before you get started, check to see if your team has already set up their Client ID and Client Secret for Parabola. If you or someone else on your team has already set this up on the Snowflake side, you will not need to go through this process again and can jump straight to the Parabola Step Set Up section.Connect your Snowflake account
In order to perform these steps, you must have the right permission level in Snowflake to create a security integration. Login to your Snowflake account. Once you’re logged in, click on “Worksheets” tab in the sidebar and click + Worksheet button in the upper right hand corner
Retrieving the Client ID and Client Secret
Run the following query: select system$show_oauth_client_secrets(‘OAUTH_PARABOLA_PROD’);Note: The name of your integration passed into this statement should be all capitalized. Ex “oauth_parabola_prod” should be entered as ‘OAUTH_PARABOLA_PROD’
Parabola Step Set Up
In your flow builder, add the Send to Snowflake step and click on “Authorize Snowflake”. You will see a form asking forclient_id, client_secret, and account_identifier. For client_id and client_secret, paste the values you received above.
For account_identifier, paste your Snowflake account id. Your account ID will be the located in your URL:
<account_identifier>.snowflakecomputing.com
Step Permissions
When a user authorizes our Send to Snowflake step, their access to data within the Parabola step will be the same as their access to data within the Snowflake platform. If a user has granular permissions configured in Snowflake, their access will be gated in the same fashion within Parabola. While credentials like Client ID and Client Secret are at the organization level, when a user actually authenticates the step through their Snowflake login, we ensure that the actual user account permissions are enforced within the step itself.Sending data
This step can send data in 3 different ways:- Insert - adds new rows to Snowflake
- Update - uses a unique identifier to find existing rows to update
- Merge (upsert) - attempts an update, and if no matching rows are found, inserts the data instead
Helpful Tips
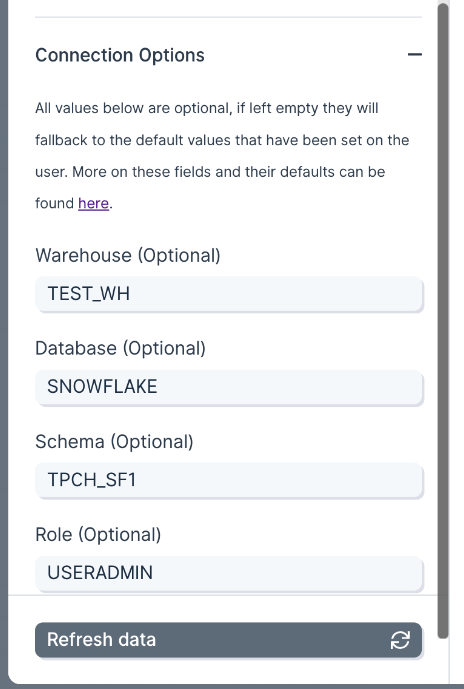
By default Parabola will mimic the permissions you have within your Snowflake instance. The request will check the users default role, warehouse, and database/schema. If these values are not set, or the users default values are not sufficient to make a certain request, you will see an error message like below: Settings Error: Error occurred with Snowflake API (status_code: 422, message: “SQL compilation error: Object ‘CUSTOMER’ does not exist or not authorized.”) If this occurs, try updating the Role, Warehouse, Database, or Schema settings. You can play around with these values in the Snowflake worksheets section to find a configuration that works for you. In the upper left hand corner of the page select for role or warehouse, and the sidebar for database or schema respectively: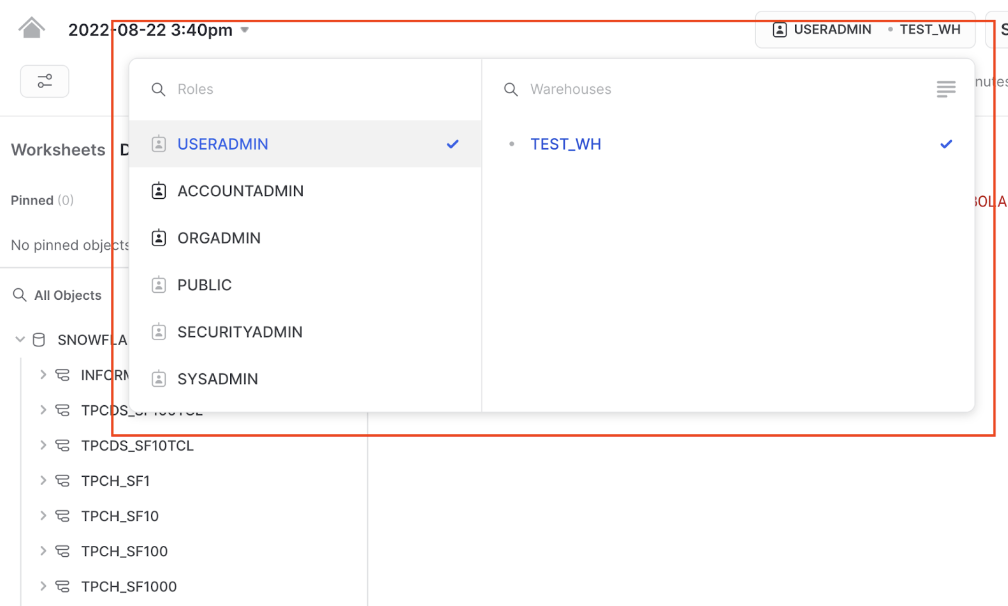
Role/Warehouse

Database/Schema
Snowflake’s maximum token validity
The maximum token validity is 90 days, as enforced by Snowflake. This limit cannot be extended. You can set a shorter validity period by updating theoauth_refresh_token_validity parameter for your custom client. If a token expires after reaching its maximum validity, you will be prompted to reauthorize your Snowflake connection the next time the flow runs.