Extracting data from emails
The Extract from email step is Parabola's most powerful tool for organizing messy data — whether it's coming in via unstructured email bodies, CSV, Excel, or PDF attachments. With this step, you can use AI to automatically translate messy data into neat tables of data, which you can then use to build downstream logic. Whether you need to pull line items from an invoice or extract shipment IDs from the body of an email, this step is your go-to tool for organizing messy data coming in via email.
Extract from email
The Extract from email step gives you the ability to receive file attachments (CSV, XLS, PDF, or JSON files) from an incoming email and pass it to the next step (eg., combining email data with PDF or Google Sheets data). The step also gives you the ability to pull an email subject and body into a Parabola Flow. Use this unique step to trigger Flows, using content from the email itself.
Watch the Parabola University video below to see this data pull in action.
Default attachment settings
To begin, take note of the generated email address that is unique to this specific flow. Copy the email address to your clipboard to start using this dedicated email address yourself or to share with others.
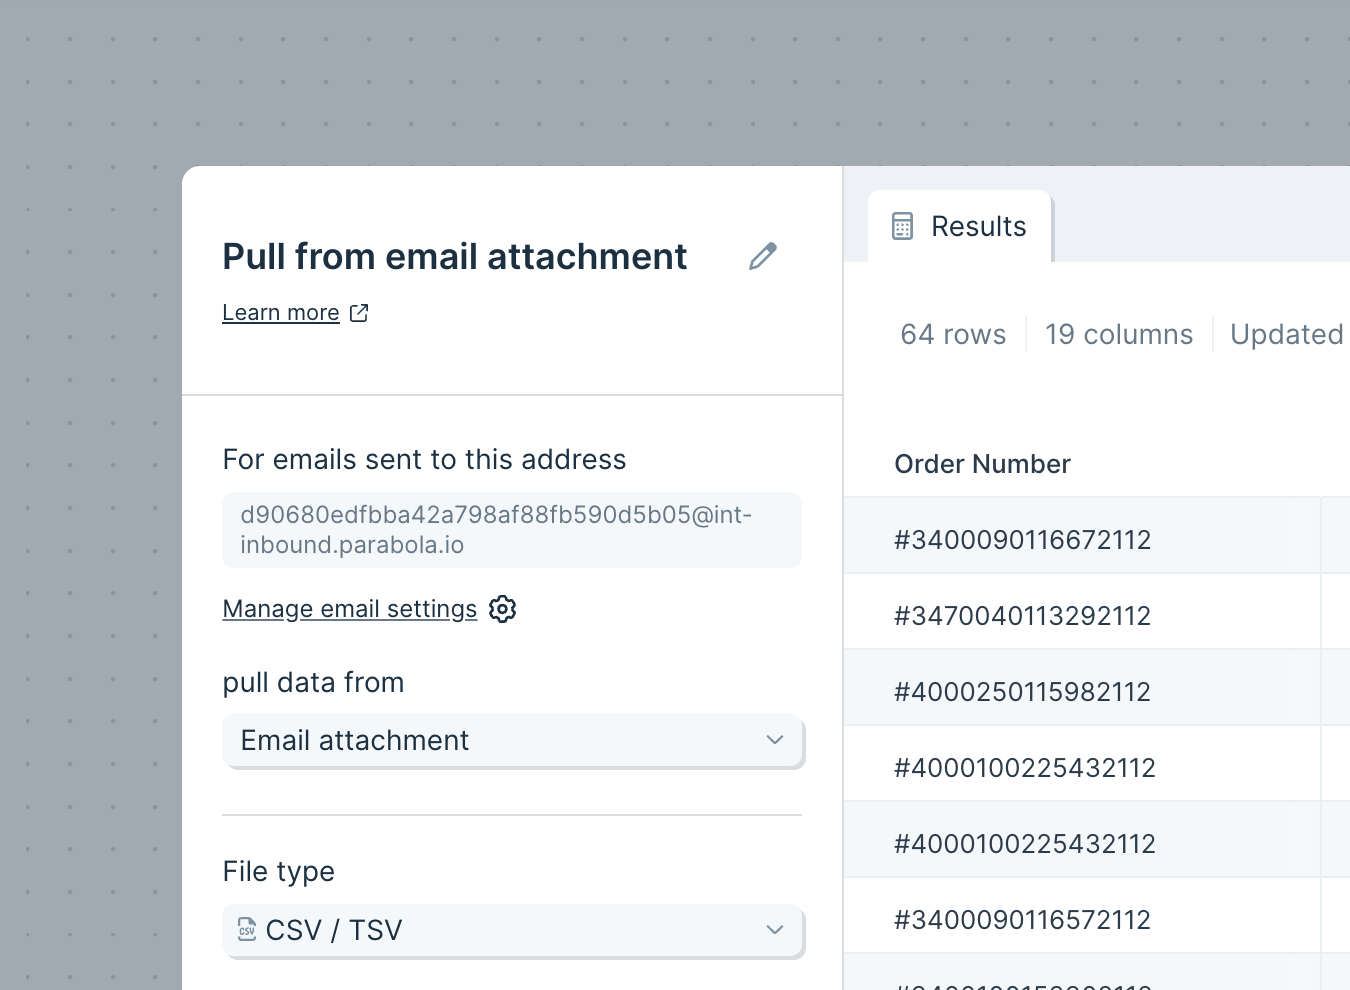
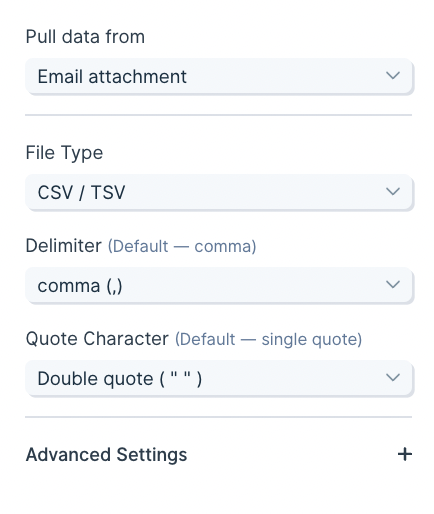
The File Type is set to CSV / TSV, though you can also receive XLS / XLSX, PDF, or JSON files.
The Delimiter is set to comma (,), but can also be adjusted to tab (\t) and semicolon (;). If needed, the default of Quote Character set to Double quote ( " " ) can be changed to single quote ( ' ' ).
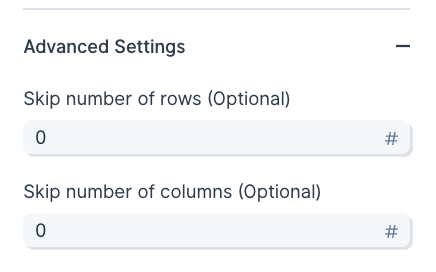
Custom settings
This step contains optional Advanced settings, where you can tell Parabola to skip a certain number of rows or columns when receiving the attached file.
Auto-forwarding emails into a Parabola flow
To auto-forward a CSV attachment to an email outside of your domain, you may need to verify the @inbound.parabola.io email address. The below example shows how to set this up in Gmail.
Video overview
Step-by-step instructions
1. Prepare Your Extract from Email Step in Parabola
- In your Parabola Flow, drag in a new Extract from Email step.
- Configure it to pull in email content, not just attachments.
- Click Update Results to generate the Parabola forwarding email address.
💡 You’ll use this address to forward emails into your Parabola Flow. Don't forget to copy this email address.
2. Set Up Forwarding in Gmail
- Go to Gmail → click the gear icon → See all settings.
- Navigate to the Forwarding and POP/IMAP tab.
- Click “Add a forwarding address.”
- Paste the email address from your Parabola step and click Next → Proceed.
3. Confirm the Gmail Forwarding Request via Parabola
- Back in Parabola, refresh the Extract from Email step.
- Look for an email with subject:
Gmail Forwarding Confirmation. - Open the body and find the sentence:
“Please click the link below to confirm the request.” It maybe easier to copy and paste the entire body content into a word doc or text editor for easier copy and pasting. - Copy the confirmation URL from the body, paste it in a browser, and click Confirm.
✅ Gmail will now recognize the Parabola address as a valid forwarding destination.
4. Create a Gmail Filter to Automatically Forward Specific Emails
- In Gmail, go to Settings → Filters and Blocked Addresses → Create a new filter.
- Set criteria such as:
- From:
nycwarehouse@gmail.com - Subject:
New York City Warehouse Inventory - Has attachment: ✅
- From:
- Click Create filter, then:
- Check Forward it to and select your verified Parabola email address.
- Click Create filter.
5. Clean up your Flow (If necessary)
- If you created a temporary Extract from Email step just for the verification, you can now delete it.
- Your Parabola Flow will continue to receive the filtered, auto-forwarded emails daily.
Other troubleshooting tips
- If you do not see the email content come into the Flow after a few minutes, double-check the email settings on that step/Flow. Click on the gear icon in the lefthand side of the step where it says "View all Flow email settings". Make sure the checkbox "Reject emails that do not contain valid attachments" is unchecked.
- If it is already checked, check your email inbox for an email with the subject line, "Sorry, we were unable to process your email attachment". The verification link from gmail should be available in the email content of this email. Click on the verification link and you should have successful verified this forwarding address!
Pull multiple file attachments
By default, Flows will run with the first valid attached file. If you want the Flow to run through multiple attached files (multiple attachments on one email), open the “Email trigger settings” modal and change the setting to “Run the Flow once per attachment:”

(Access these settings from the Extract from email step, or from the Flow trigger settings on the published Flow page.)
For emails with multiple files attached, the Flow will run once per file received, sequentially.
- Files must be of the same type (CSV, XLS, PDF, or JSON) for the runs to process.
- The file type is defined in the initial step settings (”File type” dropdown).
- Any files received that are of a different type will cause a Flow run error.
Pull from email content
We also support the ability to pull in additional information about an email.The default behavior pulls:
- Subject
- Body (plain text)
- CC
- From
- Attached file name
Additional fields:
- Body (HTML)
- Body (all URLs)
- Attached file URL
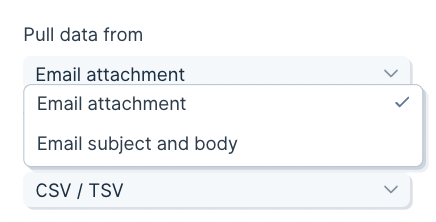
To access these fields, you can toggle the “Pull data from" field to ‘Email content’. If you'd like to pull both an attachment and the subject and body, select ‘Email content and attachment’.
Extract data from the body of an email with AI
Use the “Extract data with AI” option to automatically extract tables and key values from email bodies to create structured output.
Enable this option under "Parsing settings" when pulling in the “Email content”.
Pull a sheet from an Excel file based on file position
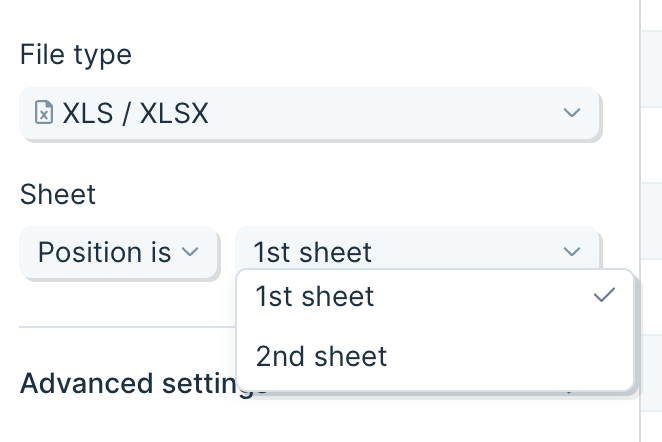
Use the "position is" option when pulling in an attached Excel document to specify which sheet to pull data from by its position, rather than its name. This is great for files that have key data in consistent sheet positions, but may not always have consistent sheet names.
When using this option, only the number of sheets that are in the last emailed file will show in the dropdown. If a Flow using these settings is run and there is no sheet in the specified position, the step will error.
Helpful tips
- This step will run every time the dedicated email address receives a new attached file. This is useful for triggering your flow to run automatically, outside of a dedicated schedule or webhook.
- If your XLS file has multiple sheets, this step auto-selects the first sheet but can be set to look for a specific sheet.
- This step can handle attached files that are up to 5MB.
- Each run of a Flow uses one file. If your Flow has multiple Extract from email steps, they will all access the same email / file.
- What happens when multiple emails are received by your flow: If your flow is processing and another email (or multiple) comes in, then they will queue up to be pulled into your flow in the order they were received. All emails sent to a flow (up to 1,000 total) will be queued up and processed.
- By default, emails that are sent to Flow email addresses must have a valid attachment. You can disable that, and allow emails without attachments, by accessing the email trigger management modal and disabling the checkbox.
- This step can only ingest data from an email, not download a file. To generate and download a CSV from a link in an email, take the following steps:
- Extract the CSV’s URL from the email content using Extract from email
- Pass the URL into a Run another Flow step at the end of the Flow
- Begin your destination Flow with Pull from file queue
- End the destination Flow with a Generate CSV file step
Extracting data from Excel files with AI
Use the "Extract data with AI" option to extract tables of data and individual values from messy and difficult excel files.
Understanding your Excel data
When extracting data from an Excel file, use the settings to extract a table, or individual values (or both)
- Tables should be composed of columns and rows, with a row representing the names of the columns
- Individual values are single pieces of data that are applicable to the entire document. For example, a date at the top of a document or an invoice number
- Columns and individual values can be given additional information to ensure the tool is identifying and returning the correct information - more on that below!
Step Configuration
Selecting Excel extraction
Once you have an Excel file in your flow, select "Extract data with AI". You will see options to add details to "Extract a table" and/or "Extract individual values".
Clicking on either of those will show additional fields to fill out. Each step can extract 1 table and any number of individual values.

Extract a table
Once you enable table extraction, do the following:
- Give your table a description - this is used by AI to find the table so it's important to be clear and precise, especially if many tables are present.
- Define your columns - each column can be named, given example values, and additional instructions. If a column is conceptually clear (i.e. "Item description") then a name might be all you need. But if the name of the column is ambiguous, or its values are ambiguous, it is best practice to add example cell values, as well as additional instructions describing what this column represents and how an AI should find it.
Extract individual values
Once you enable individual value extraction, do the following:
- Define your value - each value can be named, given example values, and additional instructions. If a value is conceptually clear (i.e. "Port of entry") then a name might be all you need. But if the name of the column is ambiguous, or its values are ambiguous, it is best practice to add example cell values, as well as additional instructions describing what this value represents and how an AI should find it.
Choosing the "type" for a column or individual value
Columns and individual values are Text by default. But you can change that to improve accuracy:
- Text - anything
- True / False - results in either "True" or "False", can be used to detect checkmarks and other indicators
- Number - will remove trailing zeros on any number
- Currency -converts the currency to a number
- Date - uses "2022-09-27T18:00:00.000" format
- Signature - converts signatures to text
- List of options - chooses from a list of possible options you provide
Working with data from PDF files
Check out this Parabola University video for a quick intro to our PDF parsing capabilities, and see below for an overview of how to read and configure your PDF data in Parabola.
Understanding your PDF data
Parabola’s Pull from PDF file step can be configured to return Columns or Keys
- Columns are parts of tables that are likely to have more than one row associated with them
- Keys are single pieces of data that are applicable to the entire document. As an example - “Total” rows or fields like dates that only appear once at the top of a document are best expressed as keys
- Sometimes AI can interpret something as a column or a key that a human might consider the other. If the tool is not correctly pulling a piece of information, you might try experimenting with columns versus keys for that data point
- Both columns and keys can be given additional information from you to ensure the tool is identifying and returning the correct information - more on that below!
Step Configuration
You can use Extract from PDF, Extract from email, and Pull from file queue to parse PDFs. Once you have a PDF file uploaded into your Flow, the configuration settings are uniform.
Extract a table
1. Auto-detected Table (default)
Parabola scans your PDF, detects possible tables, and labels the most likely columns. This option uses LLM technology and works exceptionally well if the PDF document has a clear, structured table. All detected tables will be available in the sub-dropdown under the "Use an auto-detected table" dropdown.
- Quickest setup
- Works best when your table has headers
- You can manually add more columns or keys after
2. Define a Custom Table
Manually define the structure of your table if the AI didn’t pick it up. You can name the table and define the columns that you want to extract from the PDF by clicking on the + Add Column button.
- Good for multi-table documents
- Works well with tables spread across multiple pages
- Requires a bit more setup
3. Extract All Data (OCR-first mode)
Use OCR to return all text from the PDF — helpful if the structure is complex or you're feeding the result into an AI step later. We only recommend this option if the first two extraction methods aren't yielding the desired results.
Return formats:
- All data → Every value, one per row
- Table data → Tables split by page, each with a table ID
- Key-value pairs → Labeled items like SKU: 12345
- Raw text → One cell per page, useful for follow-up AI parsing
Extract values
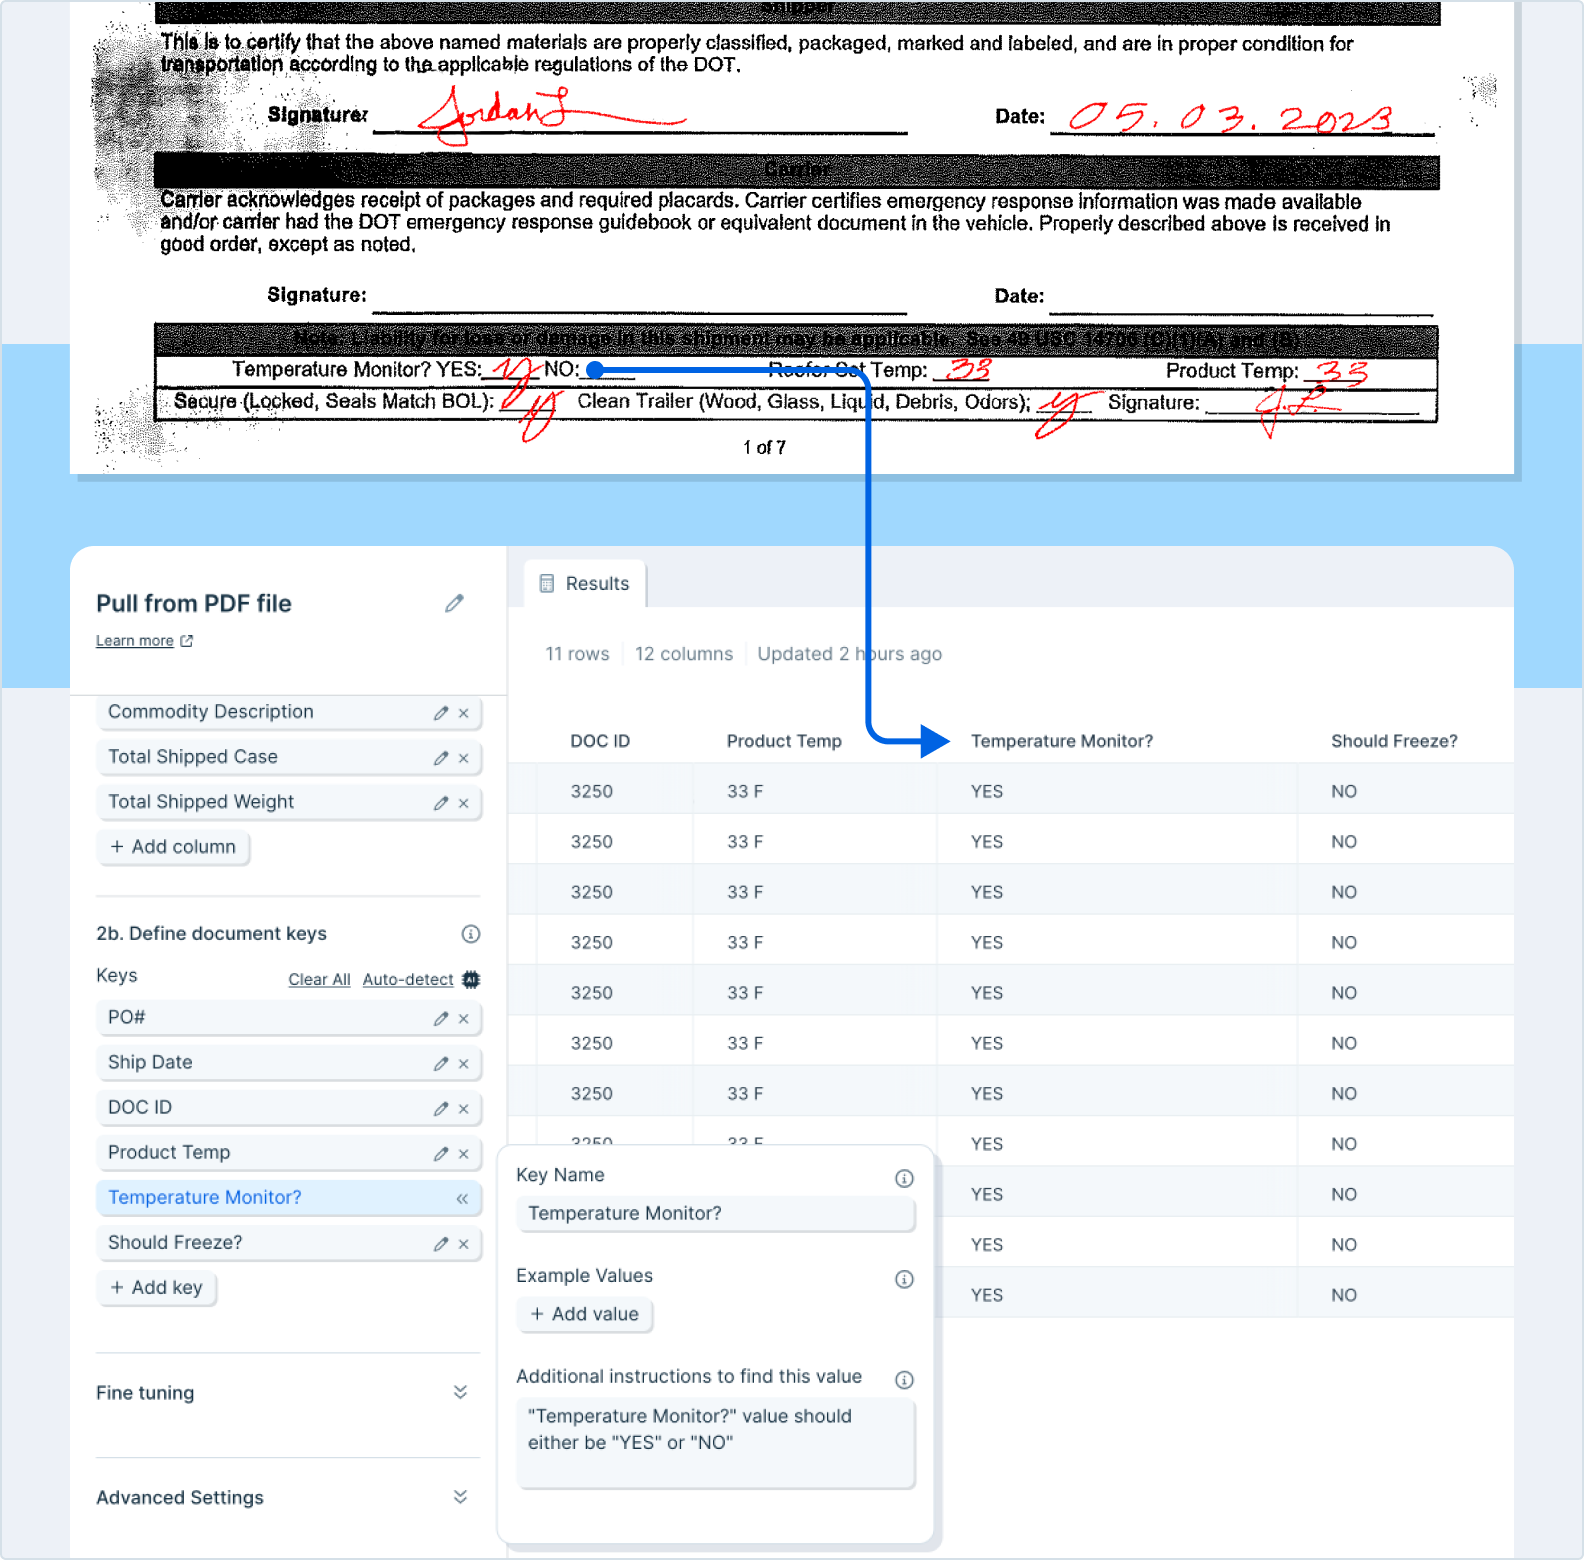
If there are document-level values like invoice date and PO number that you want to extract, add them as keys in this section. You can add this by clicking on the “+ Add key” button. Each key that you configure will be represented as its own column and the value will be repeated across all the rows of the resulting data set.
- Column and key names can be descriptive or instructive, and do not need to match exactly what the PDF says. However, you should try to ensure the name is something that the underlying AI can associate with the desired column of data
- Providing examples is the best way to increase the accuracy of column (or key) parsing
- The “Additional instructions to find this value” field is not required, however, here you can input further instructions on how to identify a value as well as instructions on how to manipulate that value. For example in a scenario where you want to make two distinct columns out of a singular value in the file, say an order number in the format “ABC:123". You might use the prompt - “Take the order ID and extract all of the characters before the “:” into a new column”
See below how in this case with handwriting, with more instructions the tool is able to determine if there is writing next to the word “YES” or “NO”.
Fine Tuning
You can give the AI more context by typing additional context and instructions into this text box. Try using specific examples, or explain the situation and the specific desired outcome. Consult the chat interface on the lefthand side to help you write clear instructions.
Advanced Settings
1. Text parsing approach
You can specify the text parsing approach if necessary. The default setting is “Auto” and we recommend keeping it this way if possible. If it’s not properly parsing your PDF, you can choose between “OCR” and “Markdown”.
- OCR - This will use a more sophisticated version of OCR text extraction that can be helpful for complex documents such as those with handwriting. This more advanced model may, however, result in the tool running slower.
- Markdown - This will use Markdown for parsing. It is generally faster for parsing and may work better for certain documents, like pdfs that have nested columns and rows.
2. Retry step on error
The checkbox will be checked by default. LLMs can occasionally return unexpected errors and oftentimes, re-running the step will resolve the issue. When checked, this step will automatically attempt to re-run one time when encountering an unexpected error.
3. Auto-update prompt versions
The checkbox will be unchecked by default. Occasionally Parabola updates step prompts in order to make parsing results more accurate/reliable. These updates may change output results, and as a result, auto-updating is turned off by default. Enable this setting to always use the most reset prompt versions.
4. Page filtering
The checkbox will be unchecked by default. This setting allows users to define specific pages of a document to parse. If you only need specific values that are consistently on the same page(s), this can drastically improve run time. If you do check this box off, please make sure to complete the dropdown settings that appear below.
- Keep, Remove, or Autodetect
- The Autodetect option will allow the parser to choose what pages to use.
- The first, the last, or these
- If you select “the first”, input a number in the “#” box to instruct how many pages from the beginning of the file should be parsed.
- If you select “the last”, input a number in the #” box to instruct how many pages from the end of the file should be parsed.
- If you select “these”, input a comma-separated list of numbers in the blank box to specify which pages. For example, if you put “1, 10, 16”, the step will parse the first, tenth, and sixteenth page only of the file.
- If you select “the first”, input a number in the “#” box to instruct how many pages from the beginning of the file should be parsed.
Usage tips & Other Notes
- The more document pages that are needed for parsing, the longer it may take. To expedite this process, you can configure the step to only review certain pages from your file. The fewer the pages, the faster the results!
- If you need to pull data across multiple tables (from a single file), you will likely need multiple steps – one per table.
- File size: PDF files must be <500 MB and 30 pages
- PDFs cannot be password protected
- We recommend always auditing the results returned in Parabola to ensure that they’re complete
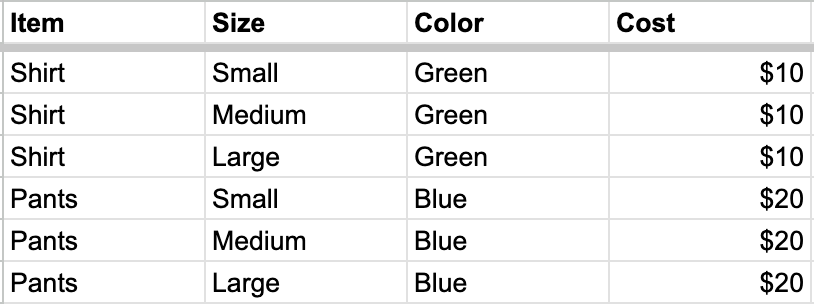
Using child columns
Mark columns as “Child columns” if they contain rows that have values unique from the parent columns:
Before:
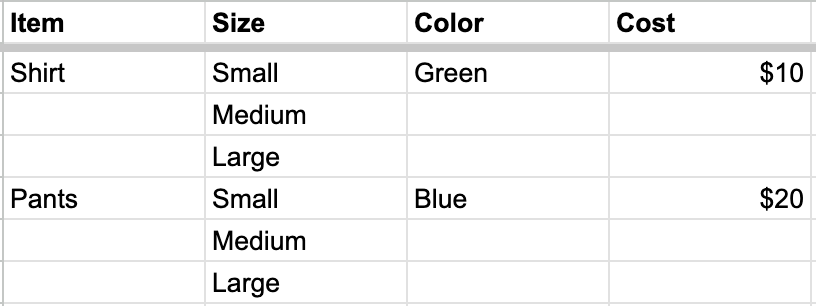
After marking “Size” as a child column: