What is an API?
An API (Application Programming Interface) is a set of rules that allows different software applications to communicate with each other. APIs enable businesses to connect systems, automate data exchanges, and extend the functionality of their applications. They are widely used for integrating third-party services, retrieving real-time data, and building custom workflows.Are you a technology team looking for a developer portal to build an integration?
While we don’t currently have a developer portal for building custom integrations, Parabola can integrate with other apps in a few key ways: our API steps (Pull from an API, Enrich with an API, and Send to an API). We also can pull in data from emails or an FTP server, so if your app supports exporting data to one of those sources, we can have something close to an integration up and running. If you’d like to discuss more of a formal partnership with a native integration, feel free to reach out to us at help@parabola.io.General API concepts
The first time interacting with an API can feel daunting. Each API is unique and requires different settings, but is generally standardized to make understanding and connecting to an API accessible. To learn how to best use APIs in Parabola, check out our video guides.Types of APIs
Parabola works best with two types of APIs. The most common API type to connect to is a REST API. Another API type rising in popularity is a GraphQL API. Parabola may be able to connect to a SOAP API, but it is unlikely due to how they are structured. To evaluate if Parabola can connect with an API, reference this flow chart.REST API
A REST API is an API that can return data by making a request to a specific URL. Each request is sent to a specific resource of an API using a unique Endpoint URL. A resource is an object that contains the data being requested. Common examples of a resource include Orders, Customers, Transactions, and Events. To receive a list of orders in Squarespace, the Pull from an API step will make a request to the Squarespace’s Orders resource using an Endpoint URL:GraphQL API
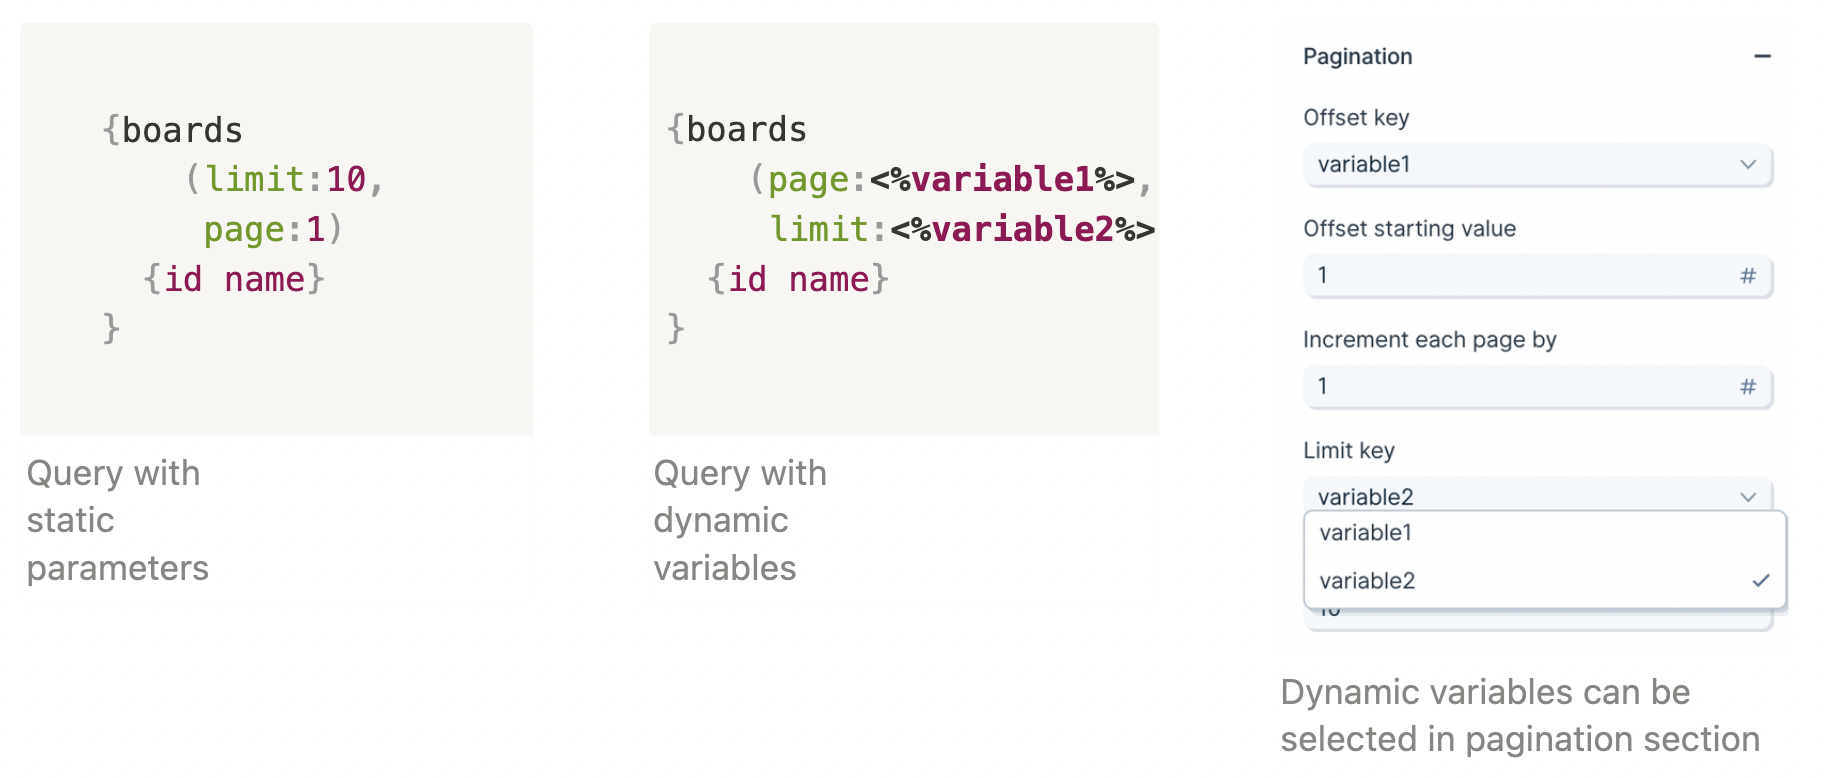
GraphQL is a new type of API that allows Parabola to specify the exact data it needs from an API resource through a request syntax known as a GraphQL query. To get started with this type of API call in Parabola, set the request type to “POST” in any API step, then select “GraphQL” as the Protocol of the request body. Once your request type is set, you can enter your query directly into the request body. When forming your query, it can be helpful to use a formatting tool to ensure correct syntax. Our GraphQL implementation current supports Offset Limit pagination, using variables inserted directly into the query. Variables can be created by inserting any single word between the brackets'<%%>'. Once created, variables will appear in the dropdown list in the “Pagination” section. One of these variables should correspond to your “limit”, and the other should correspond to “offset.”
Reading API documentation
The first step to connect to an API is to read the documentation that the service provides. Oftentimes, the documentation is commonly referred to as the API Reference, or something similar. These pages tend to feature URL and code block content. The API Reference, always provides at least two points of instruction. The first point outlines how to Authenticate a request to give a user or application permission to access the data. The second point outlines the API resources and Endpoint URLs, or where a request can be sent.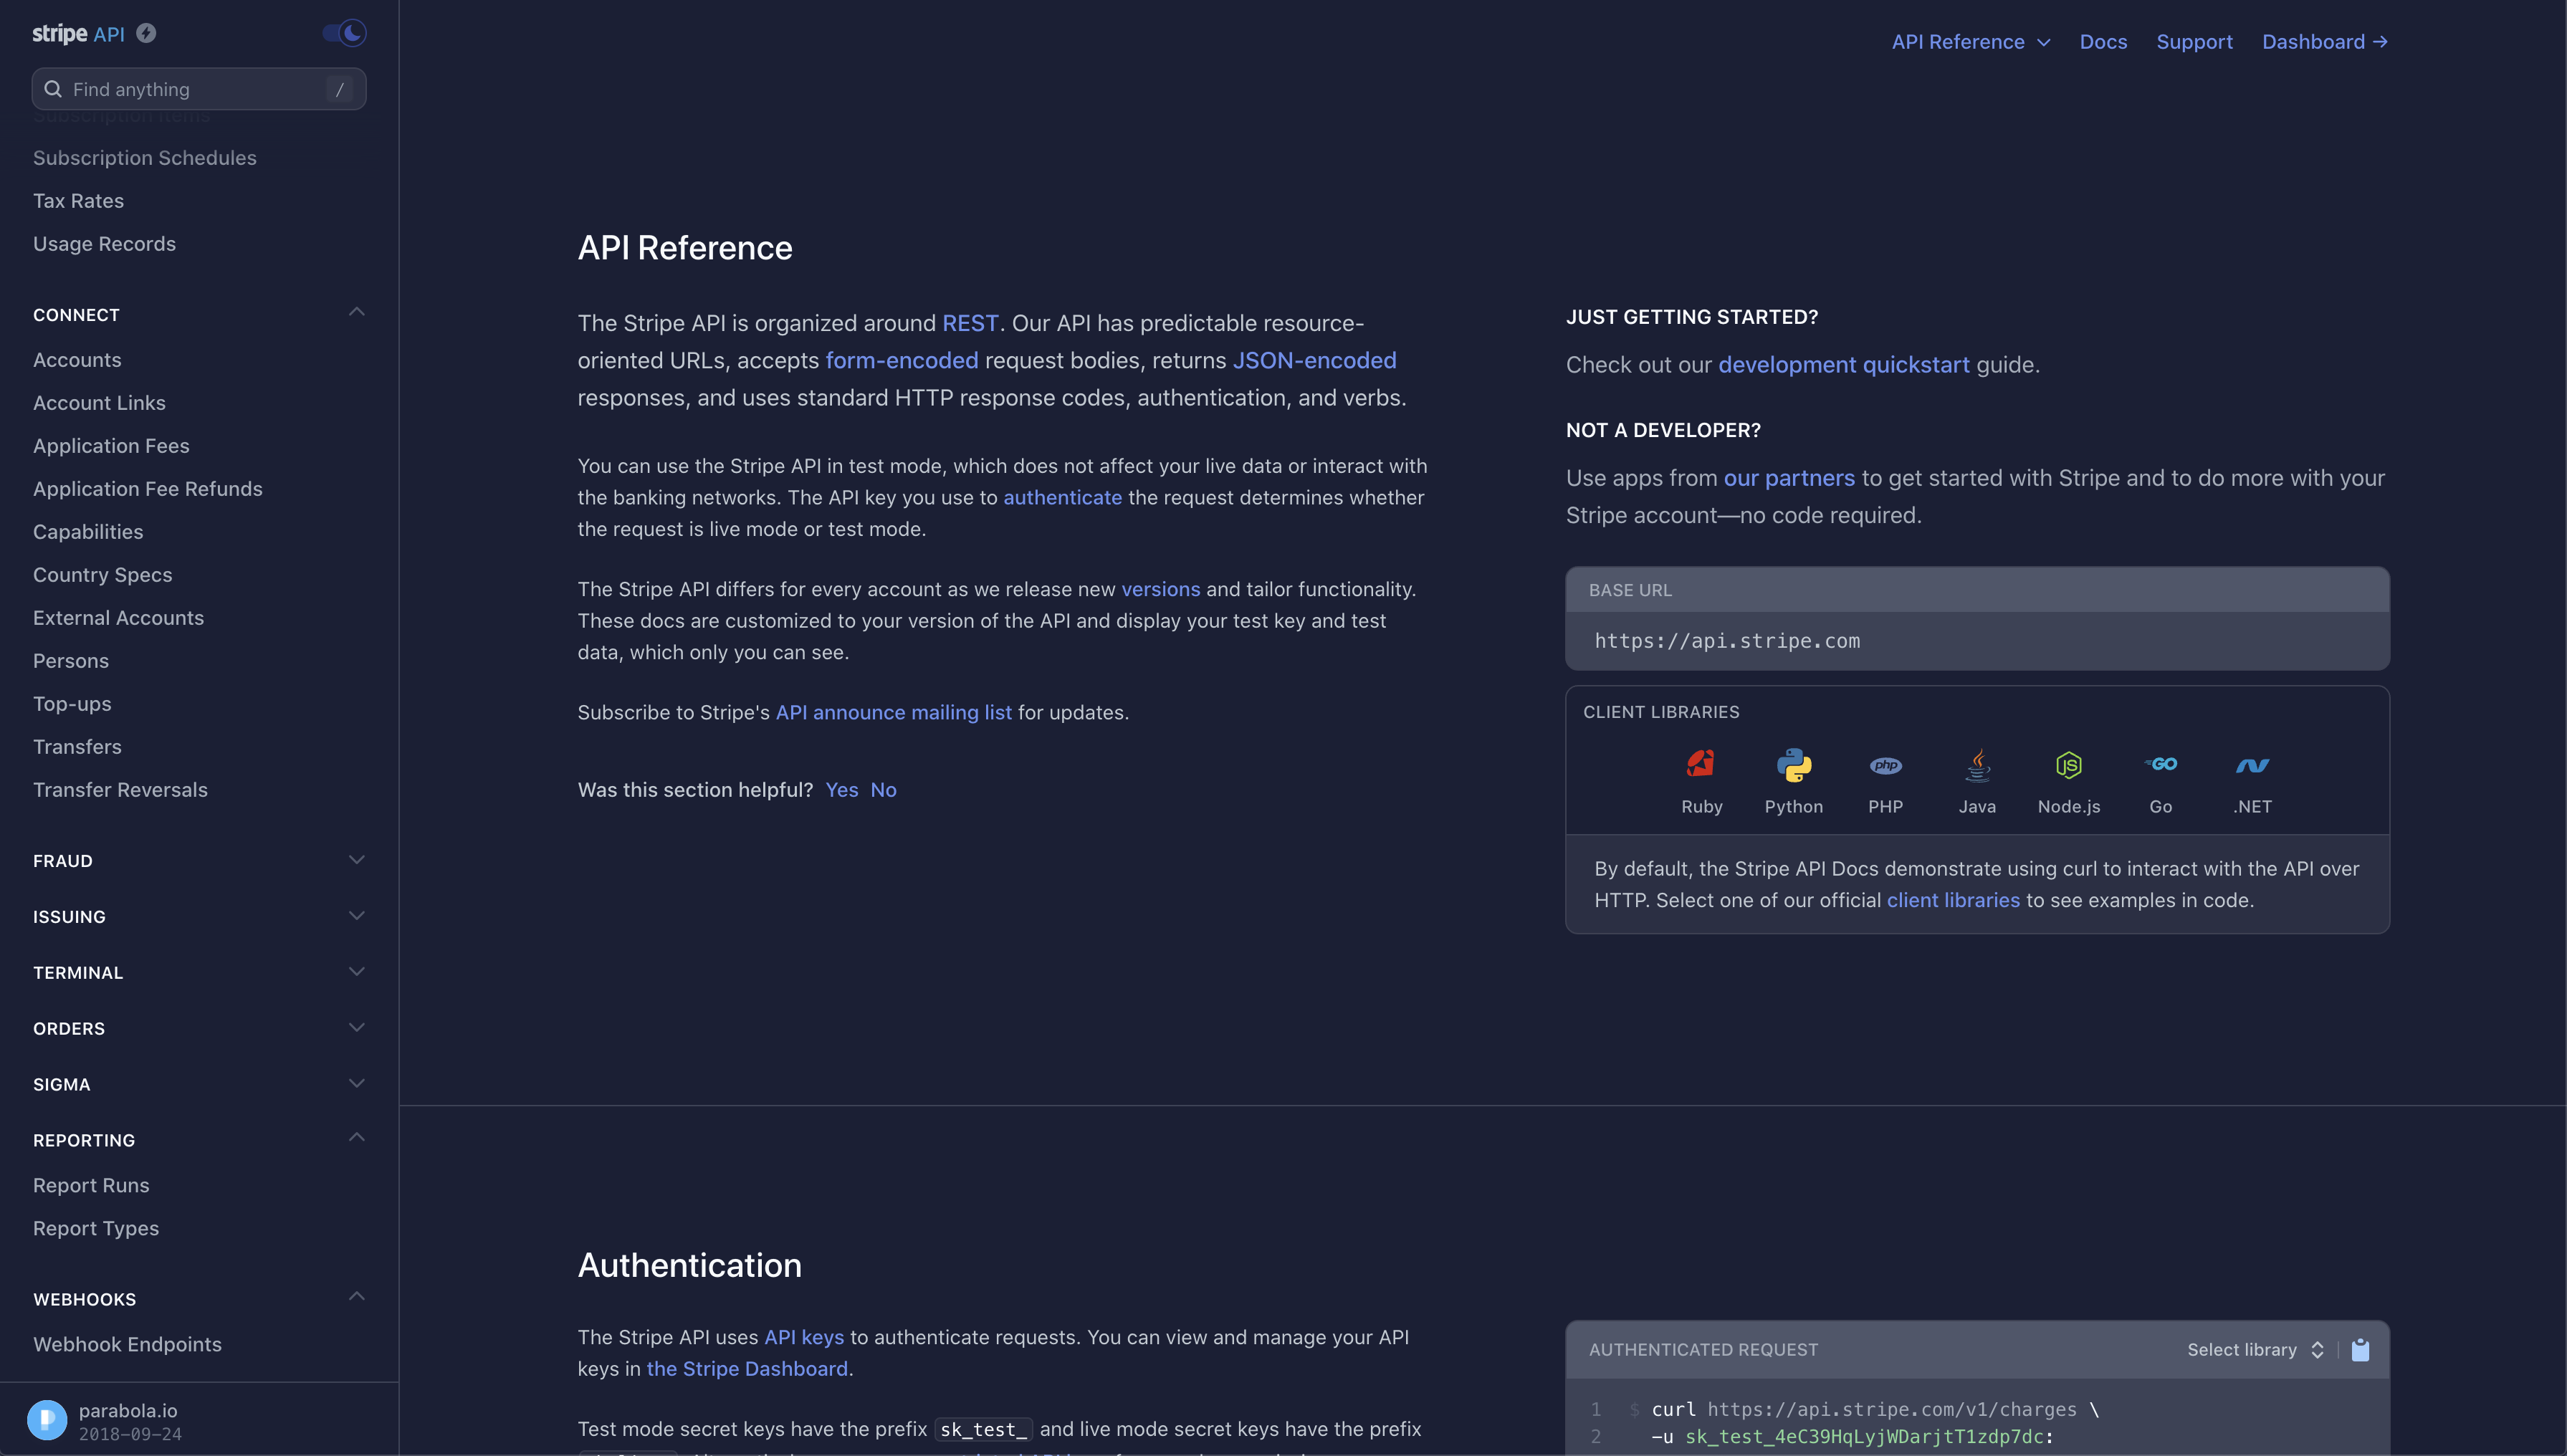
Authentication
Most APIs require authentication to access their data. This is likely the first part of their documentation. Try searching for the word “Authentication” in their documentation.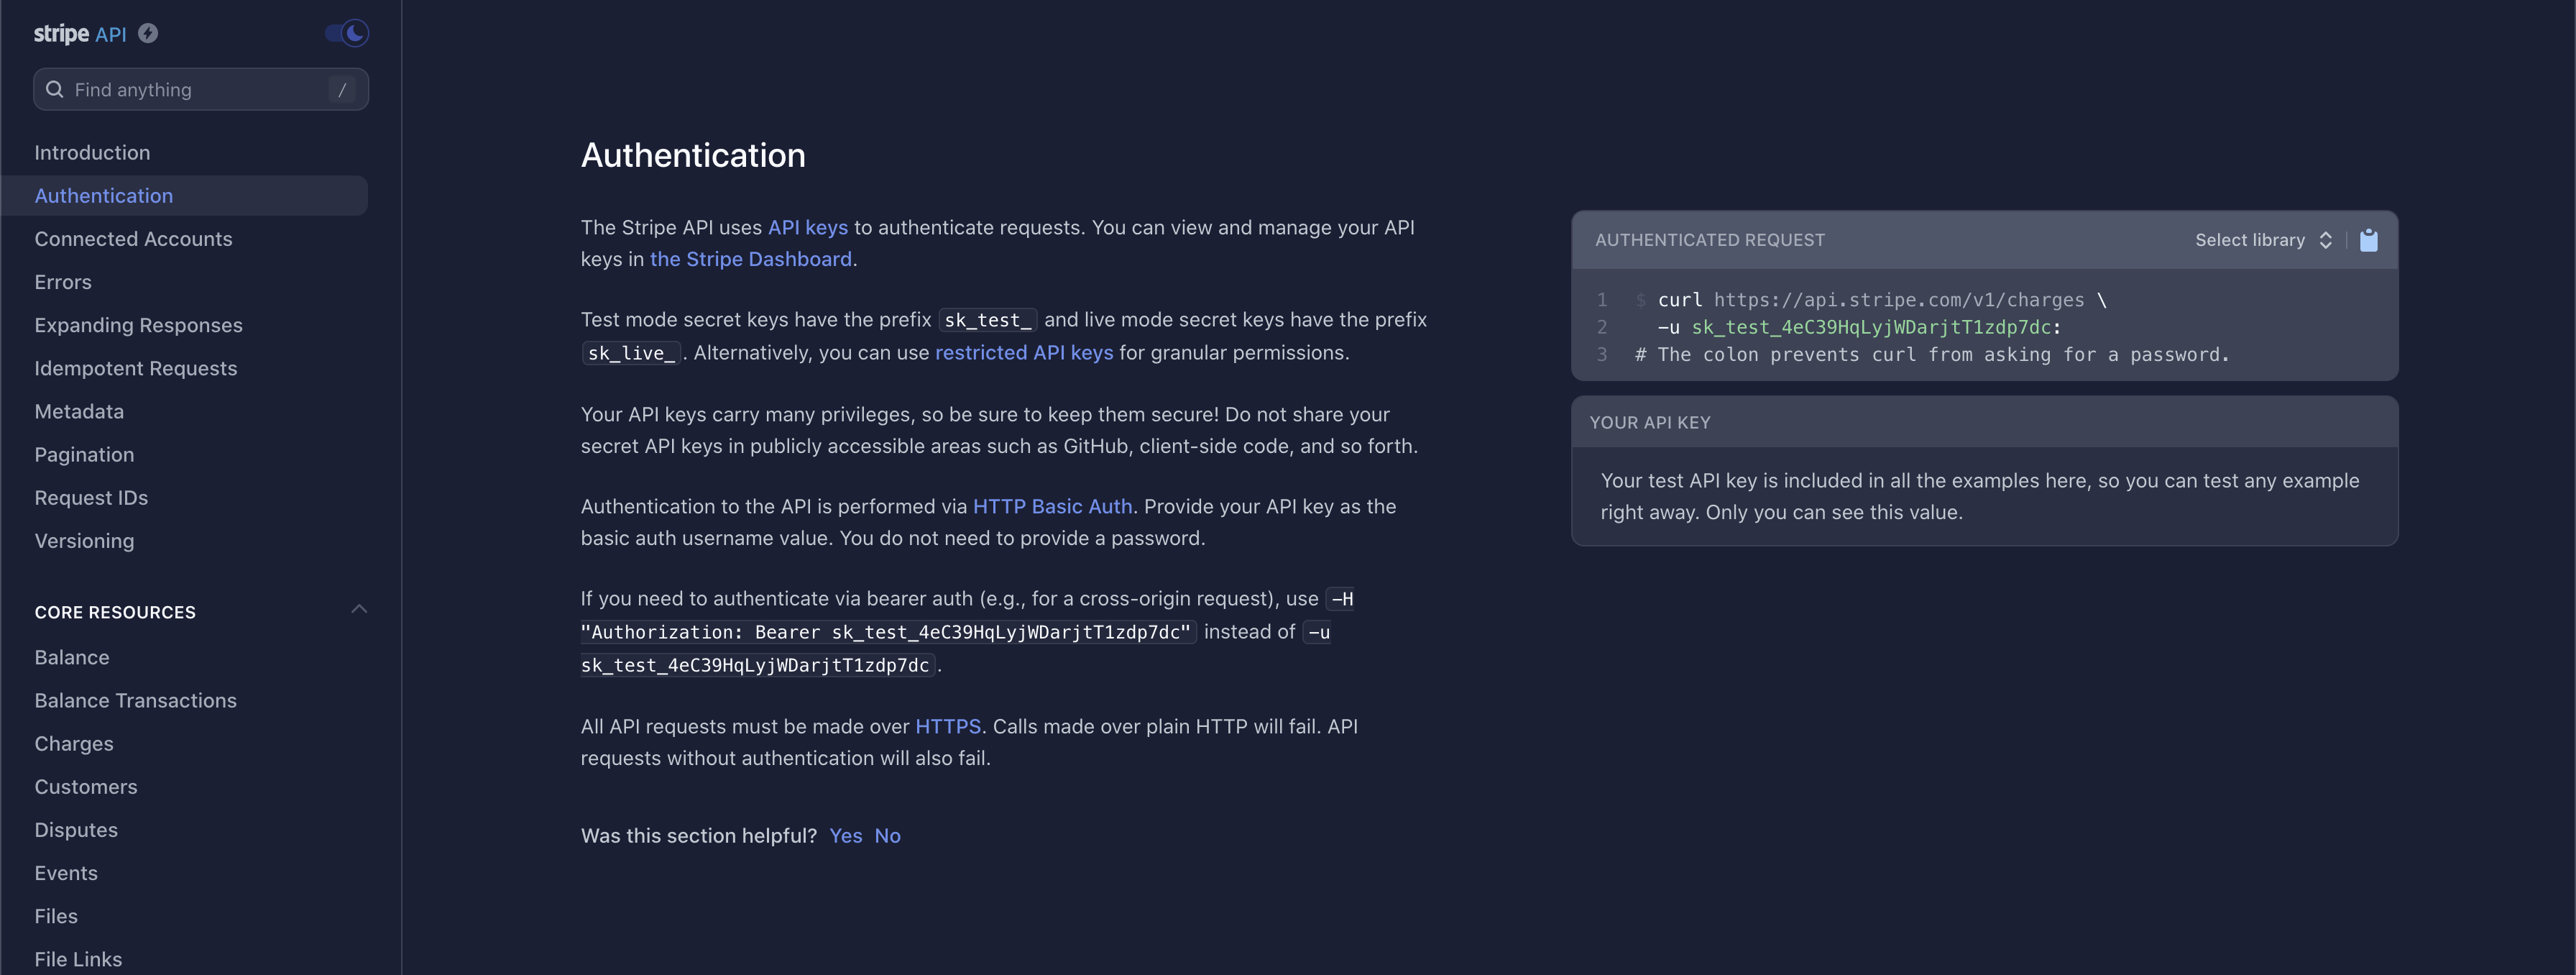
Bearer Tokens, Username/Password (also referred to as Basic), and OAuth2.0.
Bearer Token
This method requires you to send your API Key or API Token as abearer token. Take a look at this example below:

bearer token is this:
Username/Password (Basic)
This method is also referred to as Basic Authorization or simply Basic. Most often, the username and password used to sign into the service can be entered here. However, some APIs require an API key to be used as a username, password, or both. If that’s the case, insert the API key into the respective field noted in the documentation. The example below demonstrates how to connect to Stripe’s API using the Basic Authorization method.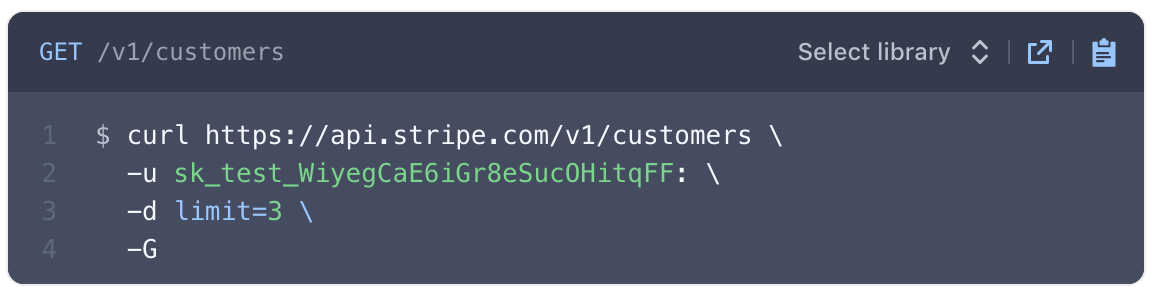
- The -u indicates Basic Authorization.
- Most APIs reference the username and password formatted as username:password. There is a colon : . This indicates that only a username is required for authentication.
OAuth2.0
This method is an authorization protocol that allows users to sign into a platform using a third-party account.OAuth2.0 allows a user to selectively grant access for various applications they may want to use.
Authenticating via OAuth2.0 does require more time to configure. For more details on how to authorize using this method, read our guide Using OAuth2.0 in Parabola.
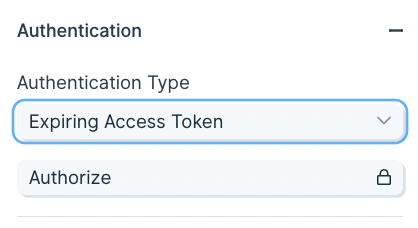
Expiring Access Token
Some APIs will require users to generate access tokens that have short expirations. Generally, any token that expires in less than 1 day is considered to be “short-lived” and may be using this type of authentication. This type of authentication in Parabola serves a grouping of related authentication styles that generally follow the same pattern. One very specific type of authentication that is served by this option in Parabola is calledOAuth2.0 Client Credentials. This differs from our standard OAuth2.0 support, which is built specifically for OAuth2.0 Authorization Code. Both Client Credentials and Authorization Code are part of the OAuth2.0 spec, but represent different Grant Types.
Authenticating with the Expiring Access Token option is more complex than options like Bearer Token, but less complex than OAuth2.0. For more details on how to use this option, read our guide Using Expiring Access Tokens in Parabola.
Resources
A resource is a specific category or type of data that can be queried using a unique Endpoint URL. For example, to get a list of customers, you might use the Customer resource. To add emails to a campaign, use the Campaign resource. Each resource has a variety of Endpoint URLs that instruct you how to structure a URL to make a request to a resource. Stripe has a list of resources including “Balance”, “Charges”, “Events”, “Payouts”, and “Refunds”.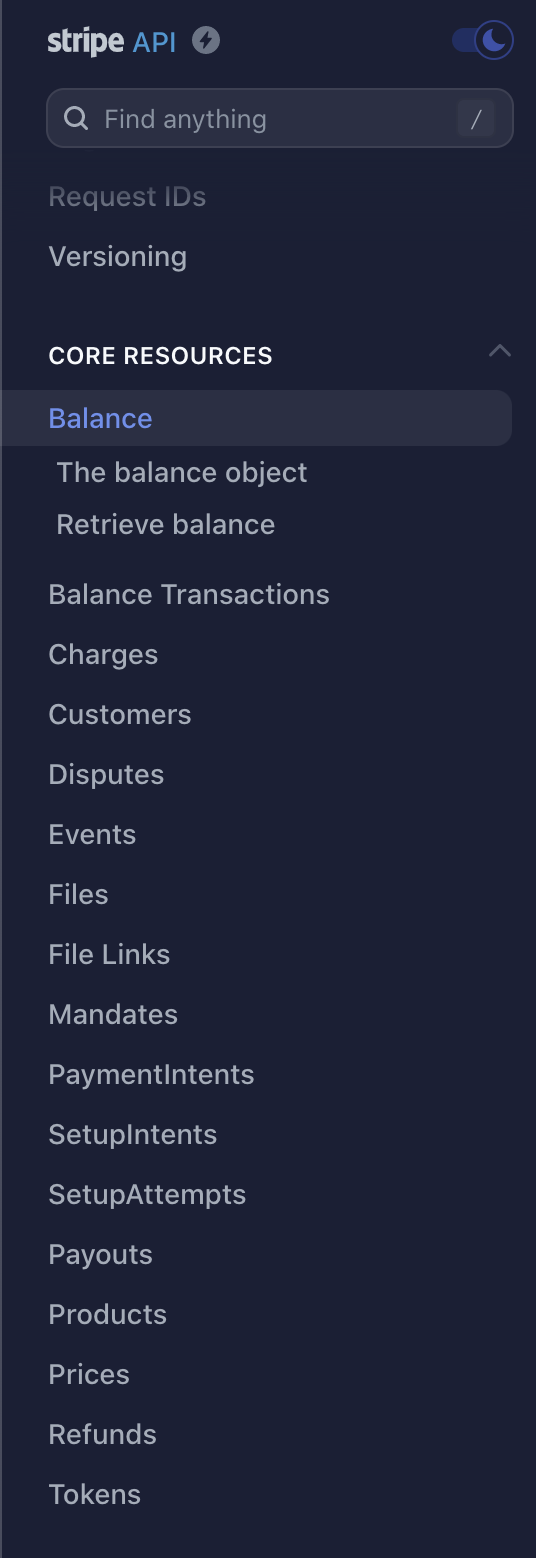
HTTP methods
HTTP methods, or verbs, are a specific type of action to make when sending a request to a resource. The primary verbs areGET, POST, PUT, PATCH, and DELETE.
- The
GETverb is used to receive data. - The
POSTverb is used to create new data. - The
PUTverb is used to update existing data. - The
PATCHverb is used to modify a specific portion of the data. - The
DELETEverb is used to delete data.
Custom headers
A header is a piece of additional information to be sent with the request to an API. If an API requires additional headers, it is commonly noted in their documentation as -H. Remember the authentication methods above? Some APIs list the authentication type to be sent as a header. Since Parabola has specific fields for authentication, those headers can typically be ignored. Taking a look at Webflow’s API, they show two headers are required: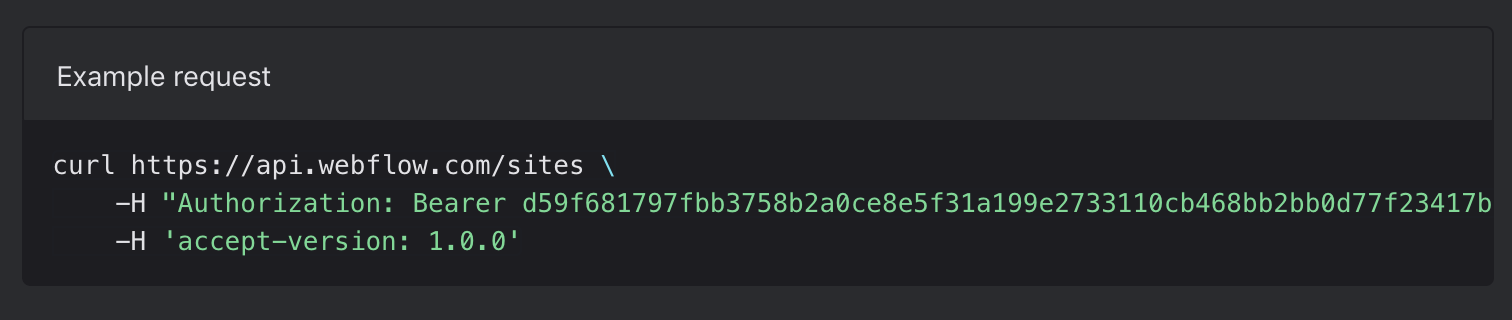
JSON
JavaScript Object Notation, or more commonly JSON, is a way for an API to exchange data between you and a third-party. JSON is follows a specific set of syntax rules. An object is set of key:value pairs and is wrapped in curly brackets . An array is a list of values linked to a single key or a list of keys linked to a single object. JSON in API documentation may look like this: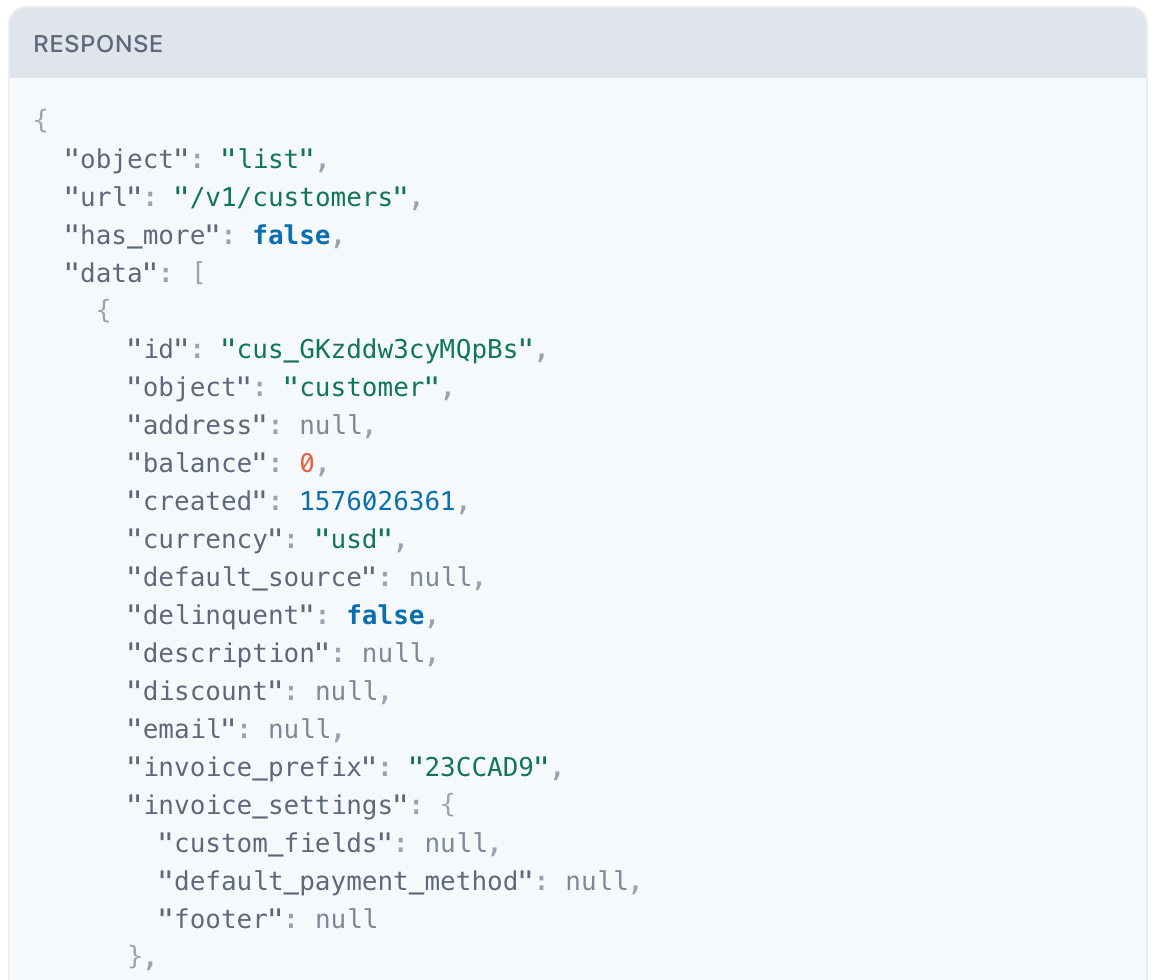
Interpreting cURL
Most documentation will use cURL to demonstrate how to make a request using an API. Let’s take a look at this cURL example referenced in Spotify’s API:- Method:
GET - Resource: artists
- Endpoint URL:
- Authorization:
Bearer token - Headers: “Authorization: Bearer
{your access token}”
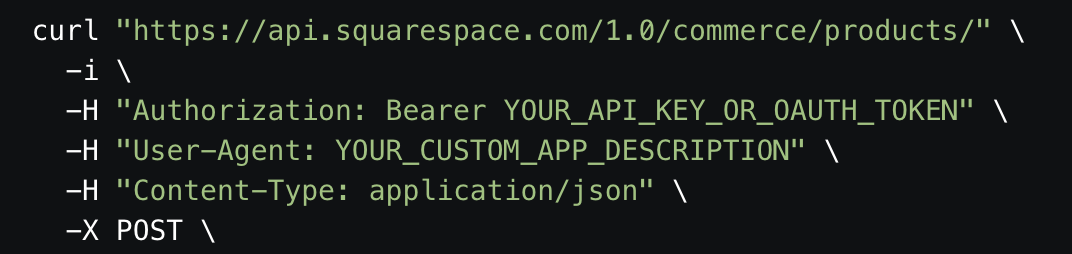
- Method:
POST - Resource: products
- Endpoint URL:
- Authorization:
Bearer token - Headers:
- Content-Type: application/json
Domain allowlist for API steps
Domain allowlist controls are available on the Enterprise plan. Reach out to your account manager or help@parabola.io to enable them.
- Limit data egress to a known set of vendor APIs
- Prevent flows from pulling data from unapproved third-party services
- Satisfy security review requirements around outbound network calls
How it works
- An Org Admin defines an allowlist of domains for the organization (for example,
api.shopify.com,api.stripe.com). - When a user configures an API step, Parabola validates the endpoint URL against the allowlist before the step can run.
- Existing API steps pointed at disallowed domains will fail on their next run, and the run history will show the domain was blocked by the allowlist.
Parabola API steps
Parabola has three API steps, each designed for a different purpose:- Pull from an API — Import data from an external API into your flow
- Send to an API — Export data from your flow to an external API
- Enrich with API — Make row-by-row API requests to append data to your existing dataset
Pull from an API
The Pull from an API step sends a request to an API to return specific data. In order for Parabola to receive this data, it must be returned in a CSV, JSON, or XML format. This step allows Parabola to connect to a third-party to import data from another service, platform, or account. You might wonder when it is best to use the Pull from API step vs Enrich with API step. If you need to take existing data and pass it through an API, we recommend you use Enrich with API in the middle of the flow. Enrich with API makes requests row by row. If you just need to fetch data and join it into the middle of a flow, you could use the “Pull from API” step and then a join step.Basic settings
To use the Pull from an API step, the “Request Type” and “API Endpoint URL” fields are required.
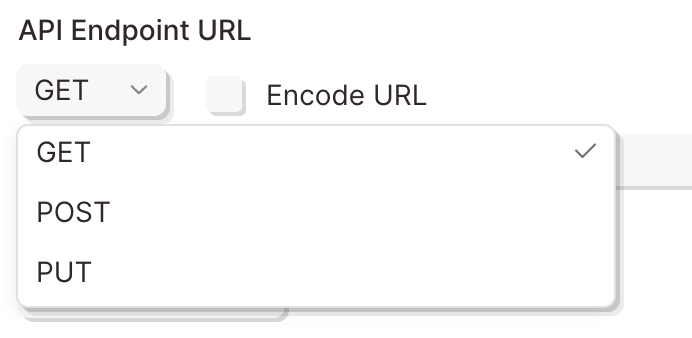
Request type
There are two ways to request data from an API: using aGET request or using a POST request. These are also referred to as verbs, and are standardized throughout REST APIs.
GET request. A GET request is a simple way to ask for existing data from an API.
“Hey API, can you GET me data from the server?”
To receive all artists from Spotify, their documentation outlines using GET request to Artist resource using this Endpoint URL:

POST request to import data, however it is uncommon. A POST request is a simple way to make changes to existing data such as adding a new user to a table.
The request information is sent to the API in theJSON body of the request. The JSON body is a block that outlines the data that will be added.
Hey API, can you POST my new data to the server? The new data is in the JSON body.
API Endpoint URL
Similar to typical websites, APIs use URLs to request or modify data. More specifically, an API Endpoint URL is used to determine where to request data from or where to send new data to. Below is an example of an API Endpoint URL.
+Add icon under the “URL Parameters” text in that editor. The endpoint dynamically changes based on the key/value pairs entered into this field.
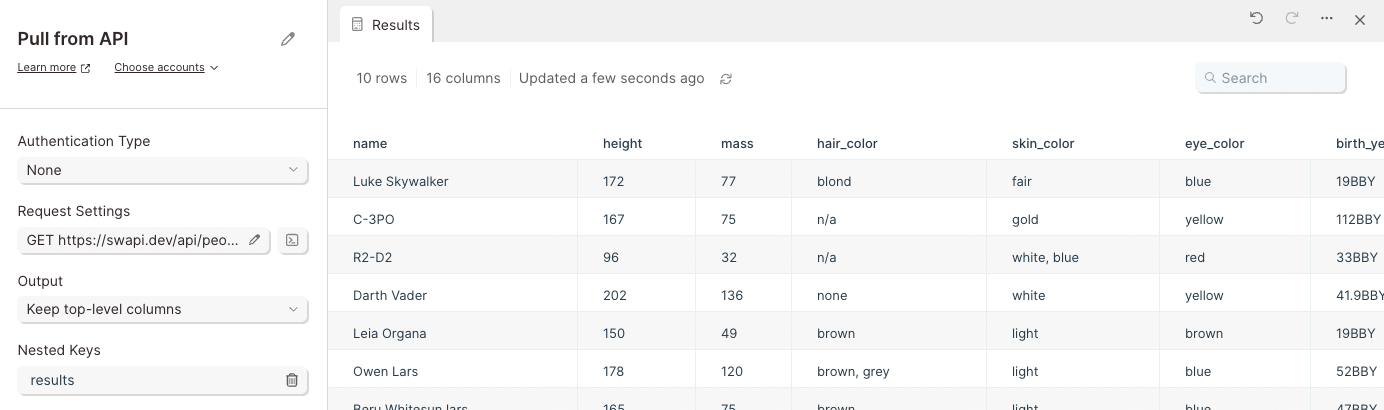
Response JSON
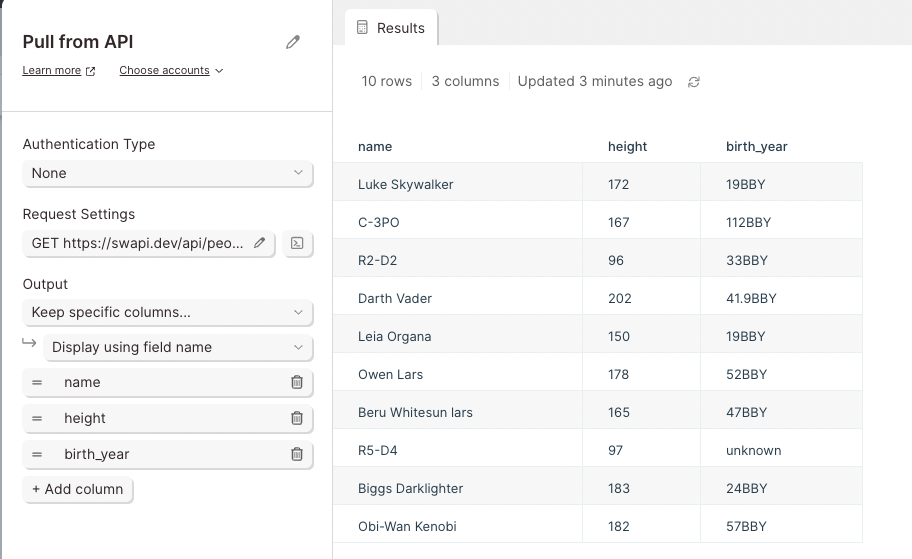
APIs typically to structure data as a nested objects. This means data can exist inside data. To extract that data into separate columns and rows, use the Output section to select a top-level column. For example, a character can exist as a data object. Inside the result object, additional data is included such as their name, date of birth, and location.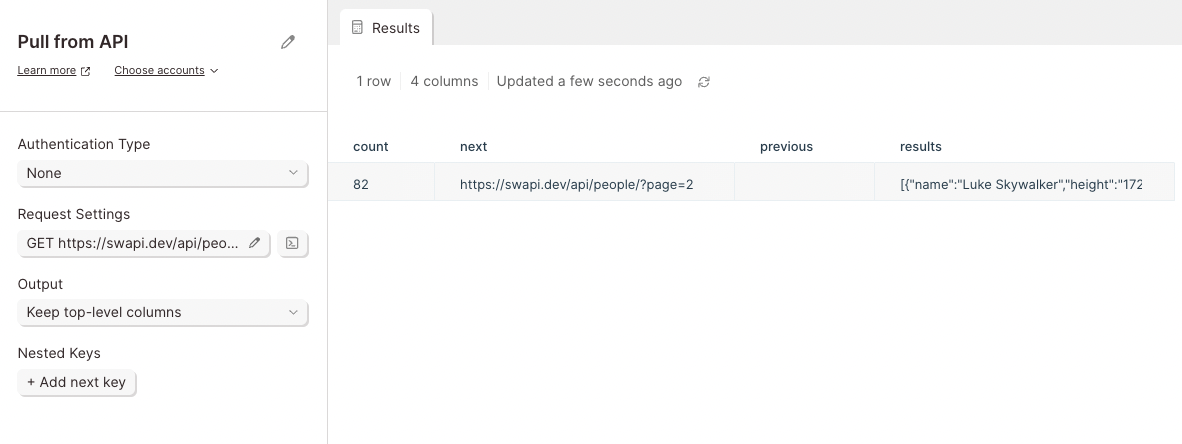
results as the top-level column in the Output section.
Pagination
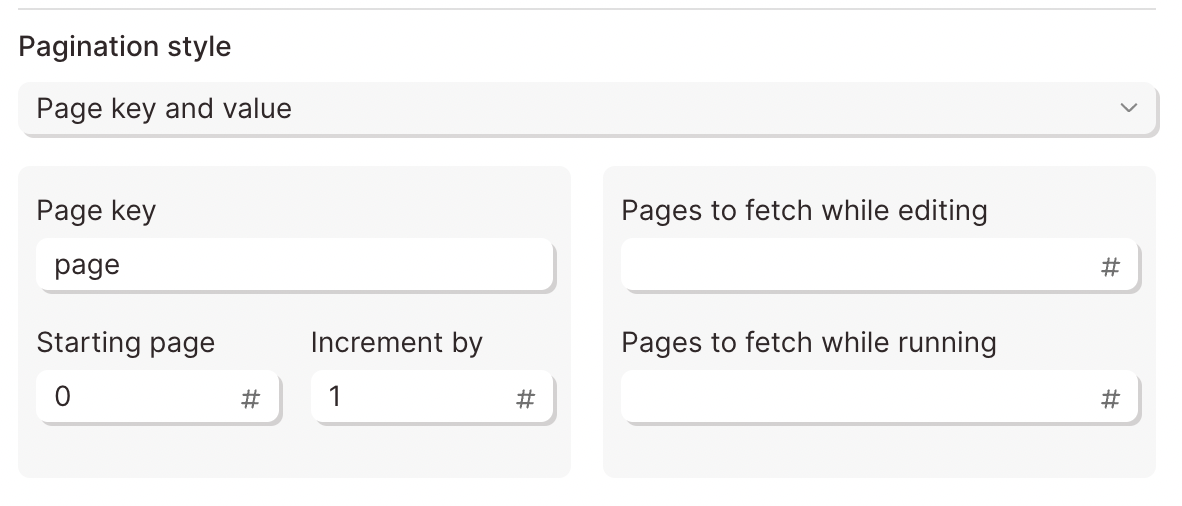
APIs return data in pages. This might not be noticeable for small requests, but larger request will not show all results. APIs return 1 page of results. To view the other pages, pagination settings must configured Each API has different Pagination settings which can be searched in their documentation. The three main types of pagination are Page, Offset and Limit, and Cursor based pagination.Page based pagination
APIs that use Page based pagination make it easy to request more pages. Documentation will refer to a specific parameter key for each request to return additional pages. Intercom uses this style of pagination. Notice they reference the specific parameter key of page:
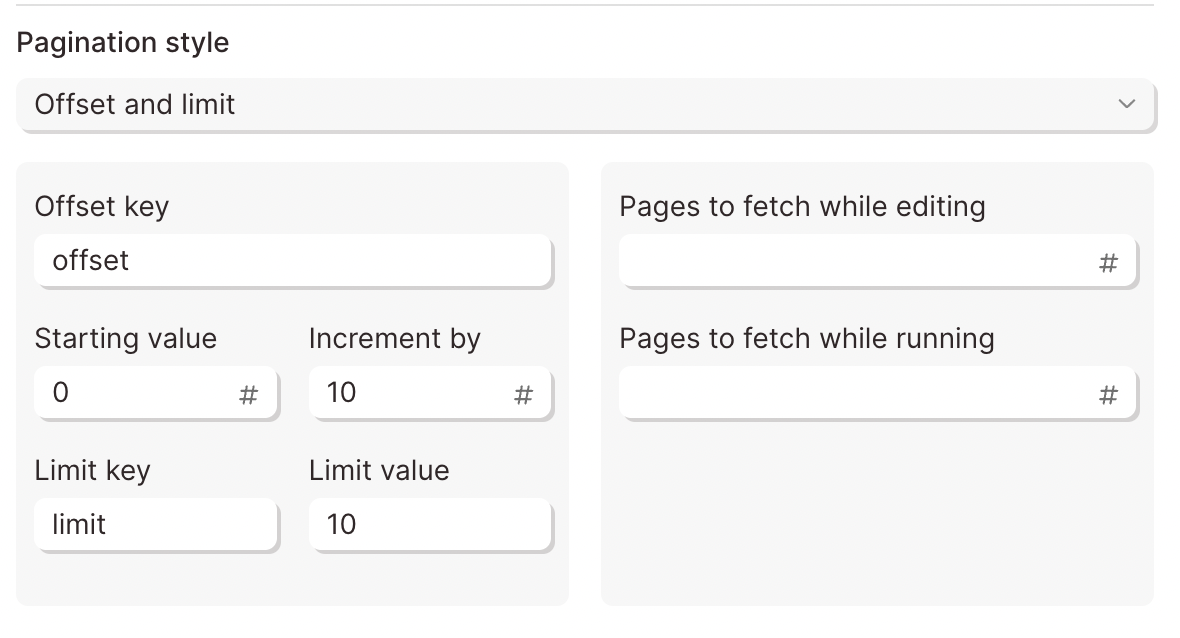
Offset and limit based pagination
APIs that use Offset and Limit based pagination require each request to limit the amount of items per page. Once that limit is reached, an offset is used to cycle through those pages. Spotify refers to this type of pagination in their documentation: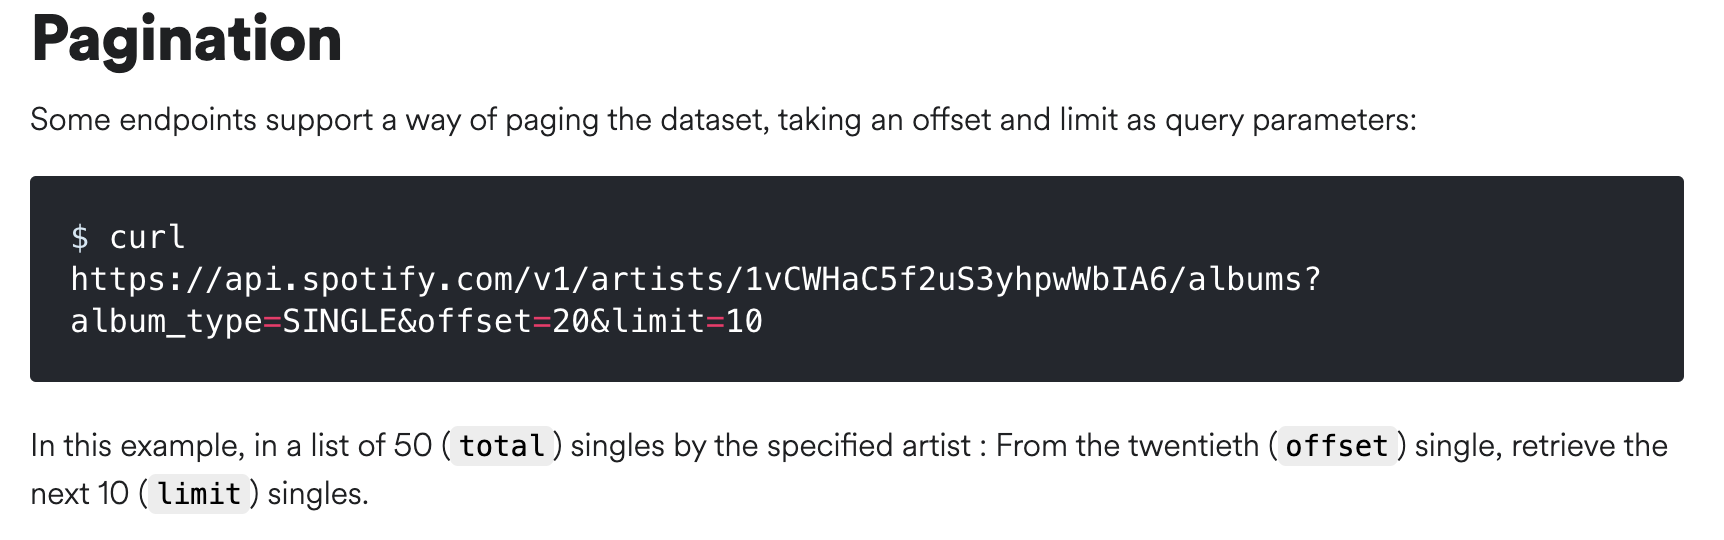
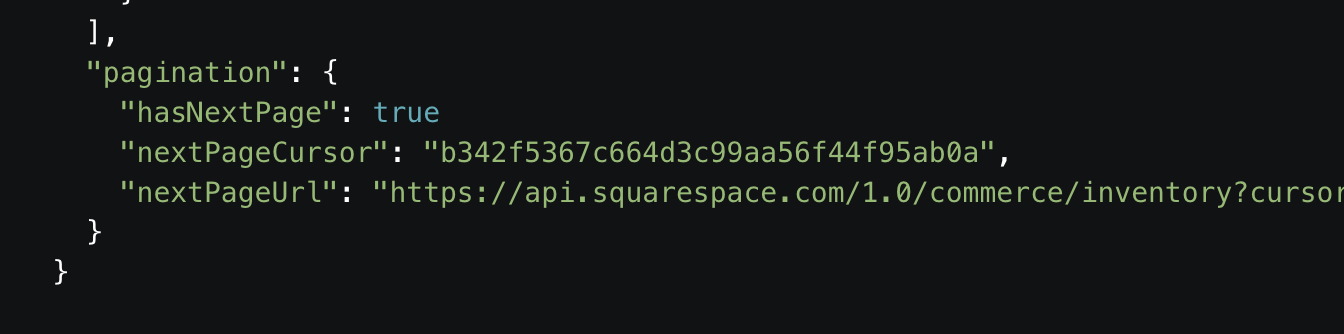
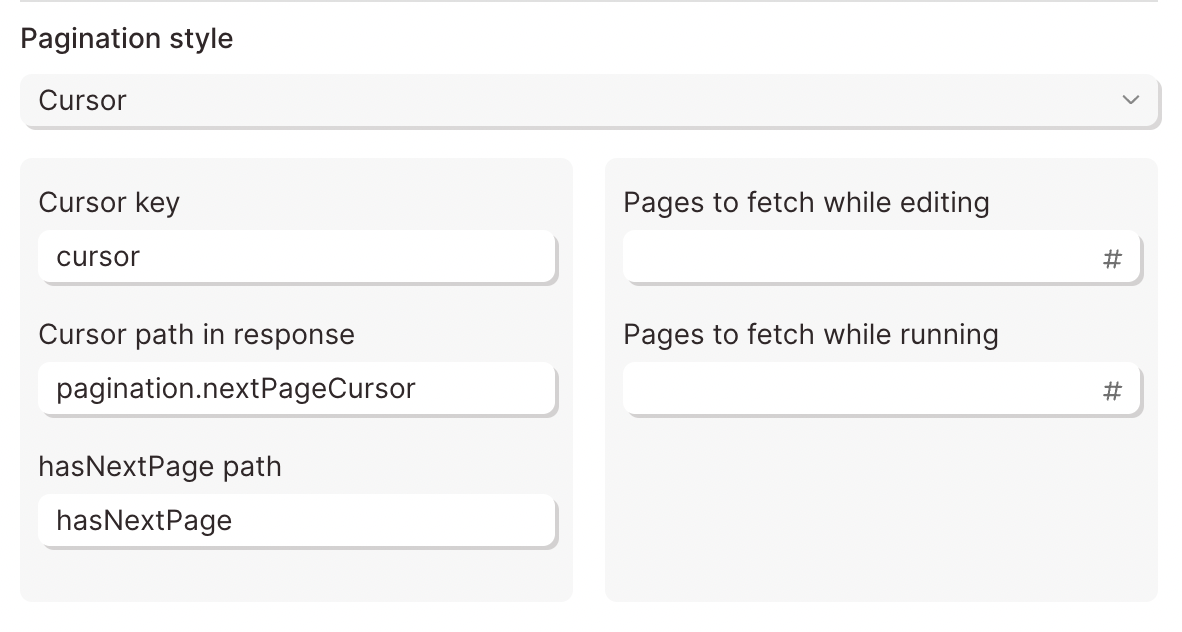
Cursor based pagination
Otherwise known as the bookmark of APIs, Cursor based pagination will mark a specific item with a cursor. To return additional pages, the API looks for a specific Cursor Key linked to a unique value or URL. Squarespace uses cursor based pagination. Their documentation states that two Cursor Keys can be used. The first one is called nextPageCursor and has a unique value: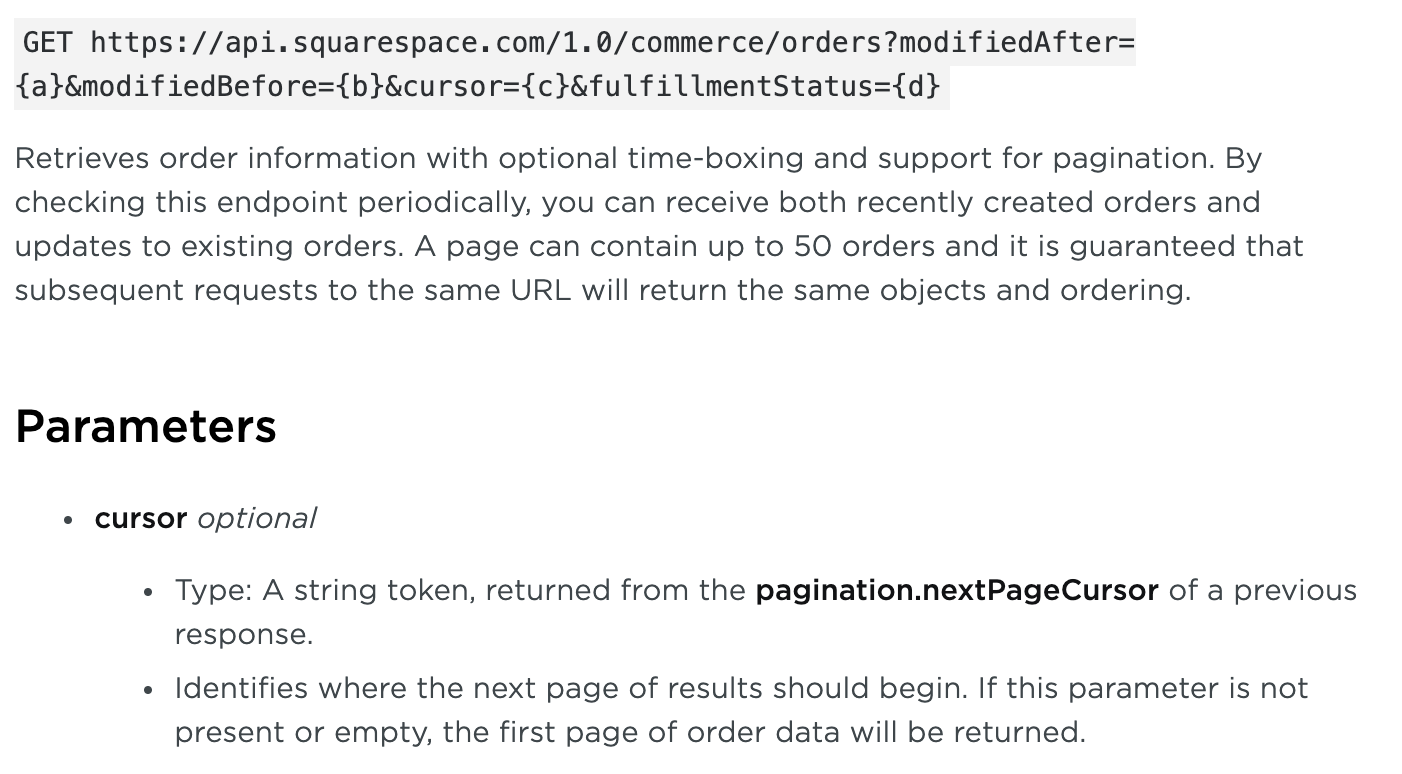
Rate limiting
Imagine someone asking thousands of questions all at once. Before the first question can be answered thousands of new questions are coming in. That can become overwhelming. Servers are no different. Making paginated API calls requires a separate request for each page. To avoid this, APIs have rate limiting rules to protect their servers from being overwhelmed with requests. Parabola can adjust the Max Requests per Minute to avoid rate limiting.
Max pages to fetch
To limit the amount of pages to fetch use this field to set the value. Lower values will return data much faster. Higher values will take longer return data.
Encode URLs
URLs tend to break when there are special characters like spaces, accented characters, or even other URLs. Most often, this occurs when using{text merge} values to dynamically insert data into a URL.
Check the “Encode URLs” box to prevent the URL from breaking if special characters need to be passed.

Response type
By default, this step will parse the data sent back to Parabola from the API in the format indicated by the content-type header received. Sometimes, APIs will send a content-type that Parabola does not know how to parse. In these cases, adjust this setting from auto-detect to a different setting, to force the step to parse the data in a specific way.
Tips and troubleshooting
- Please note that the Pull from API step cannot extract dynamic ranges, such as date. We suggest taking existing data—even just a Start with date & time step—and using an Enrich with API step to create a flow whose parameters update on each flow run.
- Parabola will never limit API calls according to a user’s plan—rate limiting is at the discretion of the user, and may be restricted natively by the API.
- We recommend using an API key that is unique to Parabola. This is not strictly necessary, but it helps with troubleshooting and debugging!
Send to an API
The Send to an API step sends a request to an API to export specific data. Data must be sent through the API using JSON formatted in the body of the request. This step can send data only when a flow is published.Input
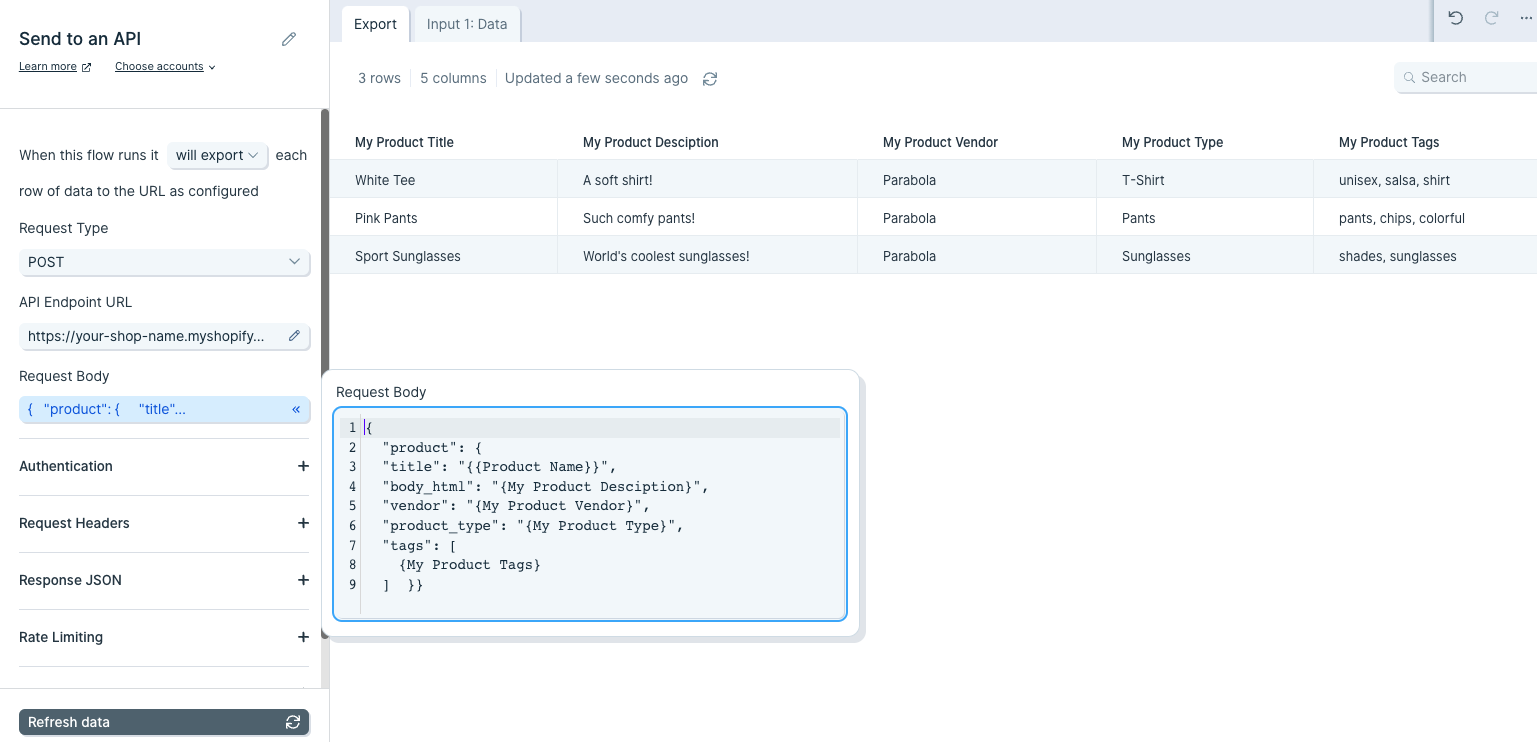
This table shows the product information for new products to be added to a store. It shows common columns like “My Product Title”, “My Product Description”, “My Product Vendor”, “My Product Tags”. These values can be used to create products in bulk via the Send to an API step.
Basic settings
To use the Send to an API step, a Request Type, API Endpoint URL, and Authentication are required. Some APIs require Custom Headers while other APIs nest their data into a single cell that requires a Top Level Key to format into rows and columns.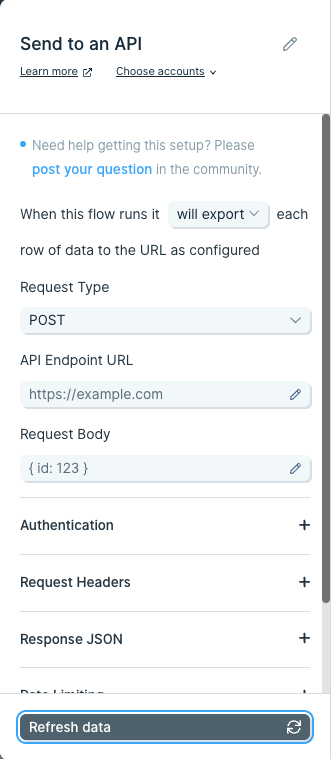
Request type
There are four ways to send data with an API usingPOST, PUT, PATCH, and DELETE requests. These methods are also known as verbs.
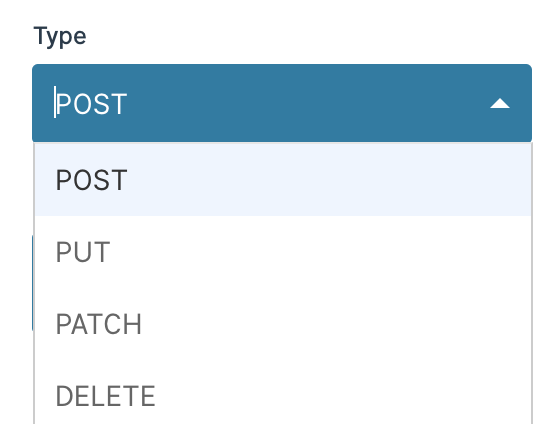
POST verb is used to create new data. The DELETE verb is used to delete data. The PUT verb is used to update exiting data, and the PATCH verb is used to modify a specific portion of the data.
Hey API, can you POST new data to the server? The new data is in the JSON body.
API Endpoint URL
The API Endpoint URL is the specific location where data will be sent. Each API Endpoint URL belongs to a specific resource. A resource is the broader category to be targeted when sending data. To create a new product in Shopify, use their Products resource. Their documentation specifies making aPOST request to that resource using this Endpoint URL:

Body
The body of each request is where data that will be sent through the API is added. The body must be in raw JSON format using key:value pairs. The JSON below shows common attributes of a Shopify product.{text merge} values can be used to dynamically pass the data in the JSON body.
Advanced settings
Encode URLs
URLs tend to break when there are special characters like spaces, accented characters, or even other URLs. Most often, this occurs when using{text merge} values to dynamically insert data into a URL.
Check the “Encode URLs” box to prevent the URL from breaking if special characters need to be passed.

See sent request
If you woud like to see the request that was sent to the API during the flow run, you can dothis from the API step. To do this, click the square button next to the Request Settings section in the step to see more detailed information.
Enrich with API
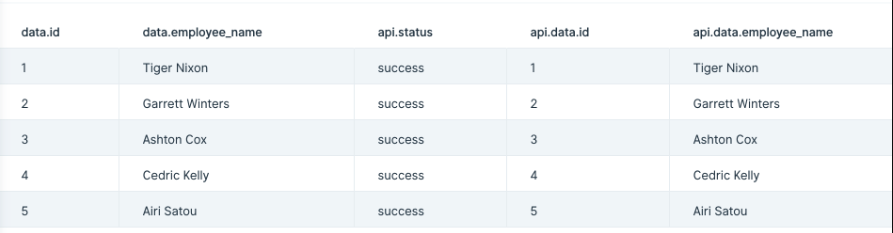
Use the Enrich with API step to make API requests using a list of data, enriching each row with data from an external API endpoint.Input/output
Our input data has two columns: “data.id” and “data.employee_name”.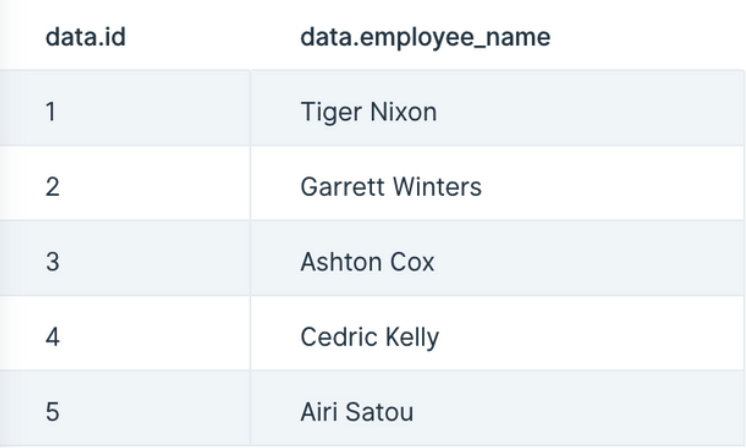
Custom settings
First, decide if your data needs a GET or POST operation, or the less common PUT or PATCH, and select it in the Type dropdown. A GET operation is the most common way to request data from an API. A POST is another way to request data, though it is more commonly used to make changes, like adding a new user to a table. PUT and PATCH make updates to data, and sometimes return a new value that can be useful.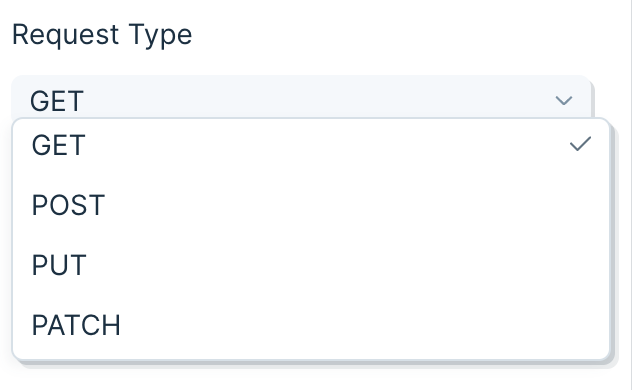
Sending a body in your API request
- A GET cannot send a body in its request. A POST can send a Body in its request. In Parabola, the Body of the request will always be sent in JSON.
- Simple JSON looks like this:
Using merge tags
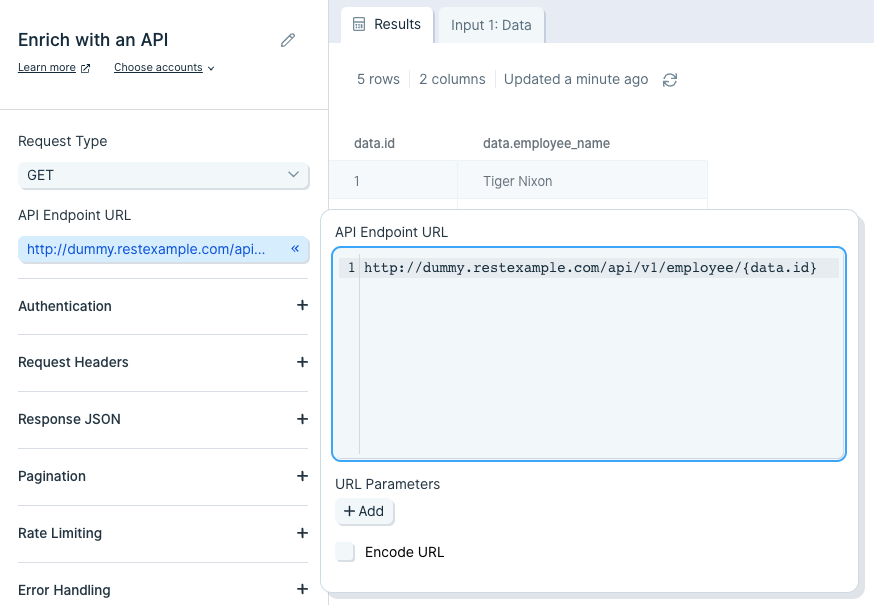
- Merge tags can be added to the API Endpoint URL or the Body of a request. For example, if you have a column named “data.id”, you could use it in the API Endpoint URL by including
{data.id}in it. Your URL would look like this:
- Similarly, you can add merge tags to the body.
- For this GET example, your API endpoint URL will require an ID or some sort of unique identifier required by the API to match your data request with the data available. Append that ID column to your API endpoint URL. In this case, we use
{data.id}. - Important Note: If the column referenced in the API endpoint URL is named “api”, the enrichment step will remove the column after the calculation. Use the Edit Columns step to change the column name to anything besides “api”, such as “api.id”.
For API error handling settings and common API error codes, see API error handling and common API errors.
Using OAuth 2.0 in Parabola
OAuth 2.0 is an authentication type that grants limited access to another application using a third-party user account. Most people have interacted with OAuth 2.0 by signing into service using a Google or Facebook account.Authorization
All OAuth connections will require you to register an application with the service. Reading their API documentation will provide instructions on how to connect using OAuth 2.0.Important note: Parabola can generally support OAuth 2.0 when the request requires grant_type=authorization_code. The other most common grant_type is client_credentials, and unfortunately Parabola cannot currently support that grant_type.
Redirect URL
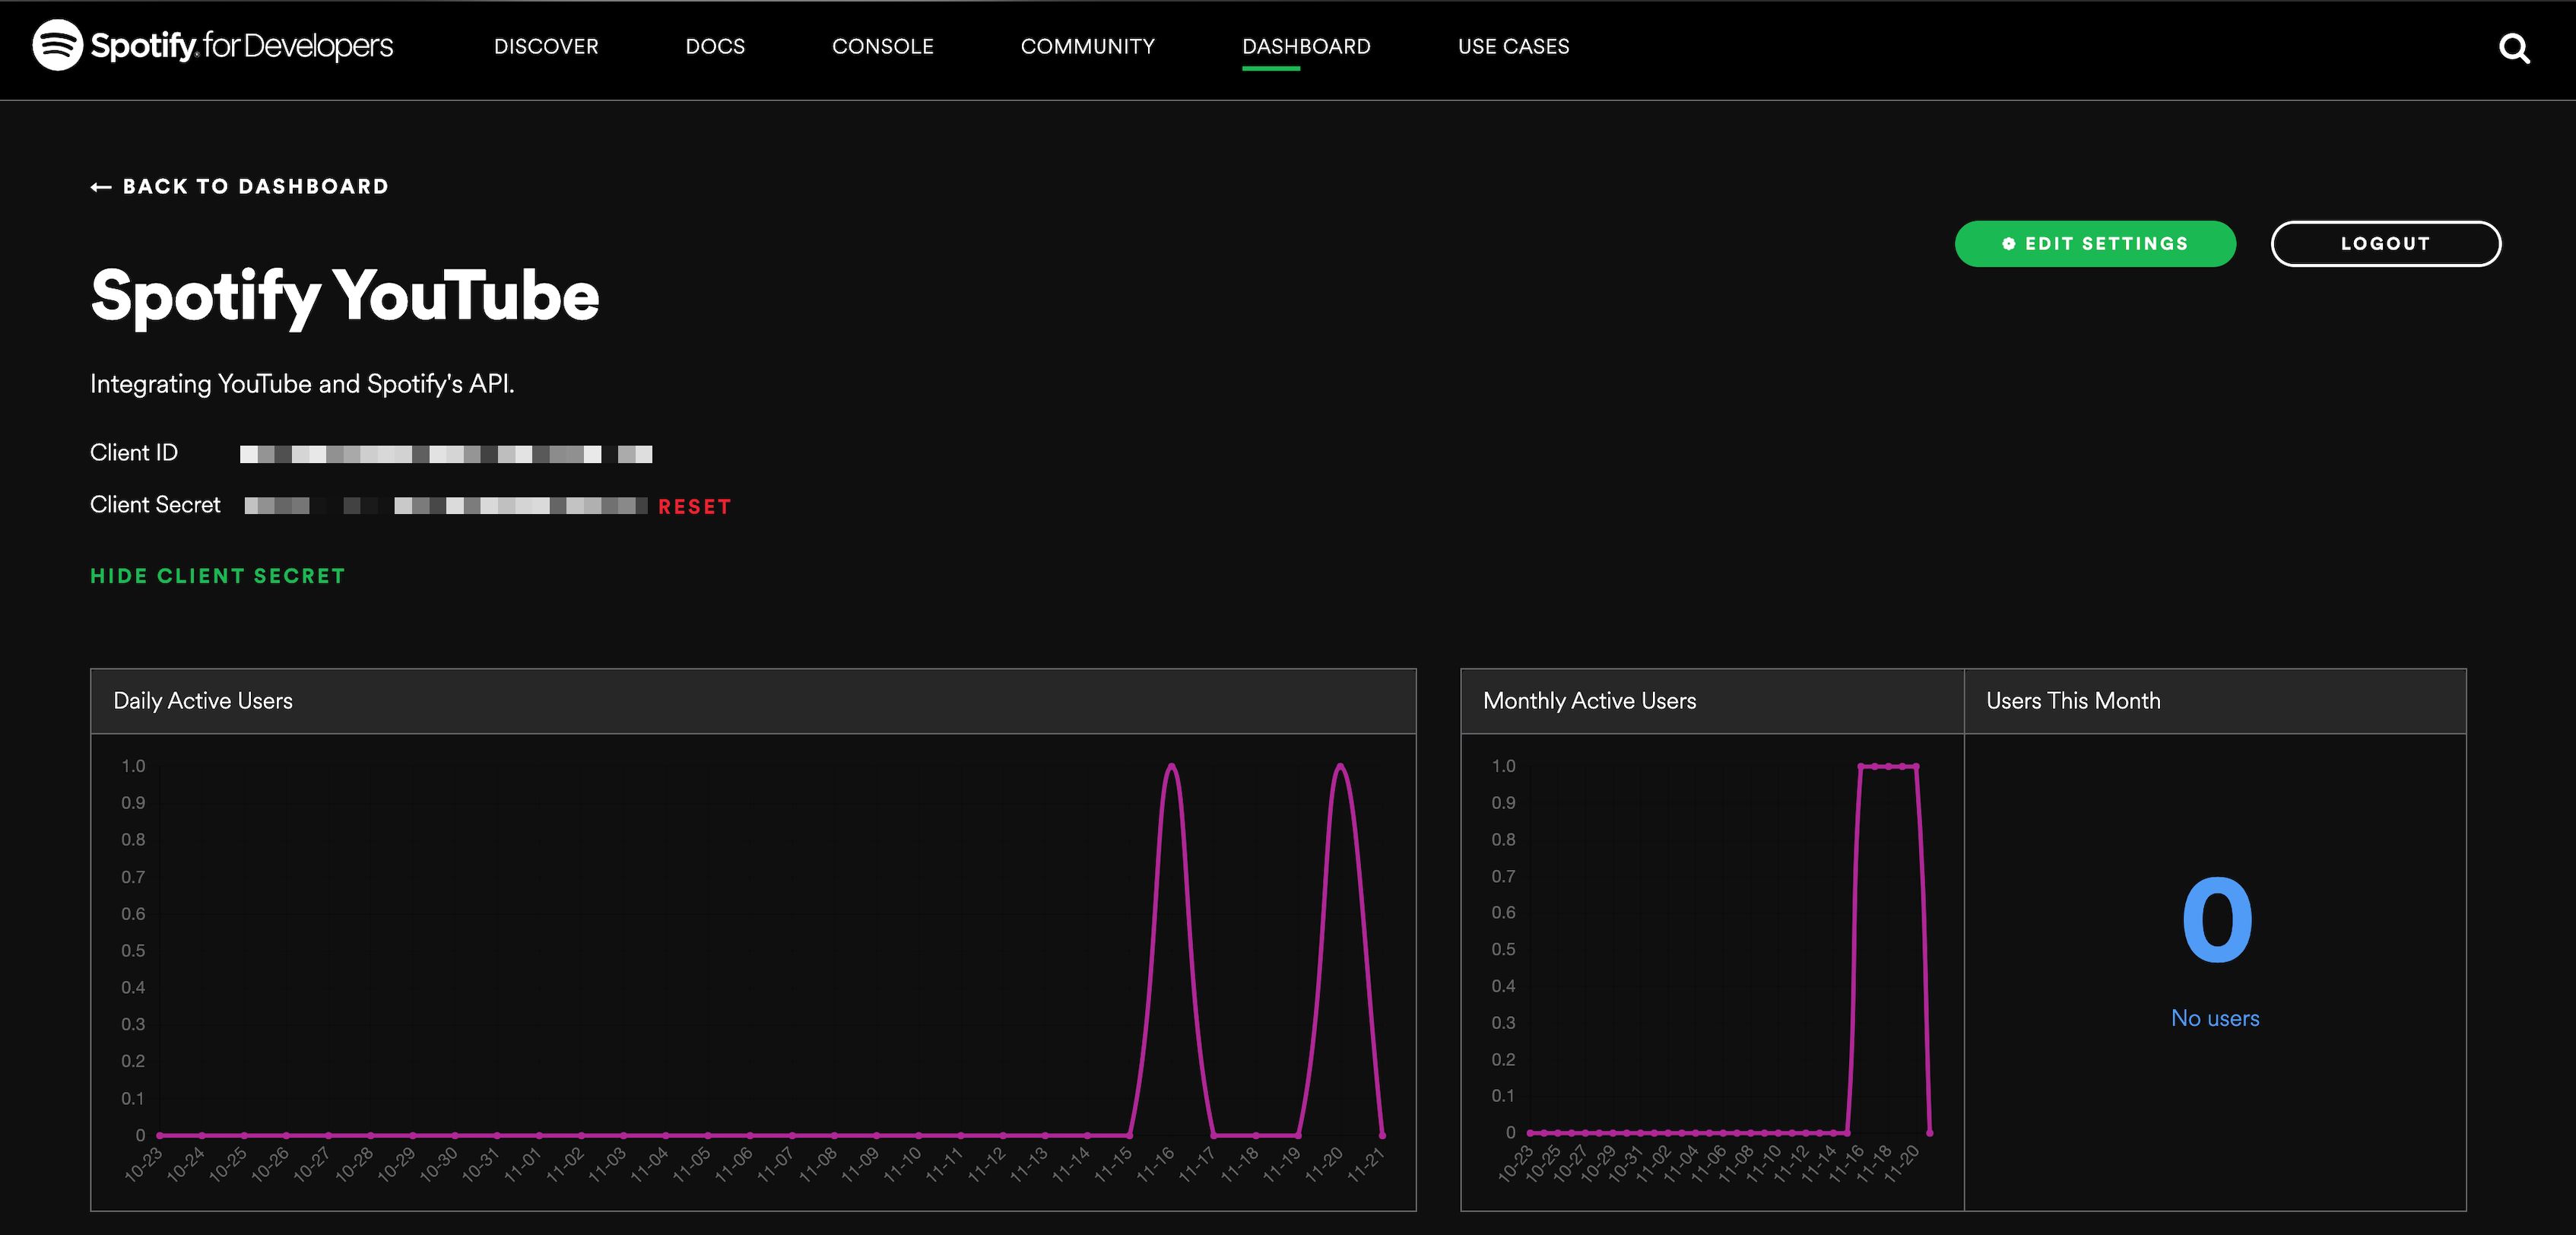
The first step is to register your application with the service you want to access. They require you to provide a Callback URL, Return URI, or Redirect URL. These terms are referring to the same thing—a specific URL where the service will send Parabola an access token for your account. Provide the service with the following Redirect URL: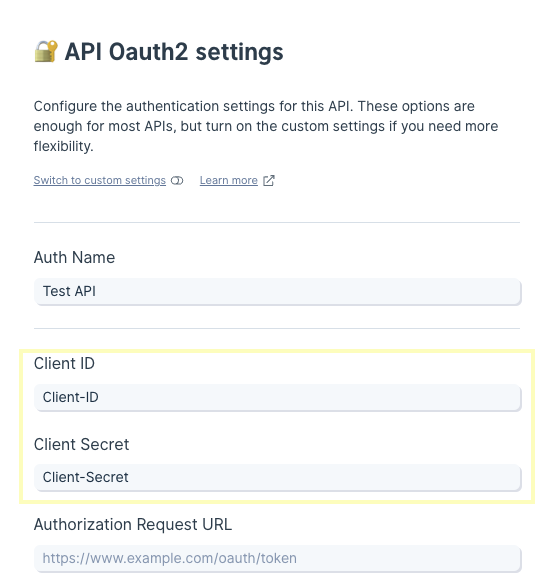
Authorization Request URL
The next step is to construct an Authorization Request URL in Parabola. This URL consists of a base URL and URL parameters. The following is Spotify’s base URL: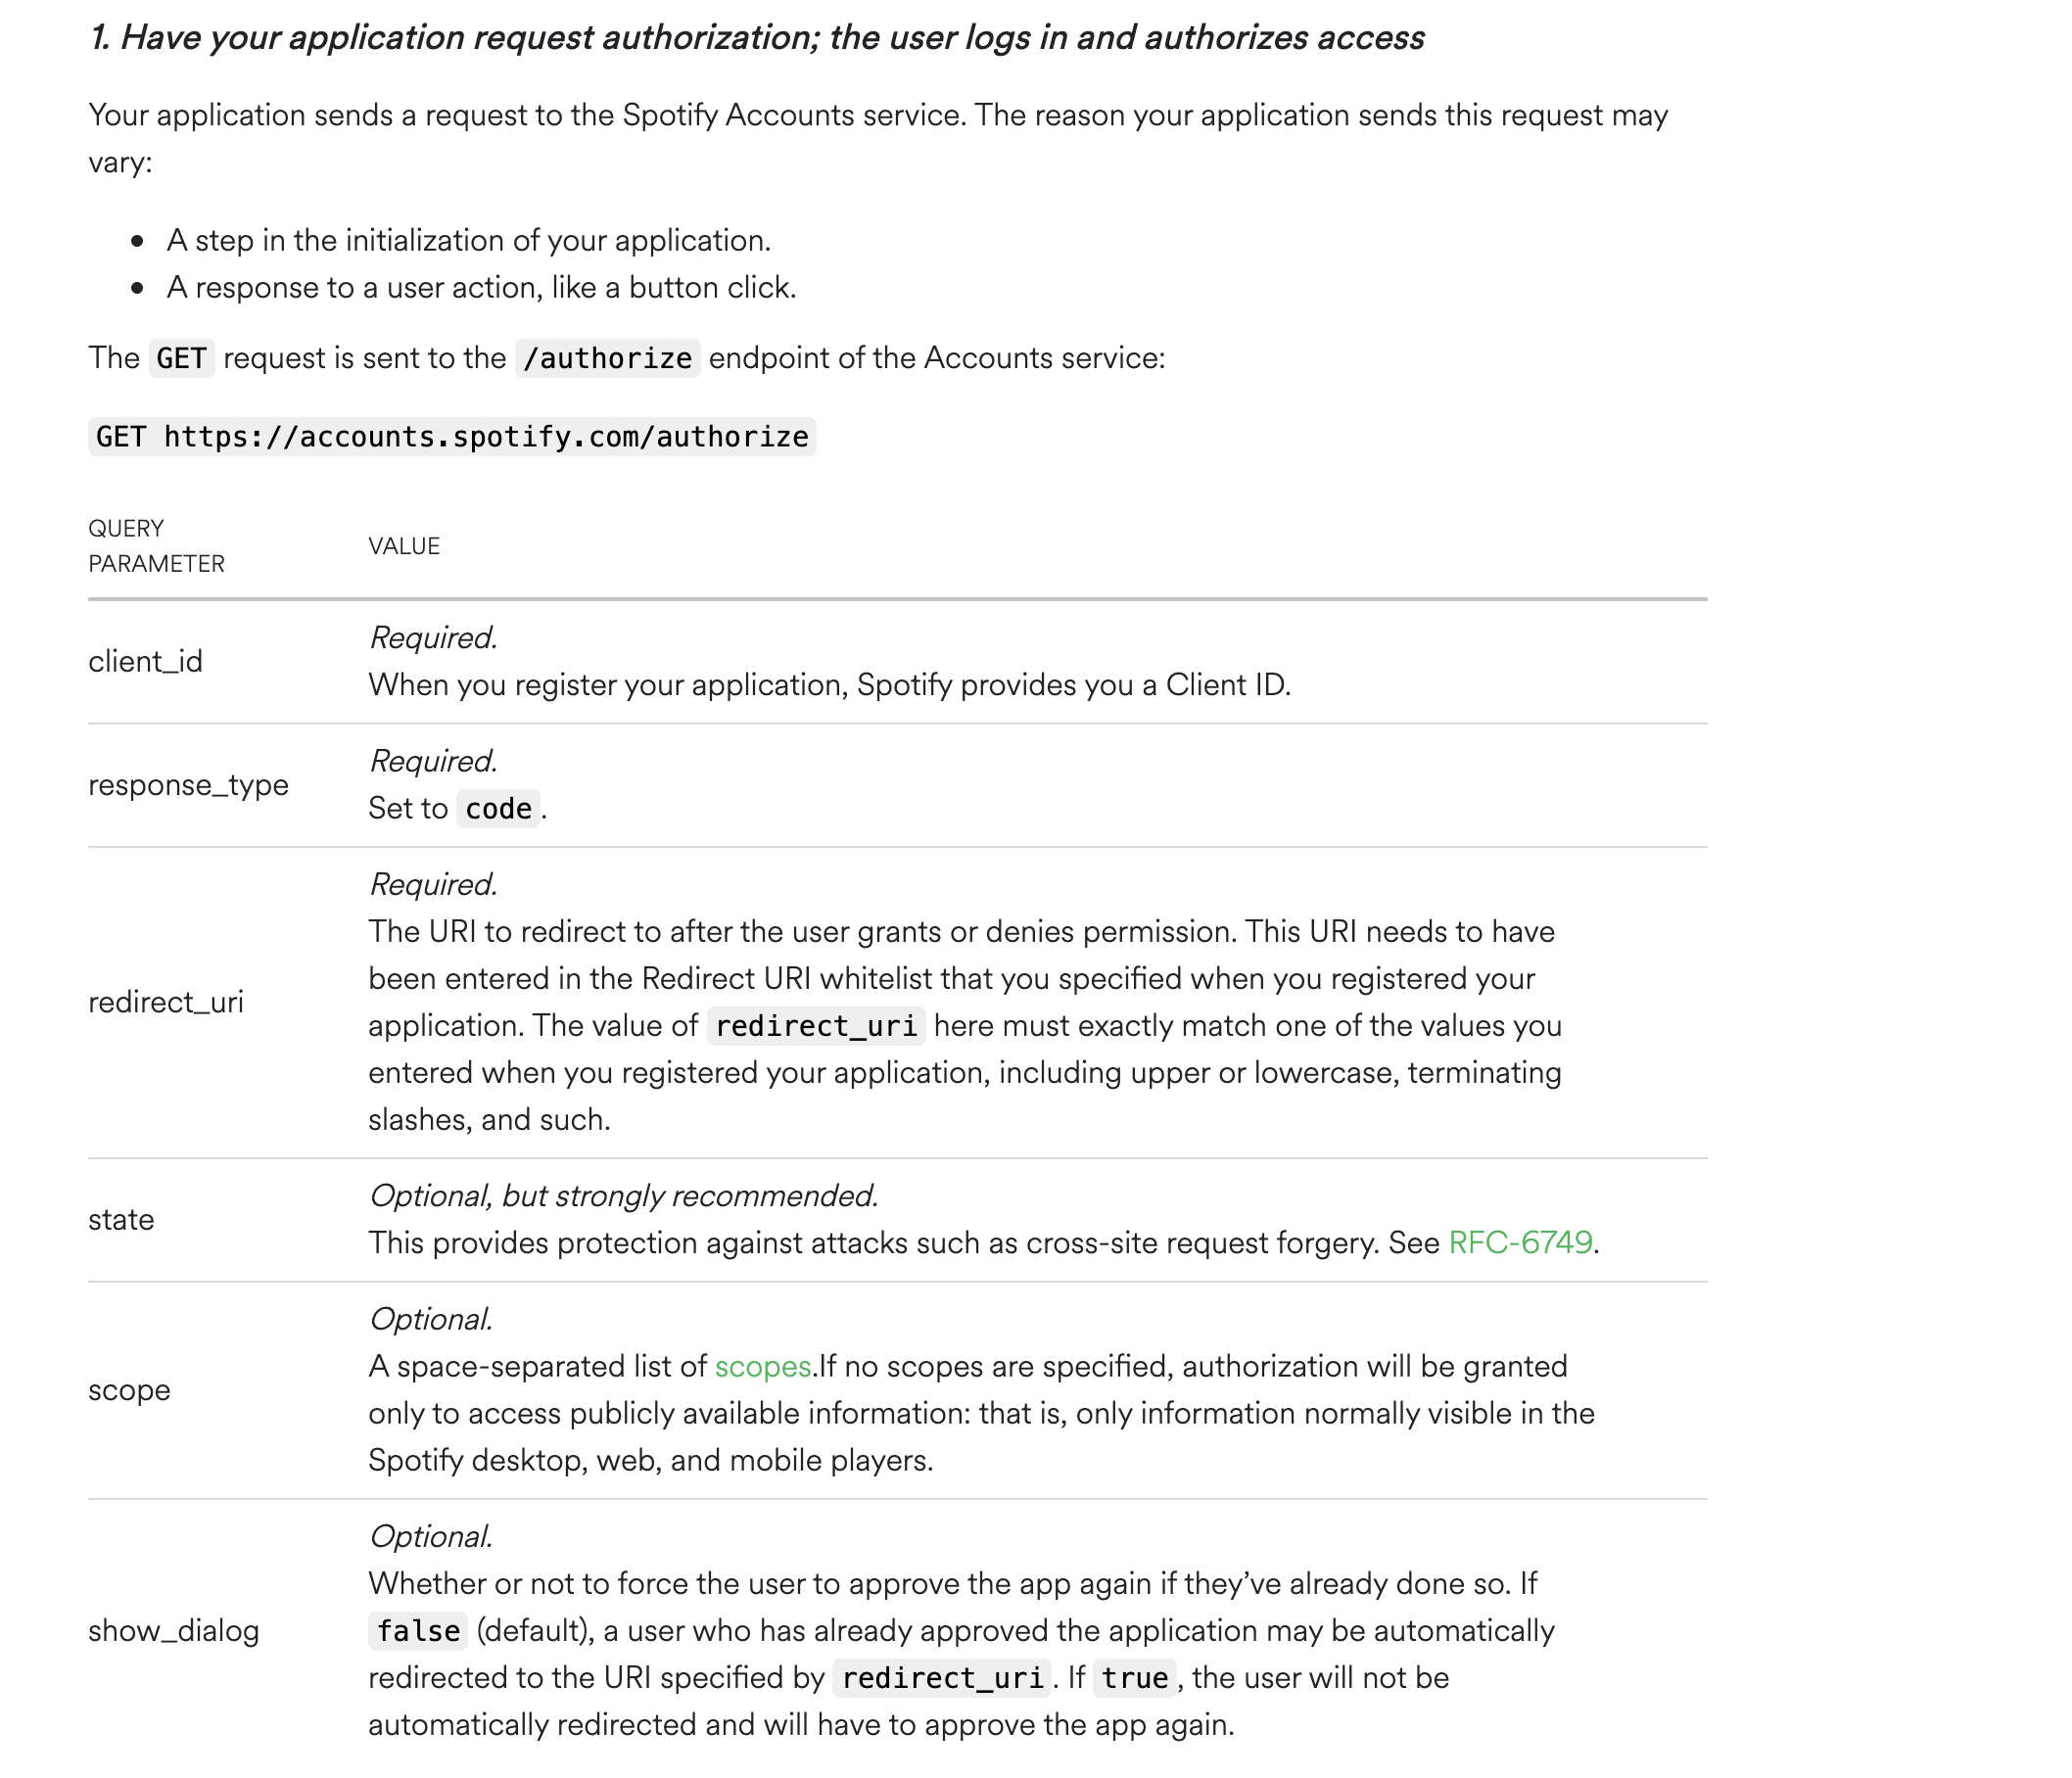
Edit URL Parameters
Adding URL parameters can be manually typed in. However, adding in parameters using the Edit URL Parameters section will help auto construct the URL.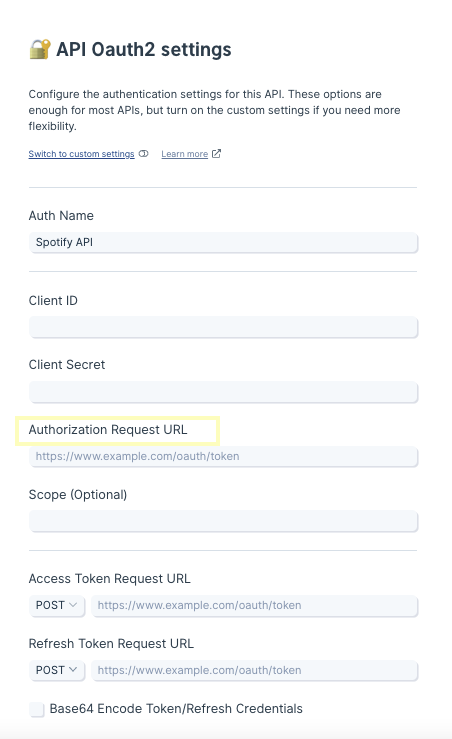
Access Token
The next step is to to request an access token to grant Parabola permission to access your service’s data. All requests must be sent to an Access Token Request URL, or more simply, a token URL.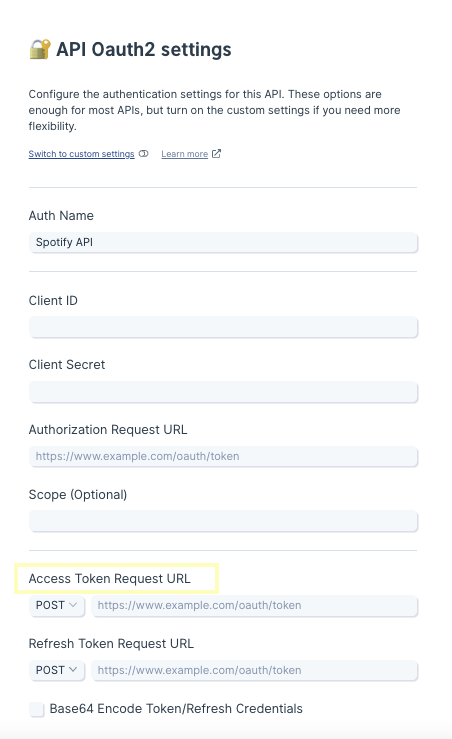
Access Token Request URL
To receive an access token, a request must be sent to the token URL with Access Token Request Body parameters. Look for a URL that ends in /token.Access Token Method
Most likely, aPOST request will be made to the token URL. If the service does require a GET request, the Access Token Request Body parameters must be manually typed into the URL.
Spotify’s token URL is listed as
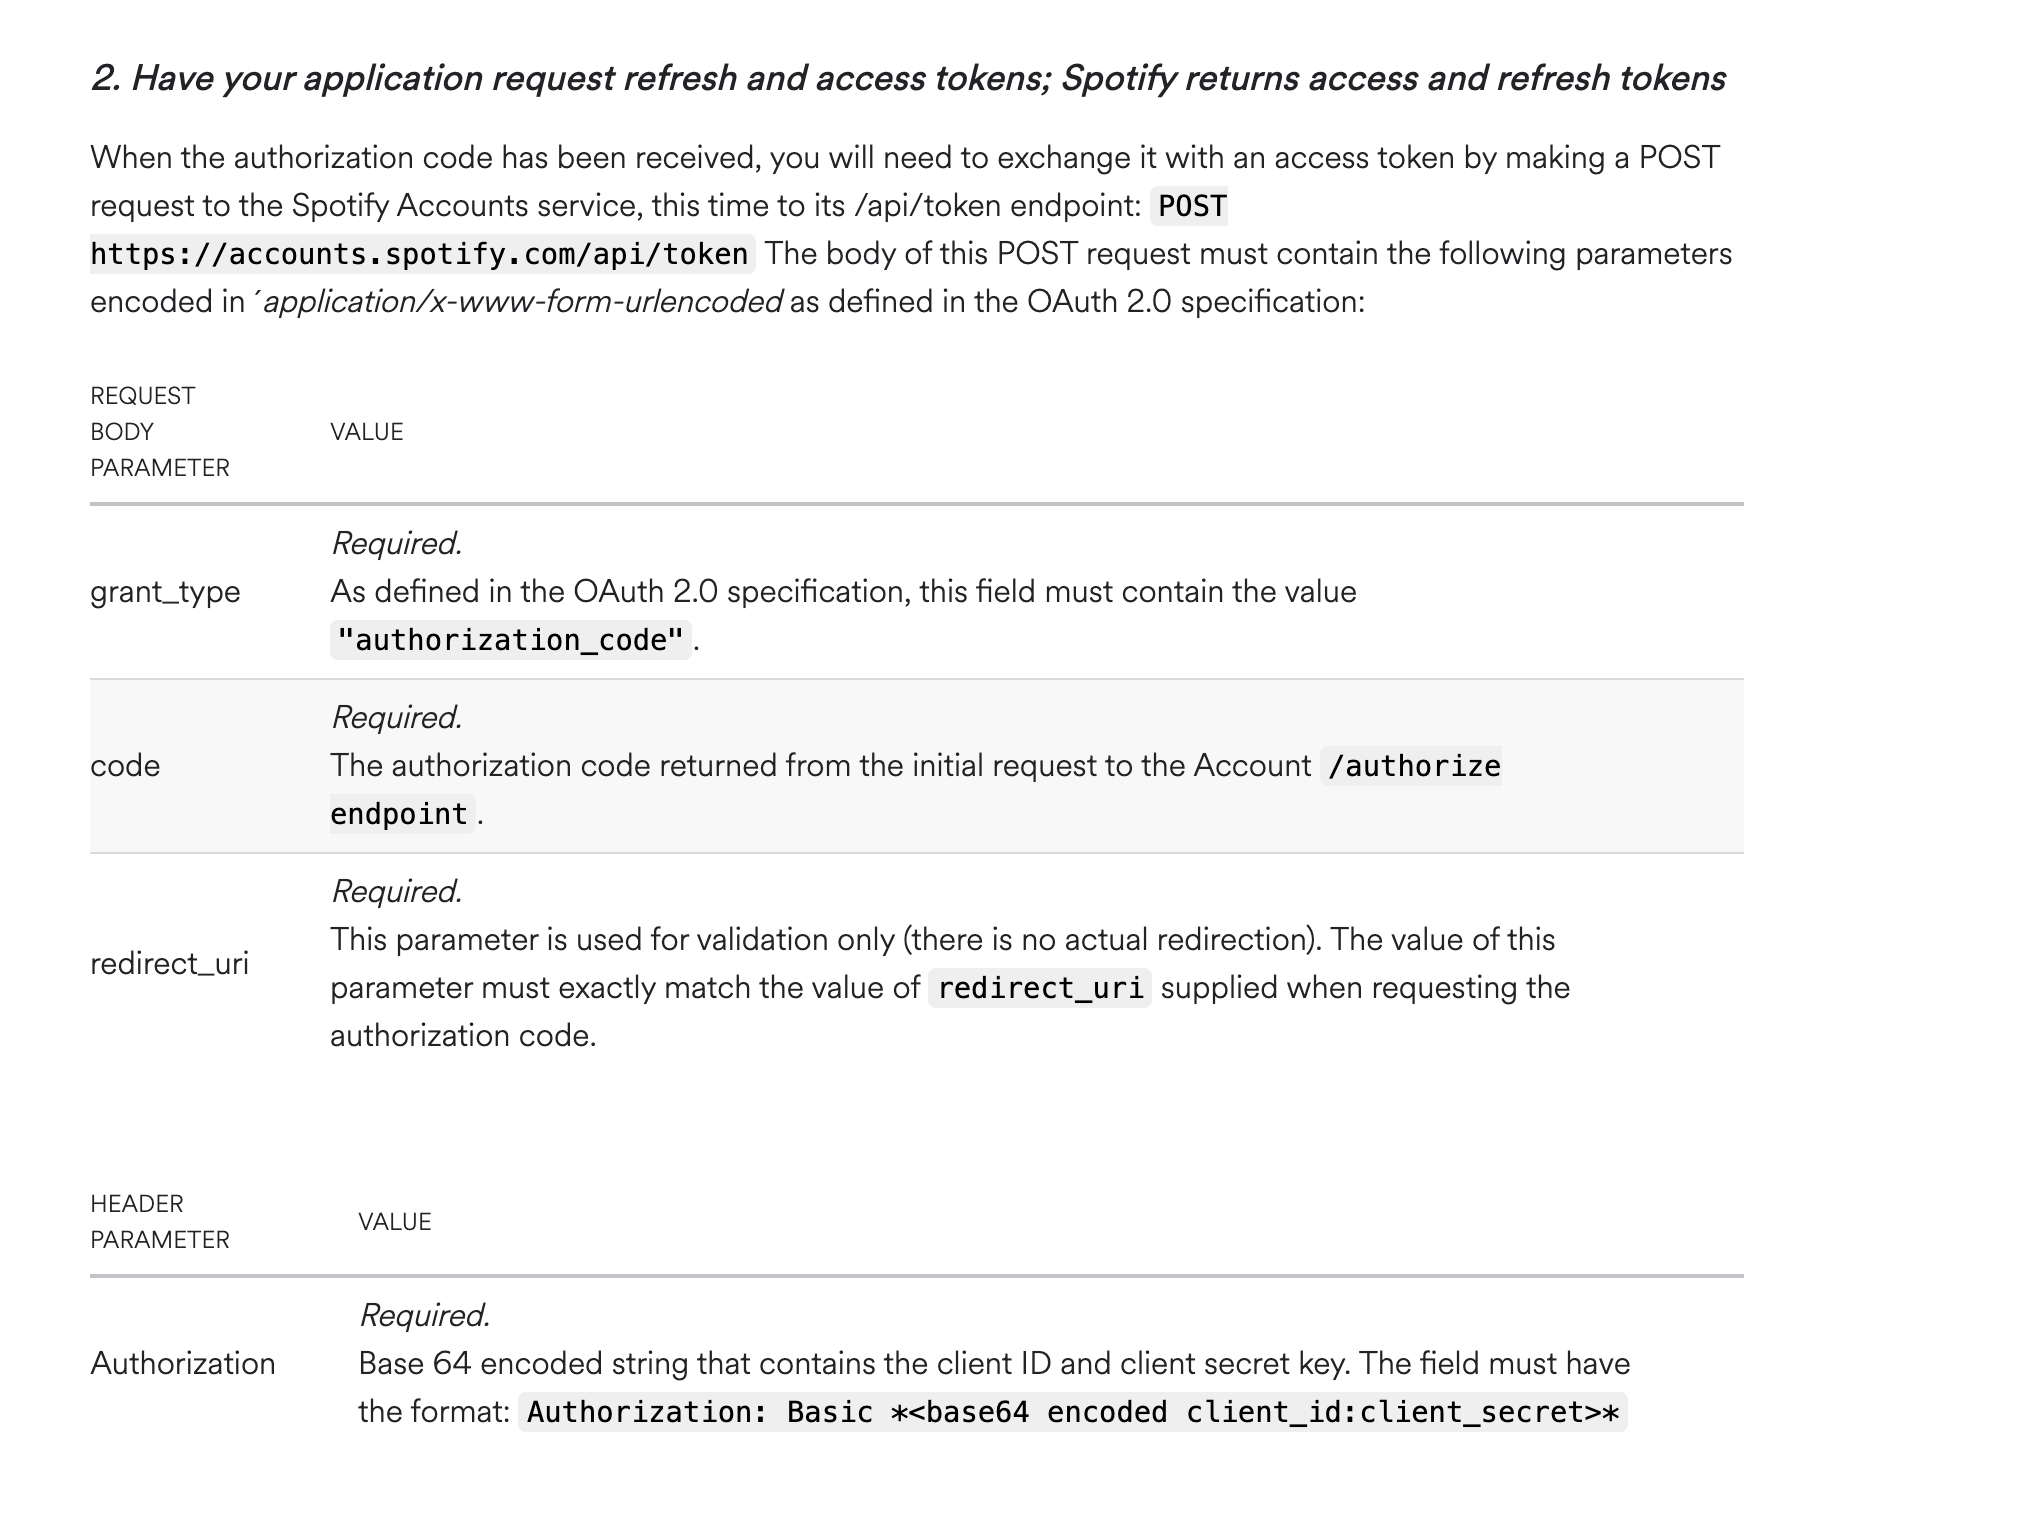
Access Token Request Body
We can add the Access Token Request Body to our request by using pairs. The above image shows Spotify requires a grant_type, code, and redirect_uri as body parameters. Parabola automatically sends code as a parameter. Do not add that as a parameter when configuring this step.Advanced Options
Spotify also requires a header parameter. Add a Custom Header and add “Authorization” as the Header Key. The Header Value is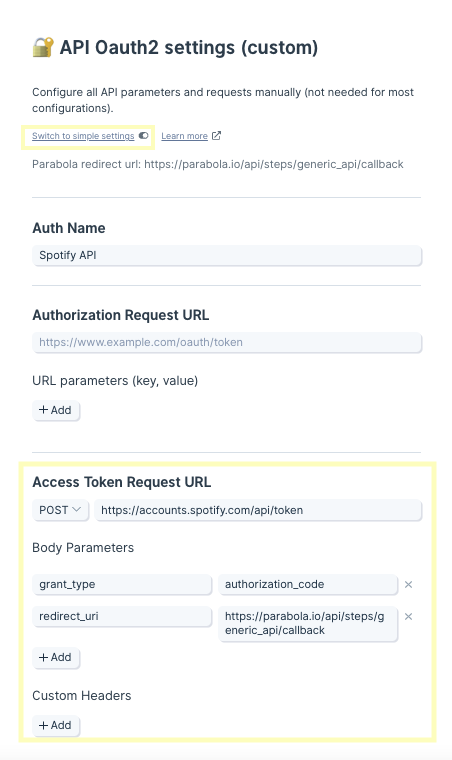
Refresh Token
Since the access tokens will expire, Parabola will need to request a refresh token to stay authorized with your service. These requests must be sent to an Refresh Token Request URL, or more simply, a refresh URL.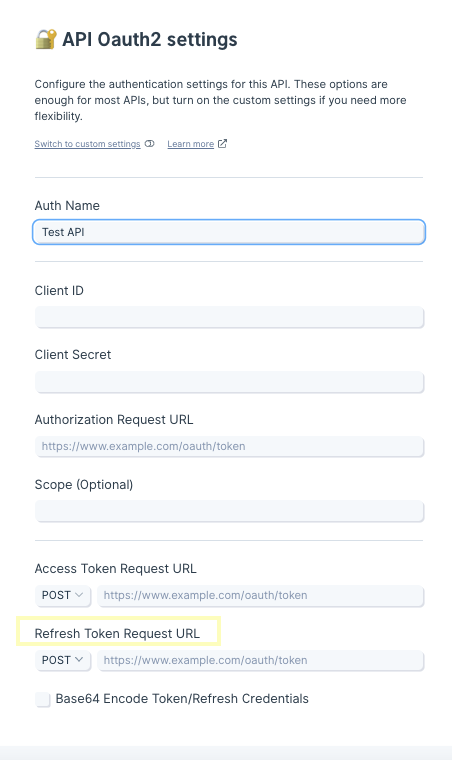
Refresh Token Request URL
To receive a refresh token, a request must be sent to the refresh URL with Refresh Token Request Body parameters. In many cases, this base URL is identical to the Access Token Request URL and ends with /token. Spotify’s refresh URL is alsoRefresh Token Method
Again, aPOST request will be made to the refresh URL. If the service does require a GET request, the Refresh Token Request Body parameters must be manually typed into the URL.
Refresh Token Request Body
We can add the Refresh Token Request Body to our request by using key:value pairs. The image below shows Spotify requires a grant_type and refresh_token as body parameters.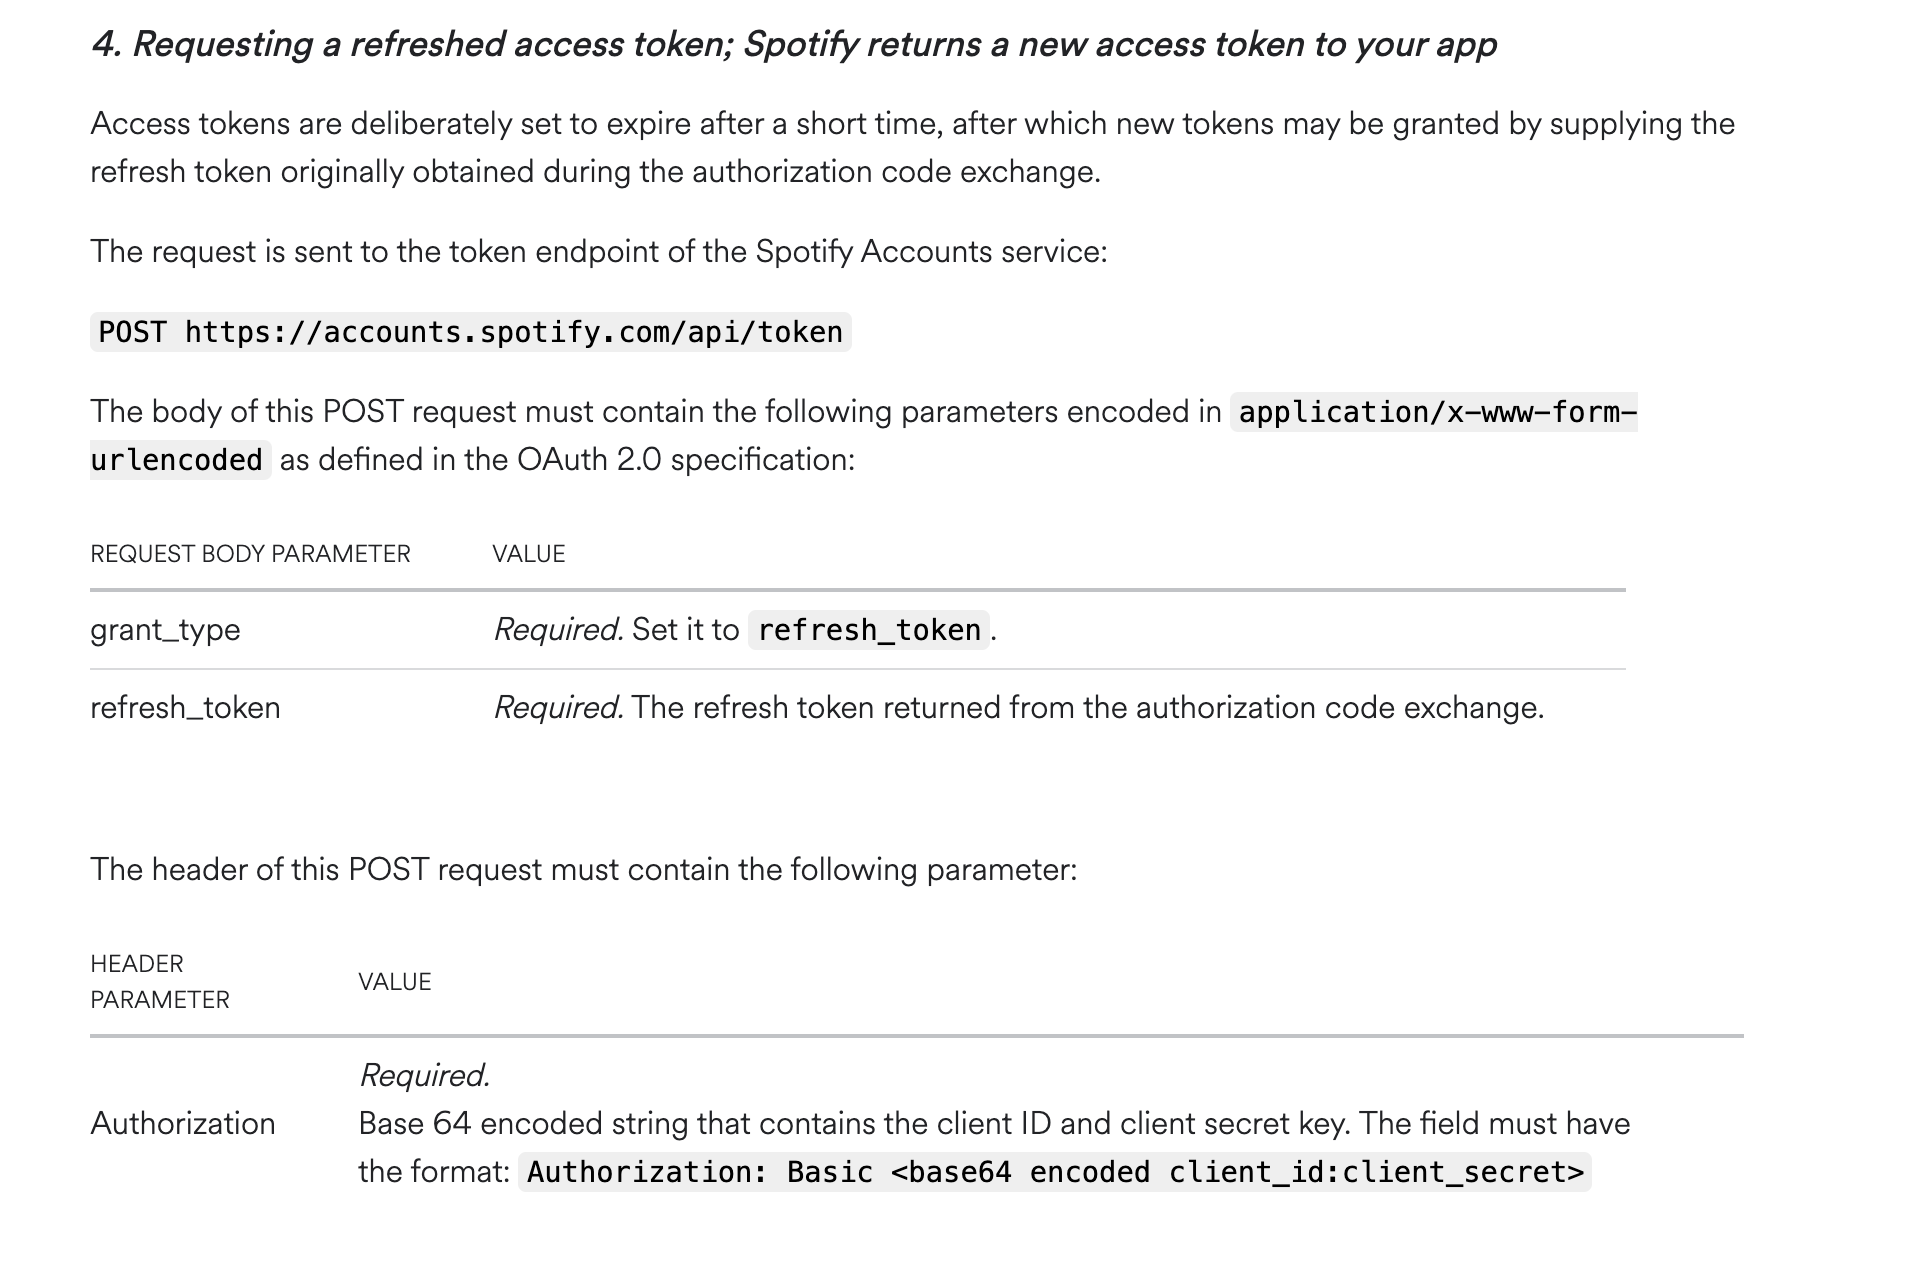
Advanced Options
Add a Custom Header if your service requires them. Spotify mentions adding Authorization as the Header Key again. The Header Value is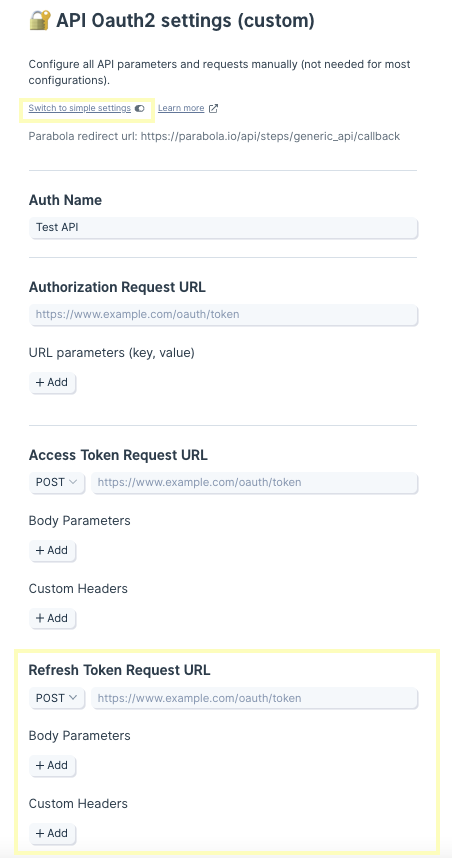
Authorize
Click “Authorize” to grant Parabola access to your service. If successful, you will be returned to your flow and see that it is ready for use. Now that you are authentication, make a request to the Endpoint URL as you normally would by adding body parameters or custom headers when necessary. The API should now return data to Parabola.Still having trouble?
If you encounter an error, try reconfiguring your settings. To adjust the form, click Edit accounts at the top of the result view, then click edit. Find the authorization that you made, and click the pencil icon to bring up your settings.Using Expiring Access Tokens in Parabola
Expiring Access Tokens represent a group of related ways that various APIs authenticate. What they share in common is that they require the user to frequently (every request, every hour, every day, or something like that) fetch a new access token and then use that token in the subsequent API calls. This option also specifically supports theOAuth2.0 Client Credentials grant type.
When to use this authentication method
If you have an API that mentions the need to fetch a new token because the access tokens expire quickly, then this method may be useful for you. Sometimes, you may see this referred to as aJWT (Javascript Web Token) in the API docs
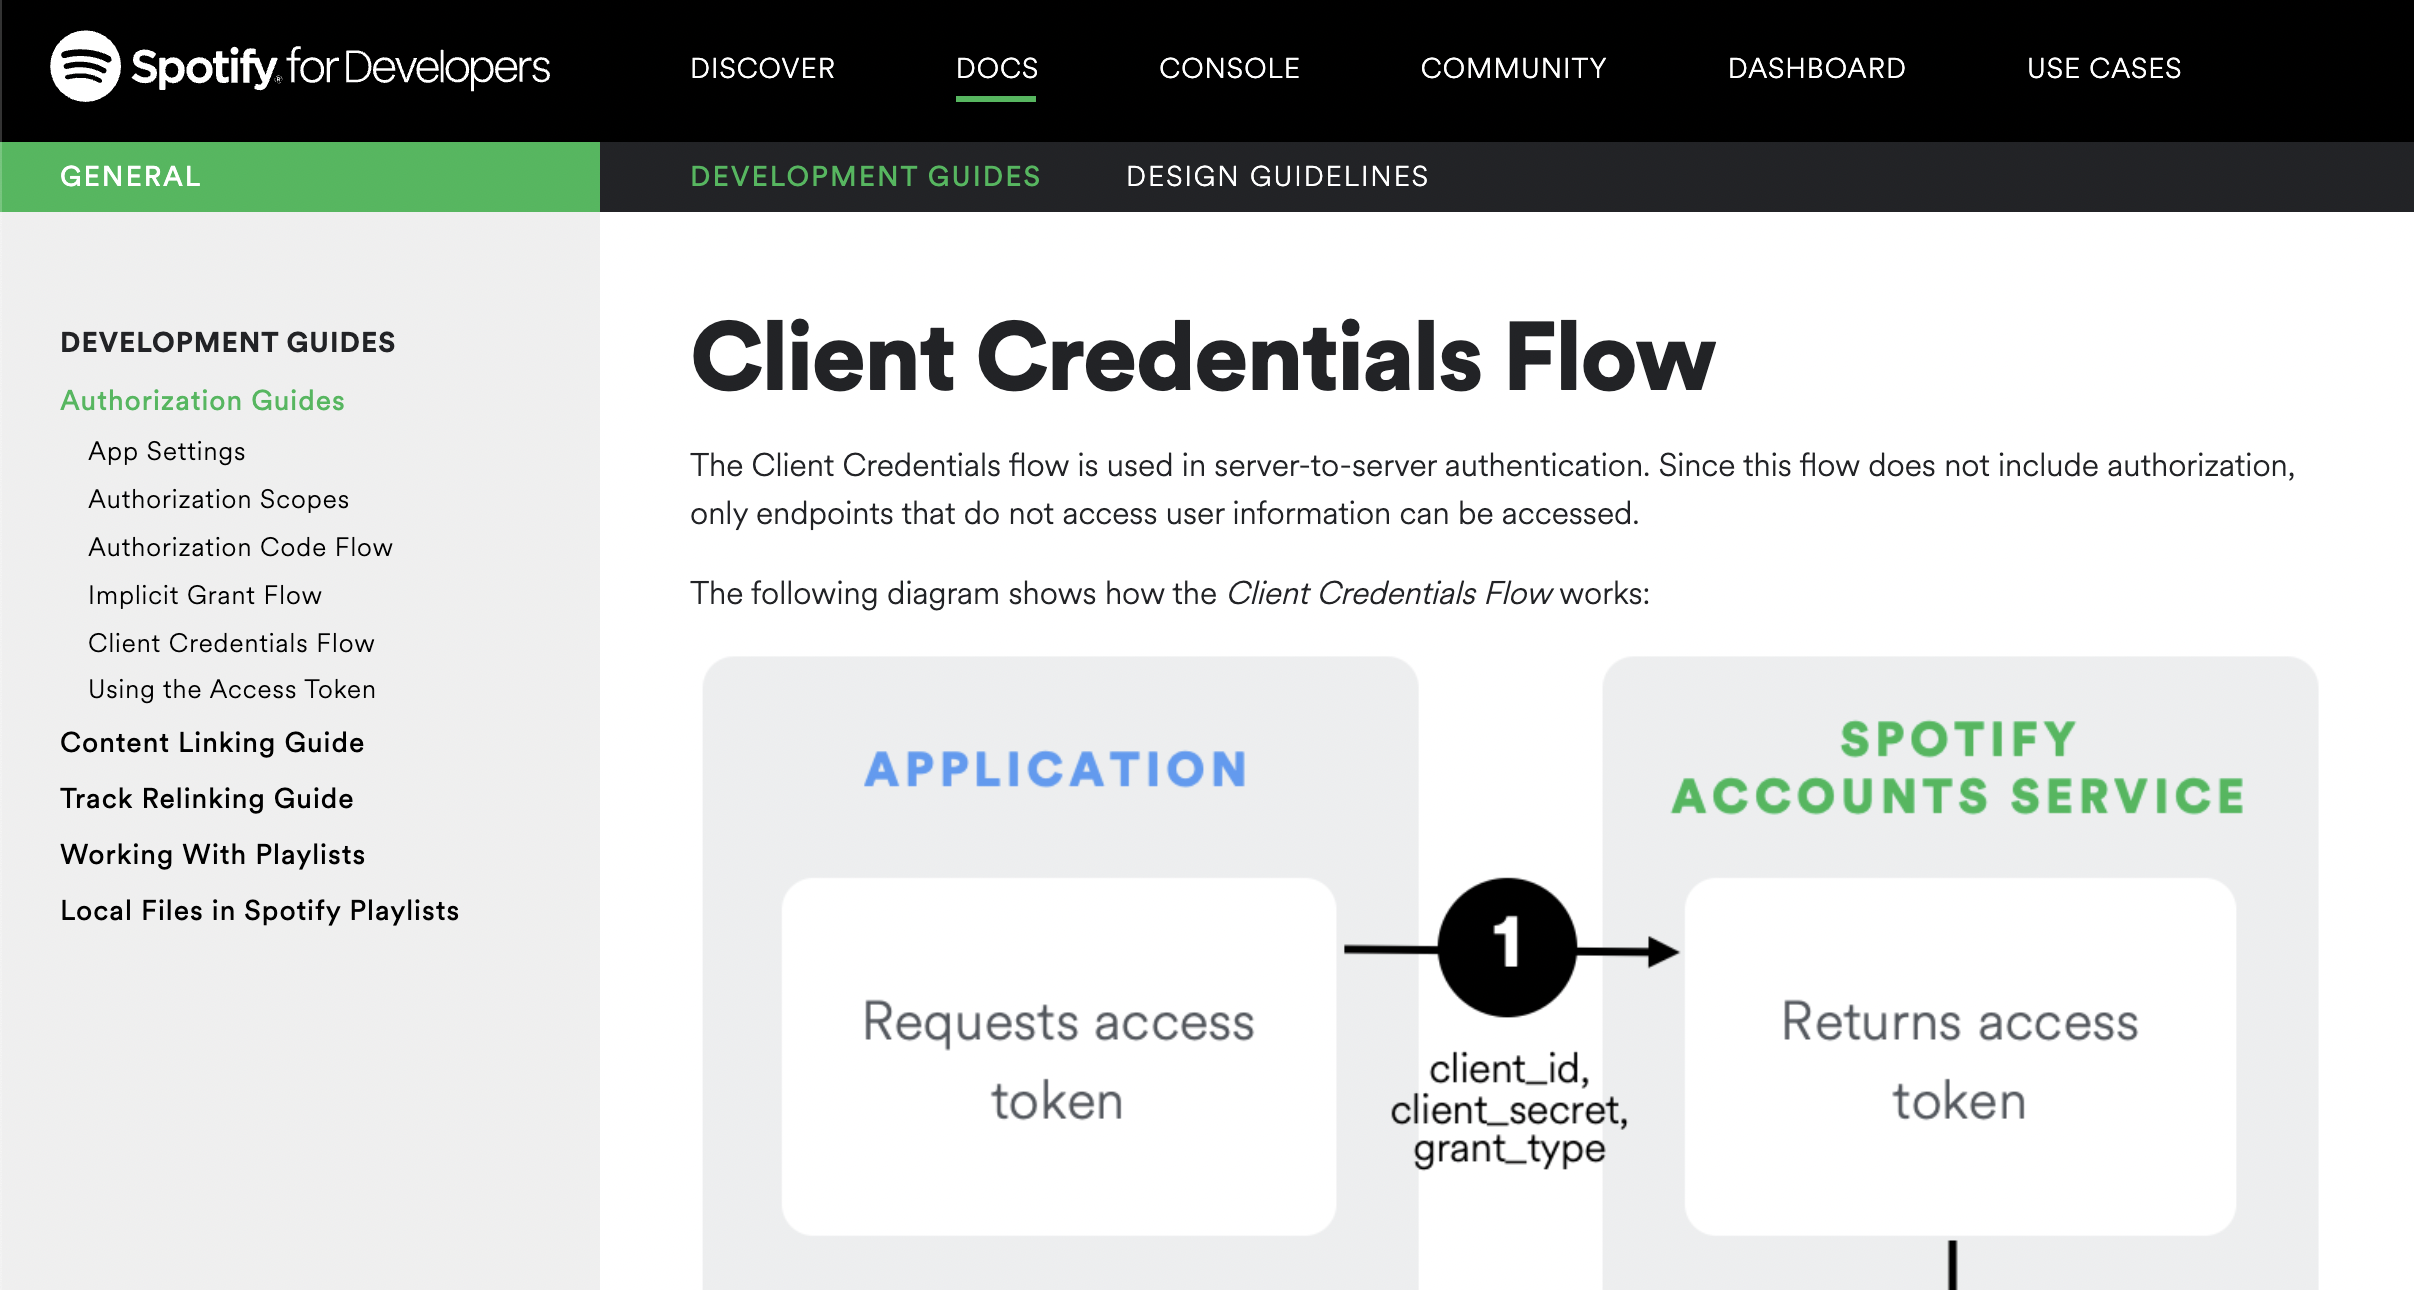
Also, if the API docs that you are looking at specify that they use OAuth2.0 Client Credentials grant type, then you should use this authentication method.
For example, Spotify has docs for using Client Credentials with their API:
Filling out the Expiring Access Token form in your flow
The Expiring Access Token auth form in Parabola has a few fields to fill out:- Authentication Token Request URL
- Body Request Parameters
- Request Headers
- Response Access Token field
- Header Key for using Access Token
- Header Value for using Access Token
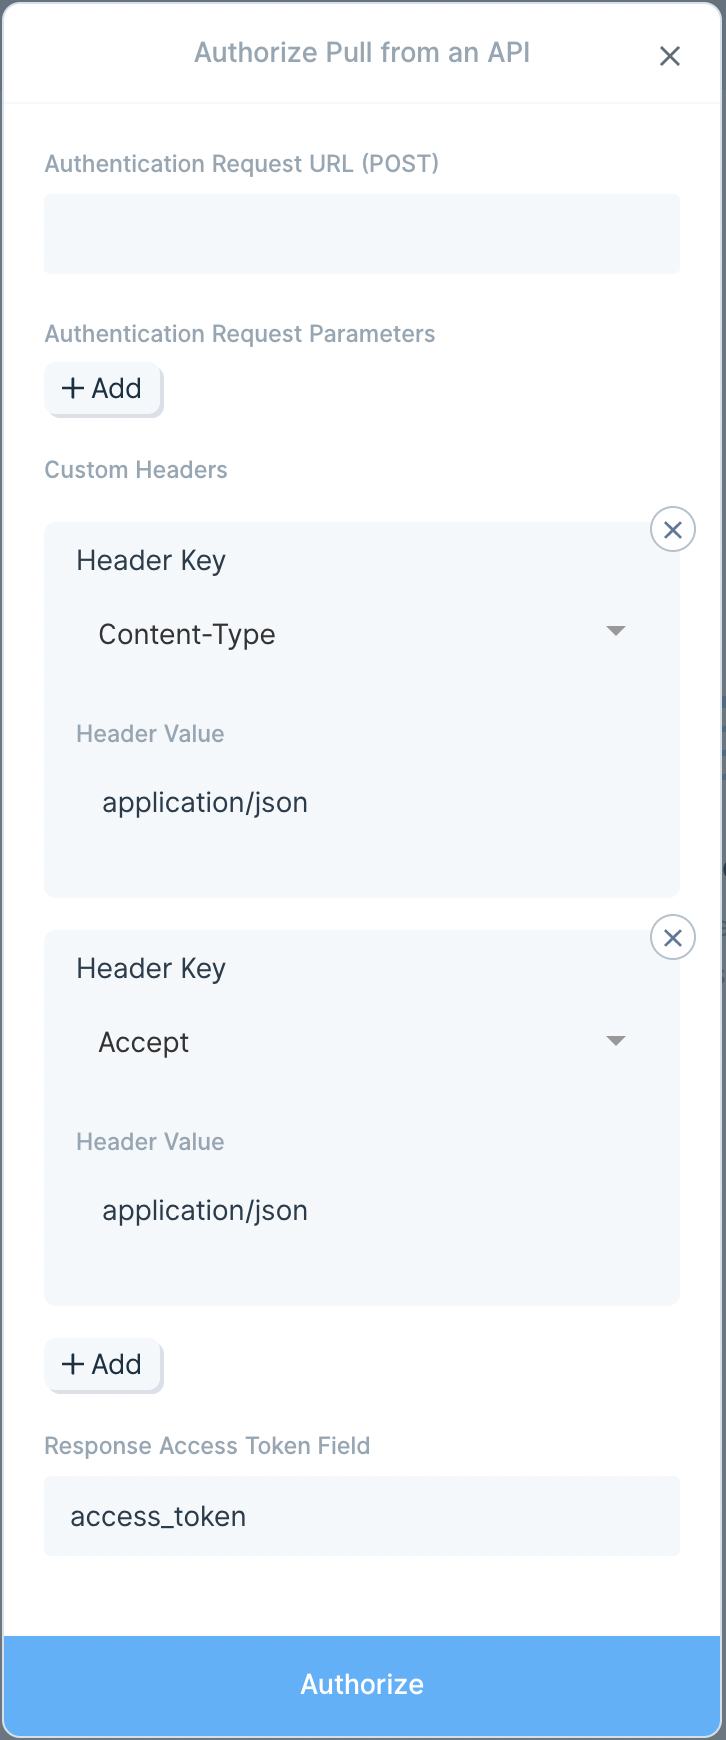
Authentication Request URL
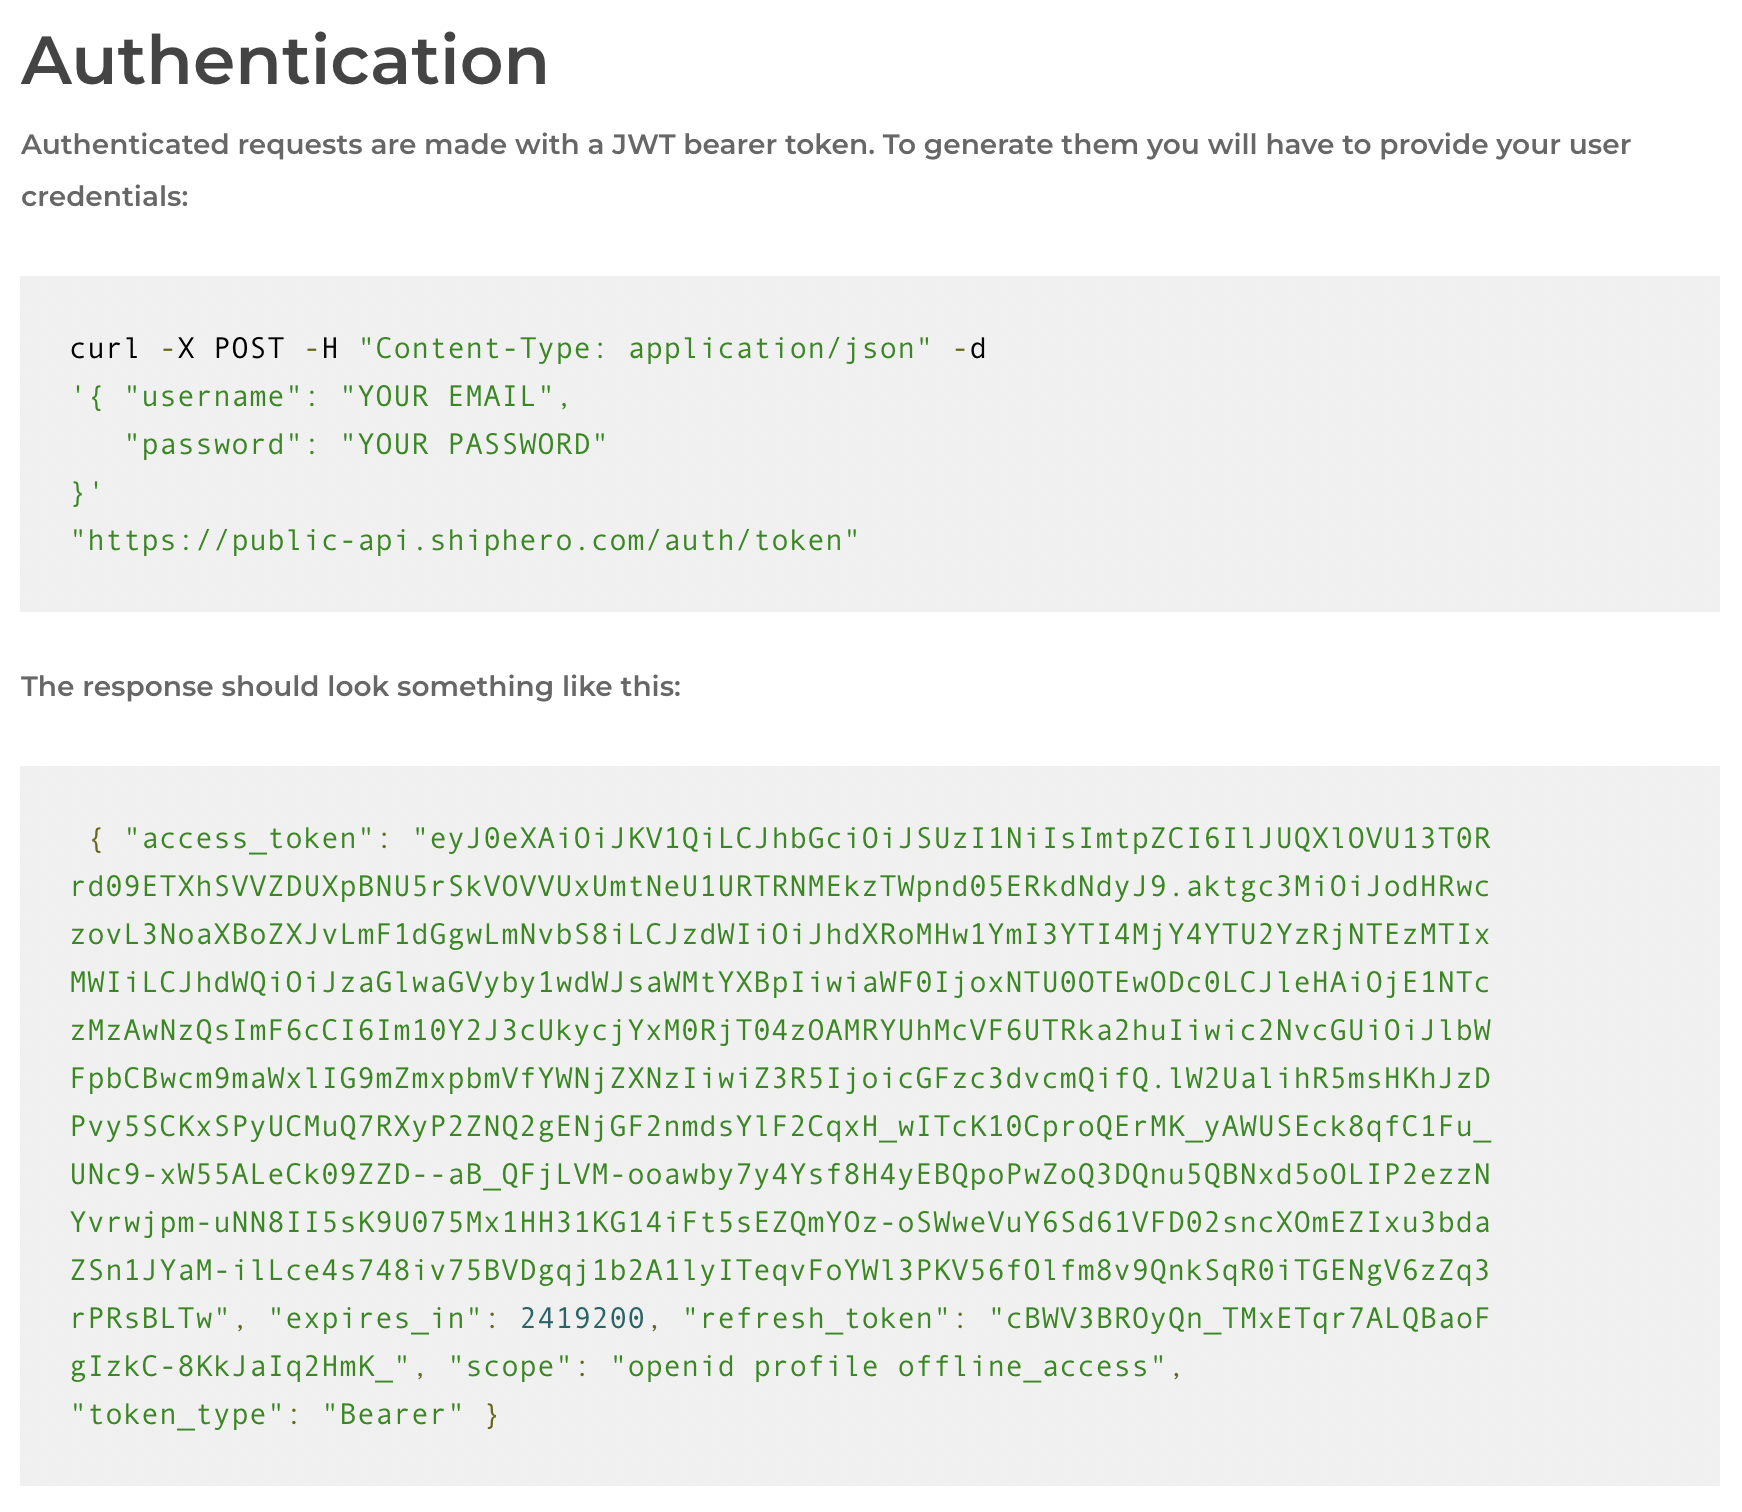
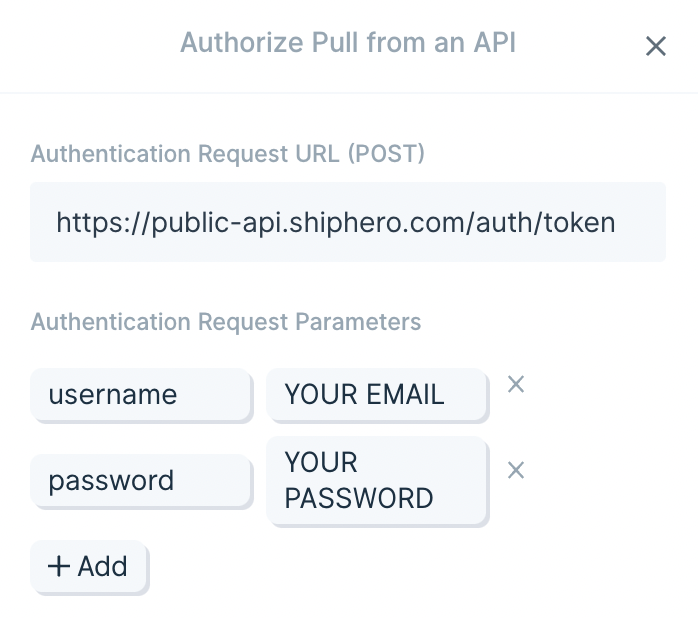
First, let’s look at the authentication request URL and optional authentication request parameters. Any API that uses this auth method will have a URL that you need to send a POST request to in order to get the access token. Put that URL in this field. In the example from the ShipHero docs, they expect us to send a POST tohttps://public-api.shiphero.com/auth/token to get the access token.
Body Request Parameters
Request parameters may be required by the API. The docs will almost always call these some sort of parameter - body parameters or request parameters. If your API docs look like the ShipHero API docs, then it may be unlabeled: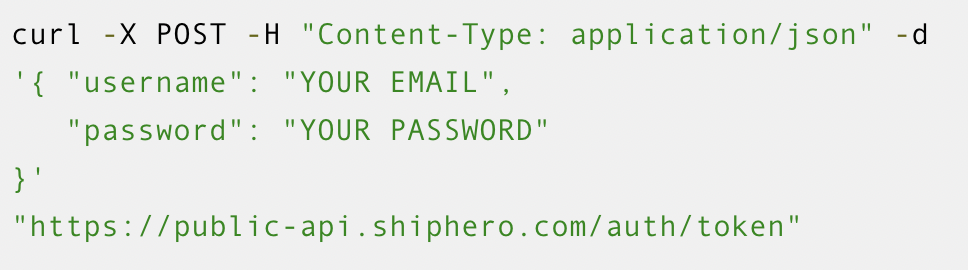
username and password. This request is written in cURL, and that means we know that the parts that follow “-d” or “—data” will be the parameters. So, in Parabola, we can enter this as:
content-type header that you set further down in the form.
Custom Headers
By default, this form will show you two headers -Content-Type and Accept. Both are set to application/json. You may need to change the Content-Type header to application/x-www-form-urlencoded if your API requires that. Notice how the Spotify API docs require that change:
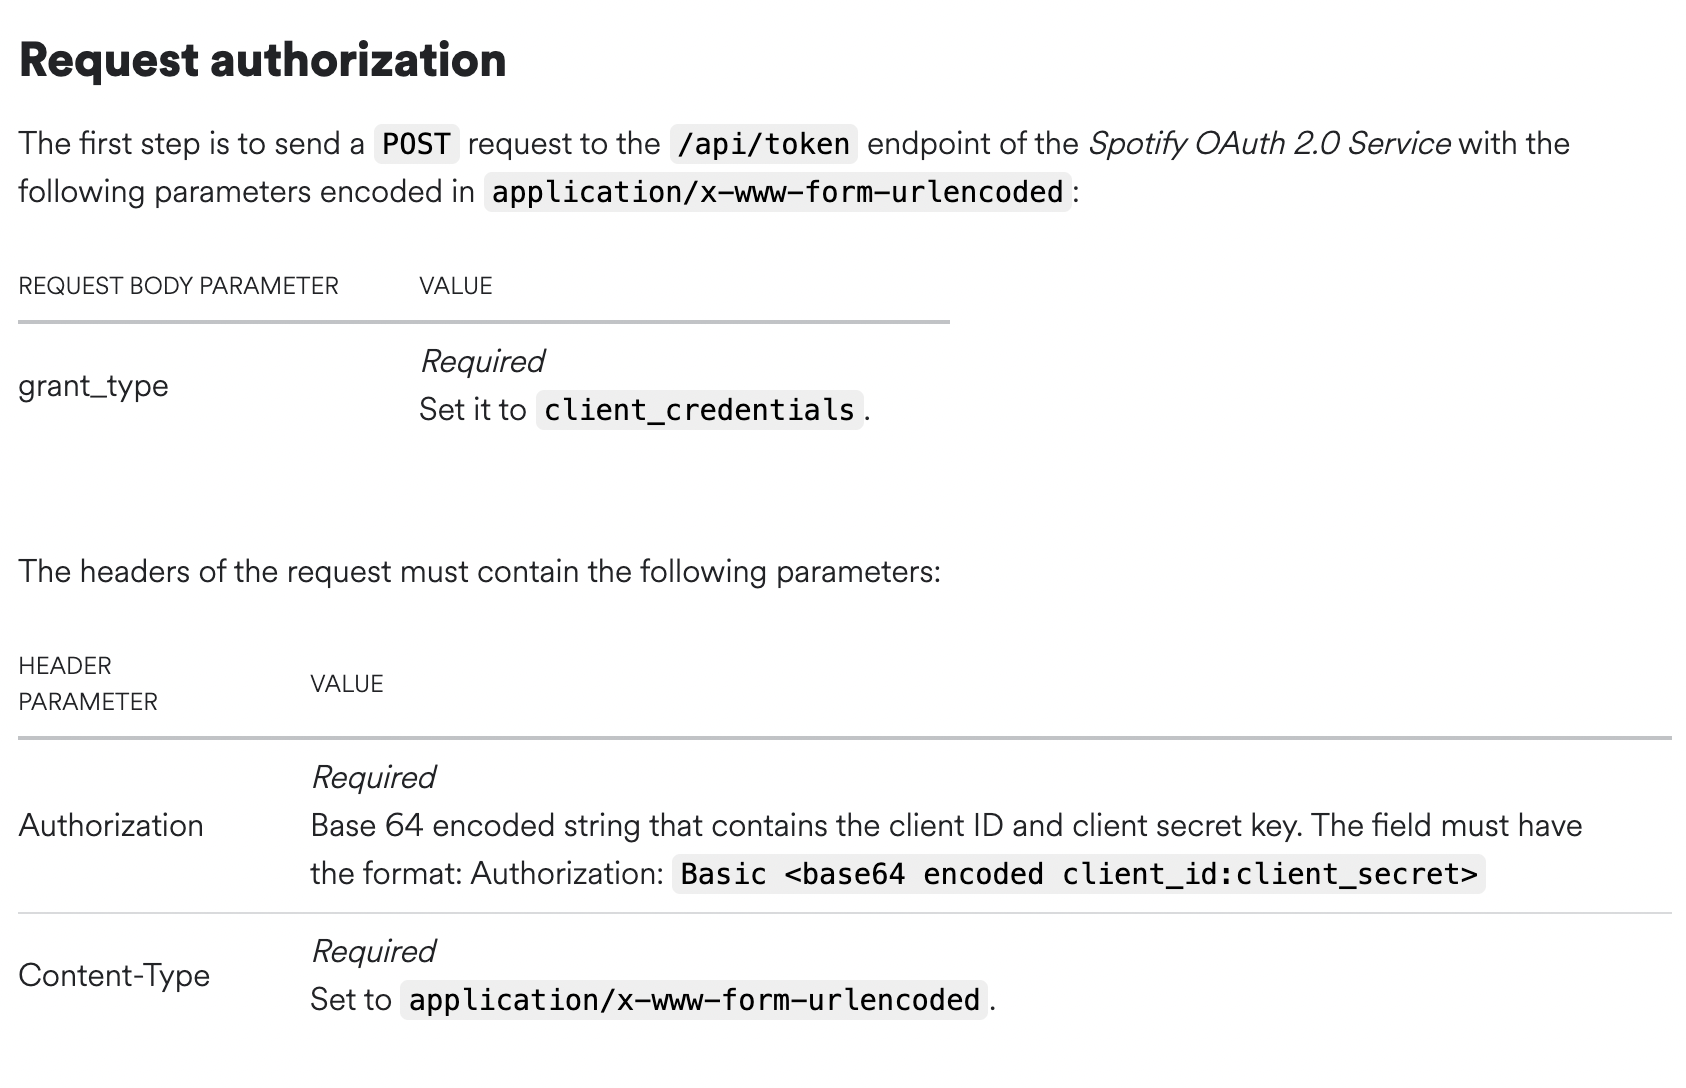
Authorization. Notice how the screenshot above from Spotify also needs that header. Usually in this context, it will be used to send some additional information, like the client_id and client_secret.
If your API, like Spotify, says that you ned to take your client_id and client_secret (or anything) and Base 64 encode it, then you will need to do the encoding outside of Parabola. There are many websites that will Base 64 encode for you, so search for and choose one.
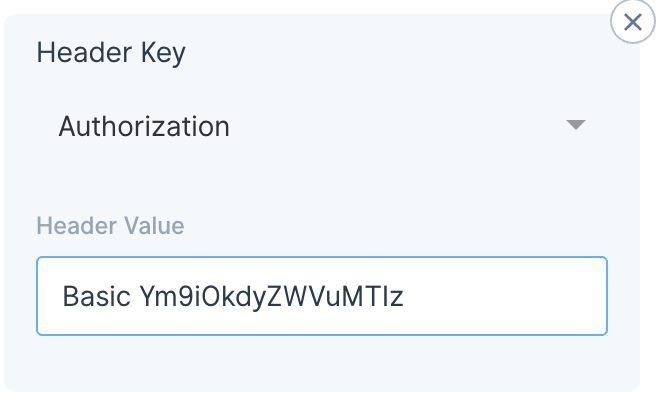
Let’s say that your client_id is bob and your client_secret is Green123. Combine those so they look like this: bob:Green123 and pass them through a Base 64 encoding service. In this example, that will be converted into: Ym9iOkdyZWVuMTIz
Now, combine that with the word “Basic” to get Basic Ym9iOkdyZWVuMTIz and put that as the value for the Authorization header:
Response Access Token field
Every setting up to this point has been in service of getting an access token from an API. Now, this field informs Parabola how to find the token within the response. It is very common for APIs to send the token that you need to authenticate with back in a key calledaccess_token. But if your API calls it something else, you can adjust that here.
For example, the ShipHero API sends back the token in a key called access_token:
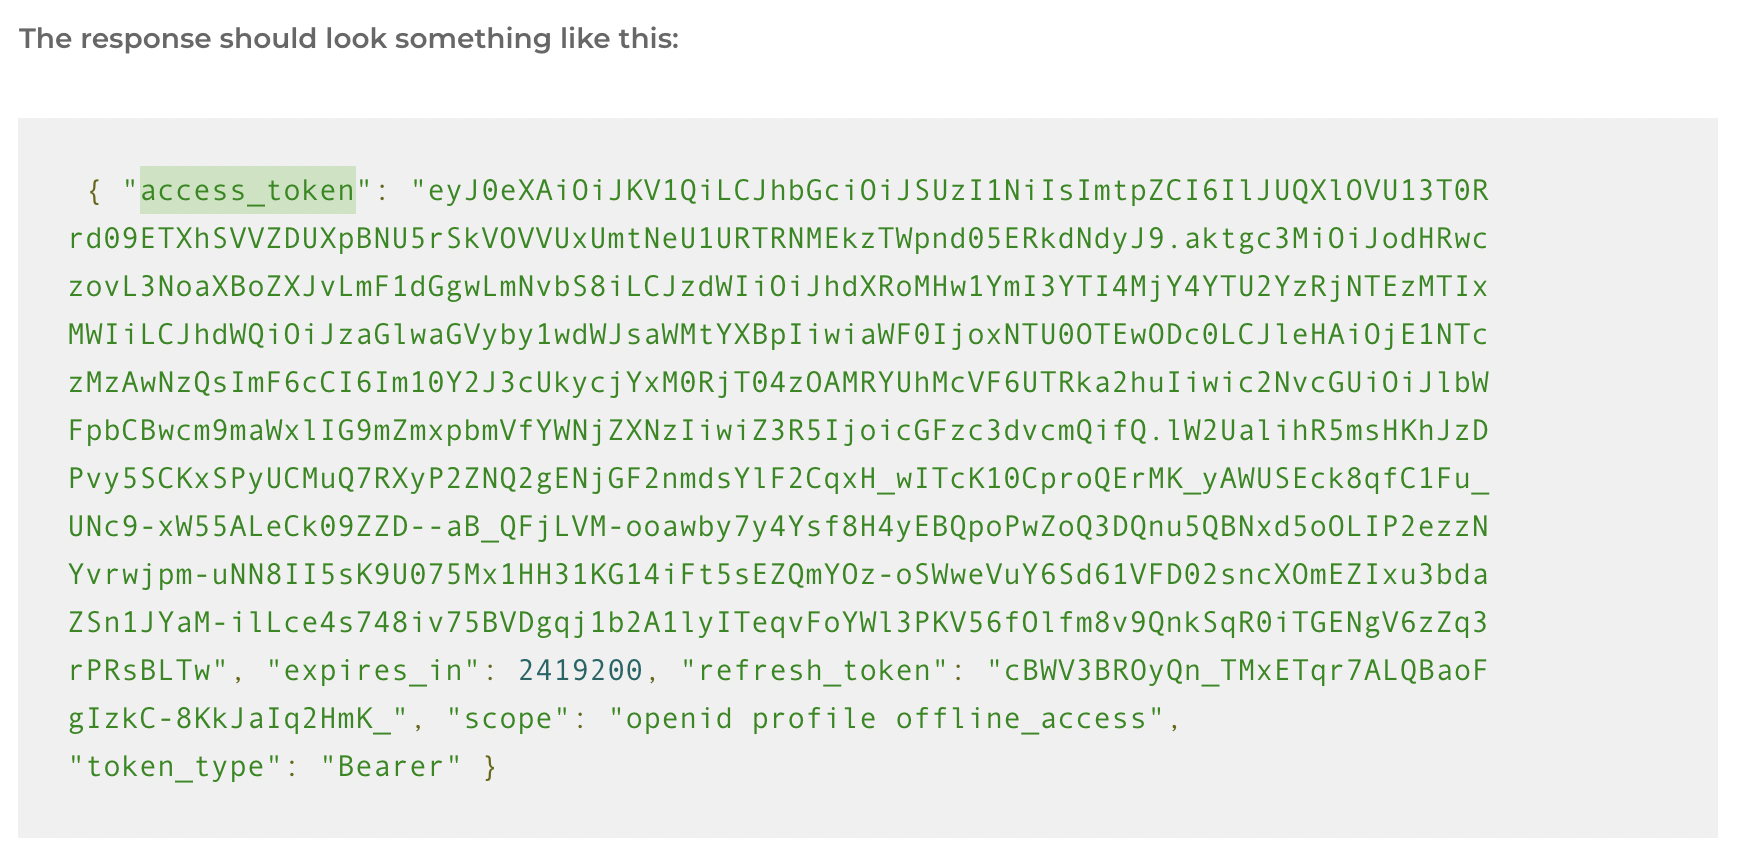
awesome_token and use that for authentication.
Once Parabola has the token, by default, it will be sent in your API requests as a bearer token. If the API that you’re working with requires a custom header to be used instead of a bearer token, you can use the Advanced Settings.
Advanced Settings (Pass Access Token in Custom Header)
Every time your Parabola flow runs, we grab a fresh token that is then inserted into your API request. By default, Parabola will use this access token specifically as a bearer token in API requests, so this works well when the API you are trying to connect to accepts bearer-token-based authentication (which is most common). There are also instances where the API you’re working with requires tokens to be passed as a custom header, such as AUTH-TOKEN. For these types of APIs, you can use the Header Key for using Access Token in the Advanced Settings option to specify a header key. The Header Value for using Access Token field will always include the string – in your live API call, is replaced by whatever was found by the Response Access Token Field.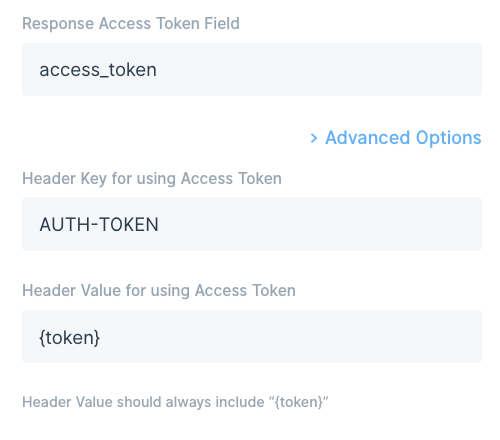
Still having trouble?
If you encounter an error, try reconfiguring your settings. To adjust the form, click Choose accounts at the top of the result view, then click edit. Find the authorization that you made, and click the pencil icon to bring up your settings. Also, ensure that you’ve selected “Expiring Access Token” in the “Authentication” dropdown list.